


Neonatal Vascular Access: UVC & IO
Neonatal Vascular Access: UVC & IO
Indications, Timing, and Team Coordination in Advanced Resuscitation
Source: Textbook of Neonatal Resuscitation, 9th Edition
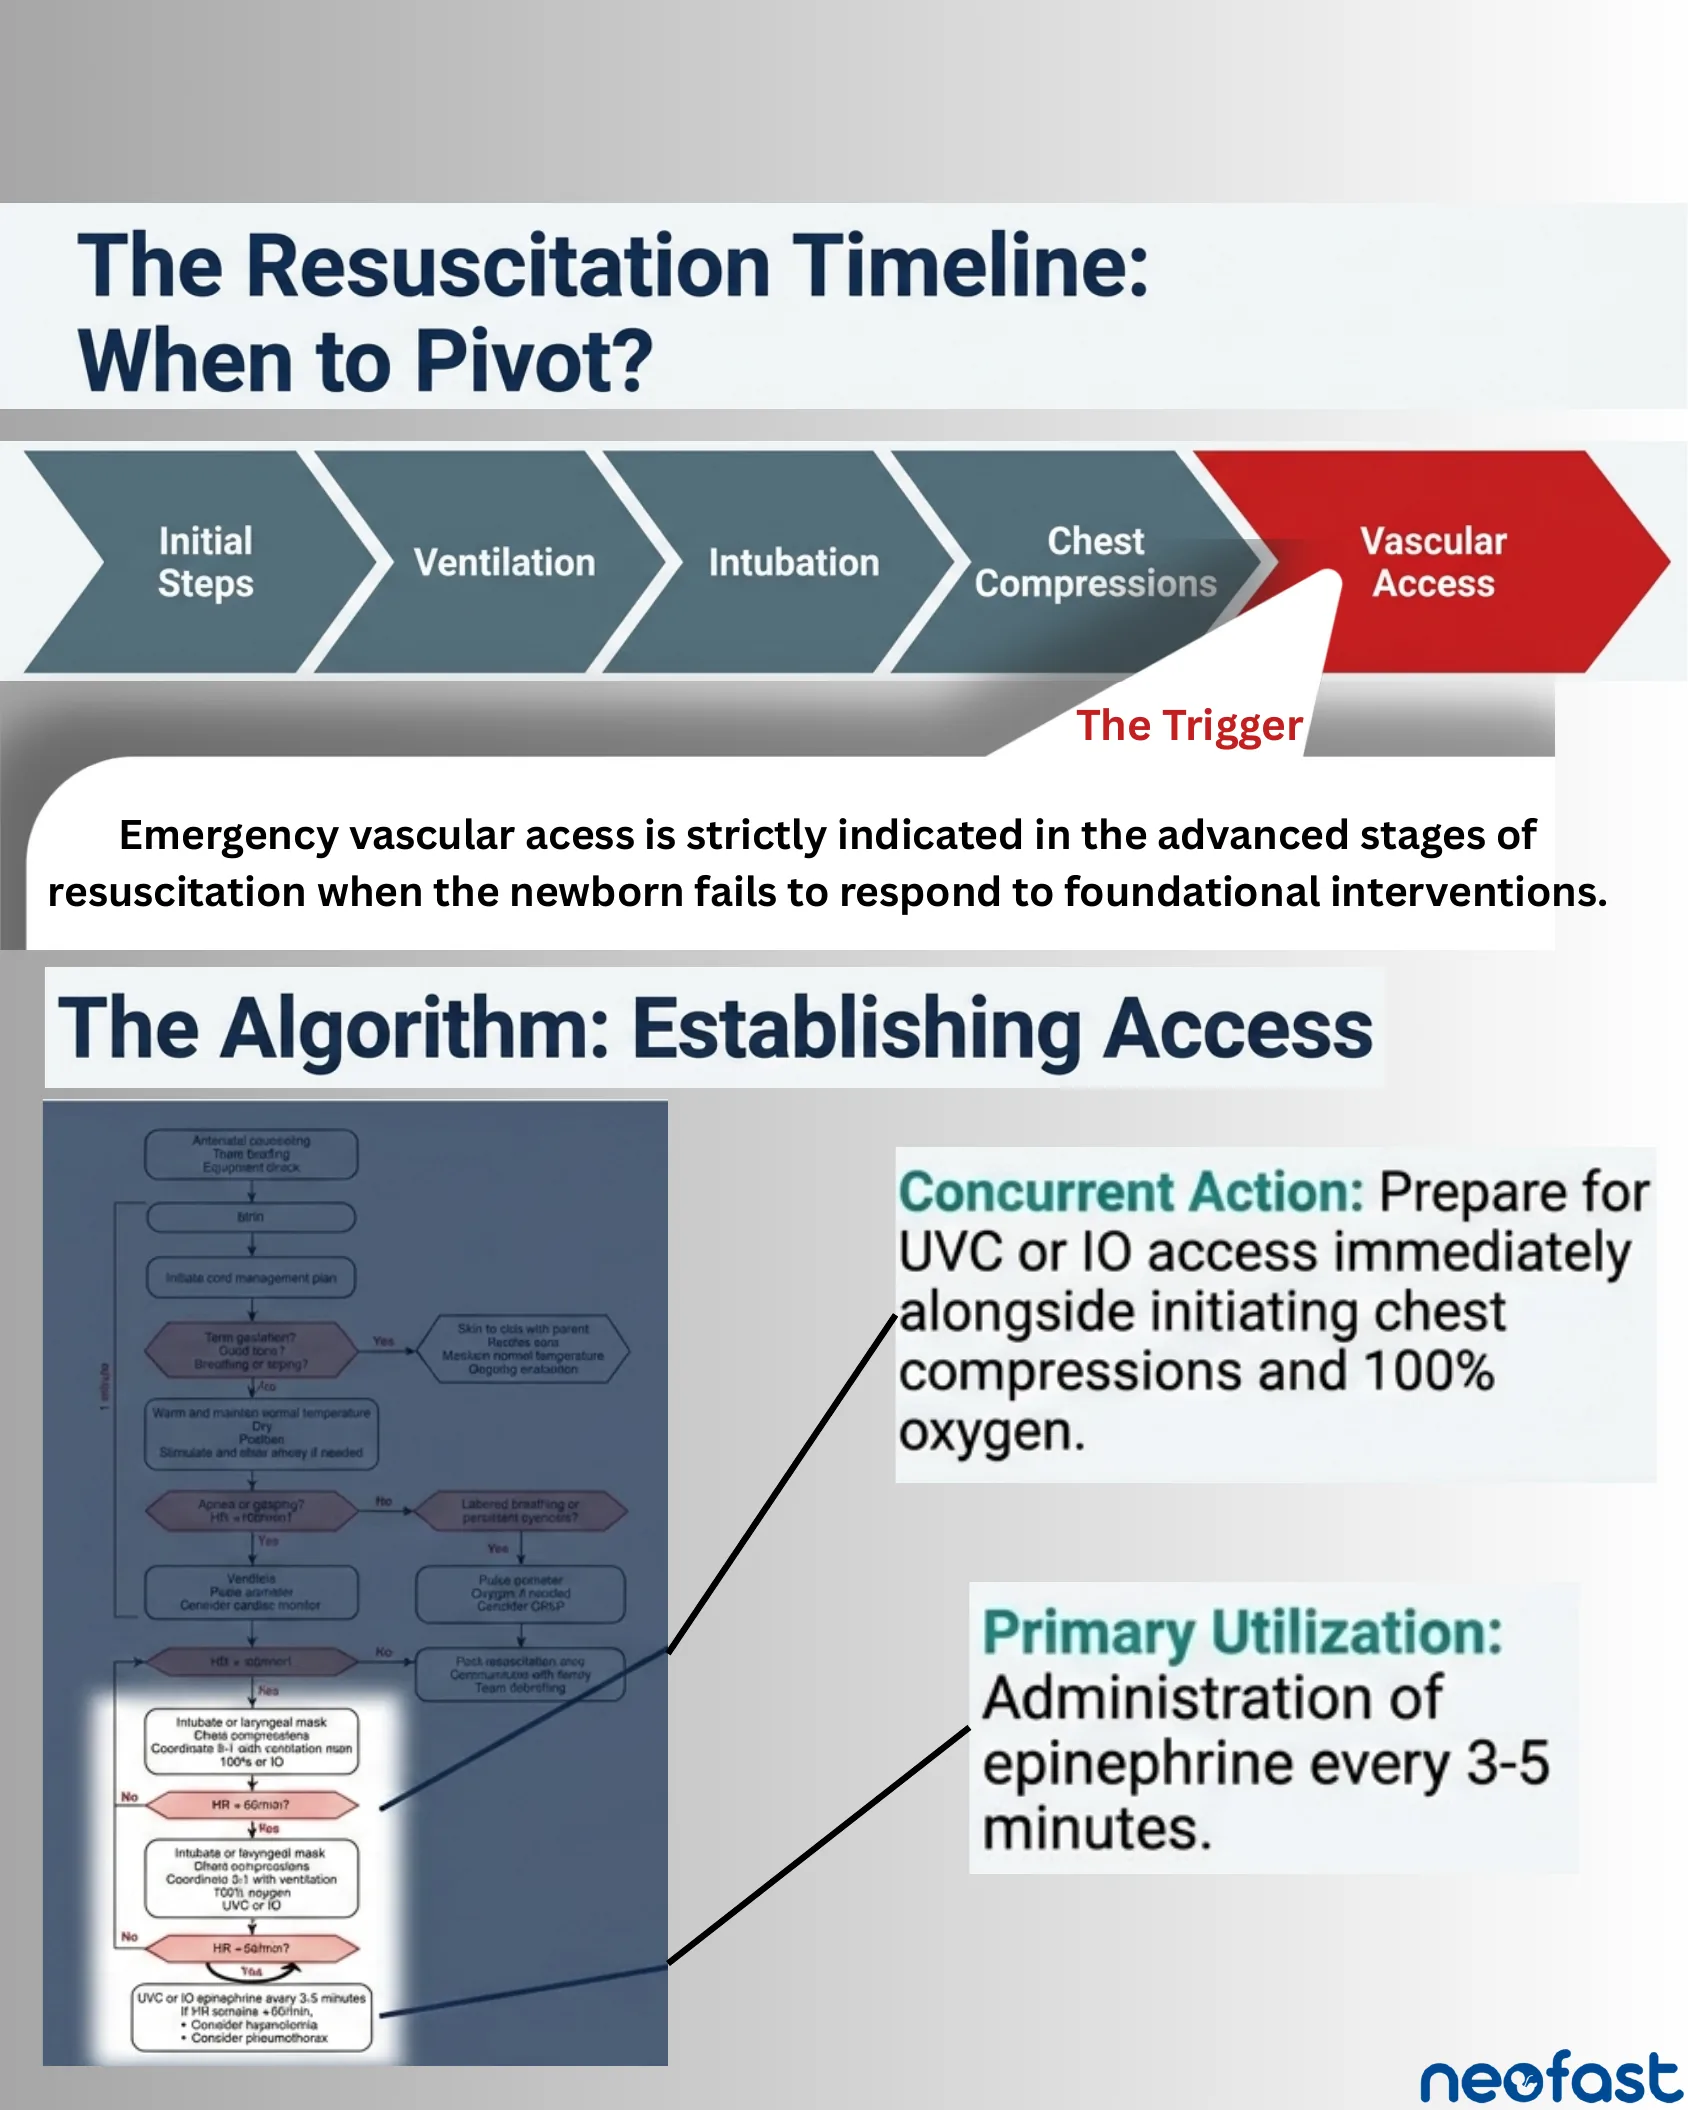
The Resuscitation Timeline: When to Pivot?
The Resuscitation Timeline: When to Pivot?
- Initial Steps
- Ventilation
- Intubation
- Chest Compressions
- Vascular Access (The Trigger)
Emergency vascular access is strictly indicated in the advanced stages of resuscitation when the newborn fails to respond to foundational interventions.
The Algorithm: Establishing Access
- Antenatal counseling, Team briefing, Equipment check
- Birth
- Initiate cord management plan
- Term gestation? Good tone? Breathing or crying? → Yes: Skin-to-skin with parent, Routine care, Maintain normal temperature, Ongoing evaluation
- No → Warm and maintain normal temperature, Dry, Position, Stimulate and clear airway if needed
- Apnea or gasping? HR < 100/min? → No: Labored breathing or persistent cyanosis? → Pulse oximeter, Oxygen if needed, Consider CPAP
- Yes → Ventilate, Pulse oximeter, Consider cardiac monitor
- HR < 100/min? → No → Post-resuscitation care, Communicate with family, Team debriefing
- Yes → Intubate or laryngeal mask, Chest compressions, Coordinate with ventilation, 100% O2 or IO
- Concurrent Action: Prepare for UVC or IO access immediately alongside initiating chest compressions and 100% oxygen.
- HR < 60/min? → No → (loop)
- Intubate or laryngeal mask, Chest compressions, Coordinate 3:1 with ventilation, 100% oxygen, UVC or IO
- HR < 60/min? → Yes → UVC or IO epinephrine every 3-5 minutes
- Primary Utilization: Administration of epinephrine every 3-5 minutes.
- If HR remains < 60/min:
- Consider hypovolemia
- Consider pneumothorax
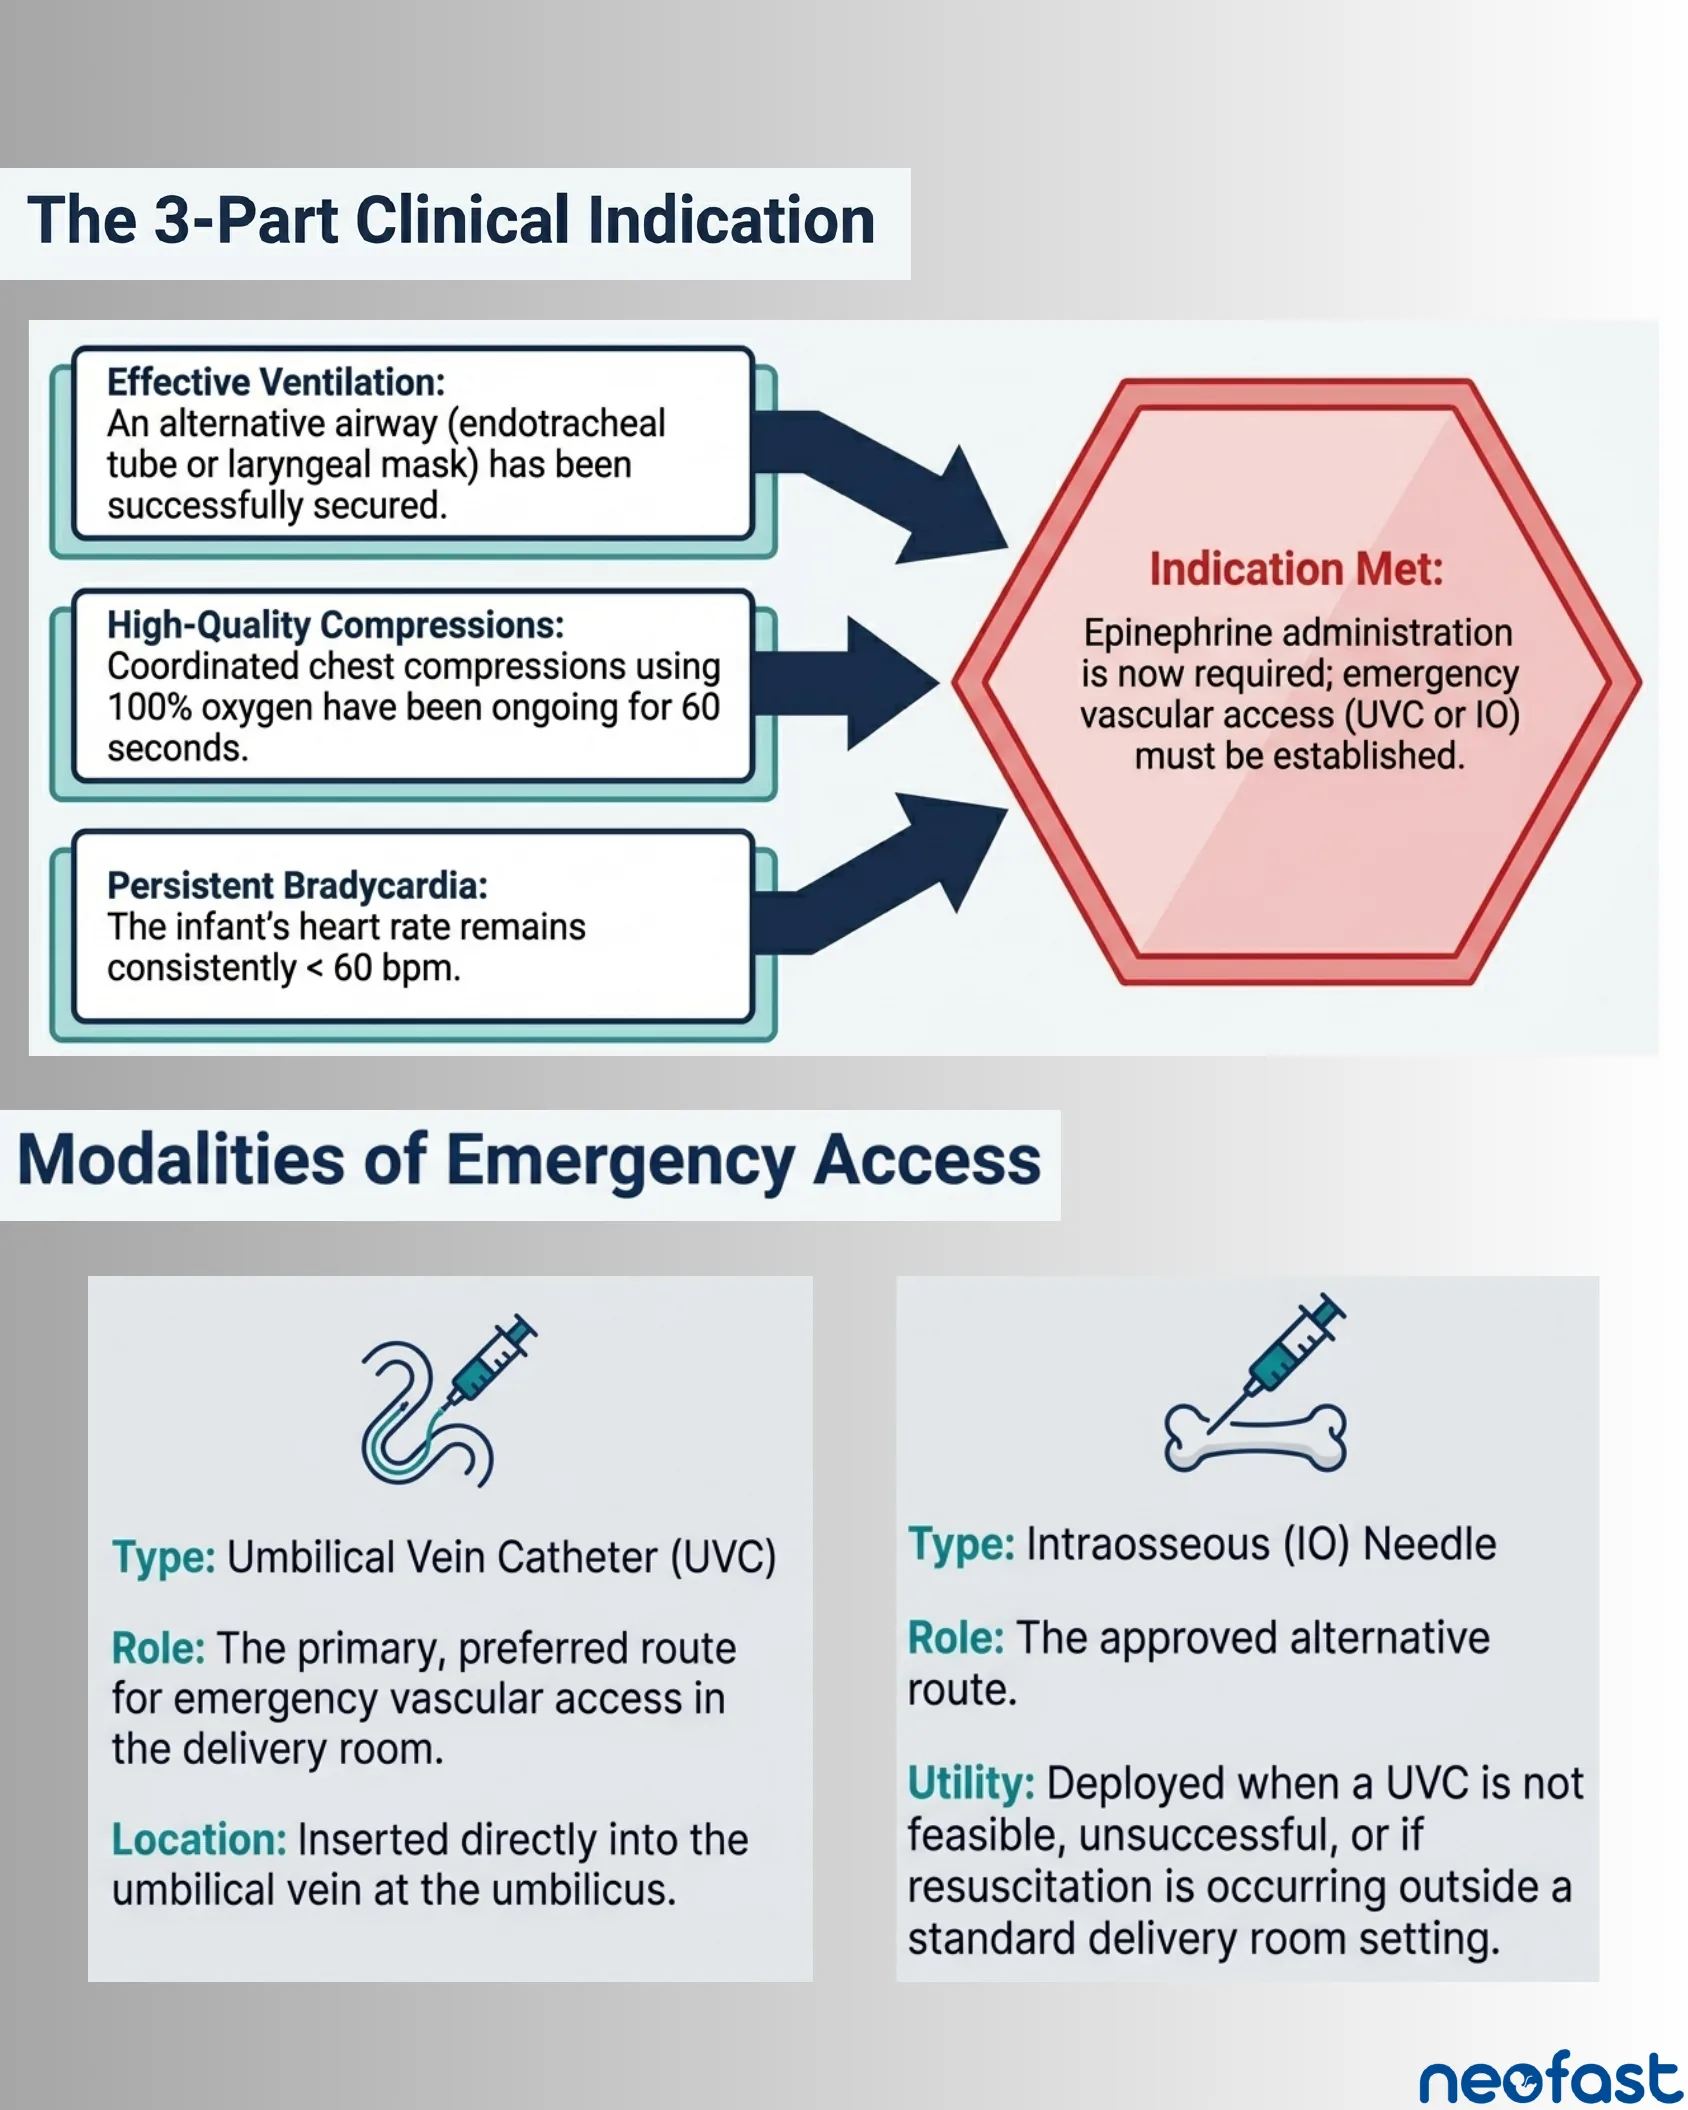
The 3-Part Clinical Indication
The 3-Part Clinical Indication
- Effective Ventilation: An alternative airway (endotracheal tube or laryngeal mask) has been successfully secured.
- High-Quality Compressions: Coordinated chest compressions using 100% oxygen have been ongoing for 60 seconds.
- Persistent Bradycardia: The infant’s heart rate remains consistently < 60 bpm.
Indication Met: Epinephrine administration is now required; emergency vascular access (UVC or IO) must be established.
Modalities of Emergency Access
| Umbilical Vein Catheter (UVC) | Intraosseous (IO) Needle | |
|---|---|---|
| Type | Umbilical Vein Catheter (UVC) | Intraosseous (IO) Needle |
| Role | The primary, preferred route for emergency vascular access in the delivery room. | The approved alternative route. |
| Location / Utility | Inserted directly into the umbilical vein at the umbilicus. | Deployed when a UVC is not feasible, unsuccessful, or if resuscitation is occurring outside a standard delivery room setting. |
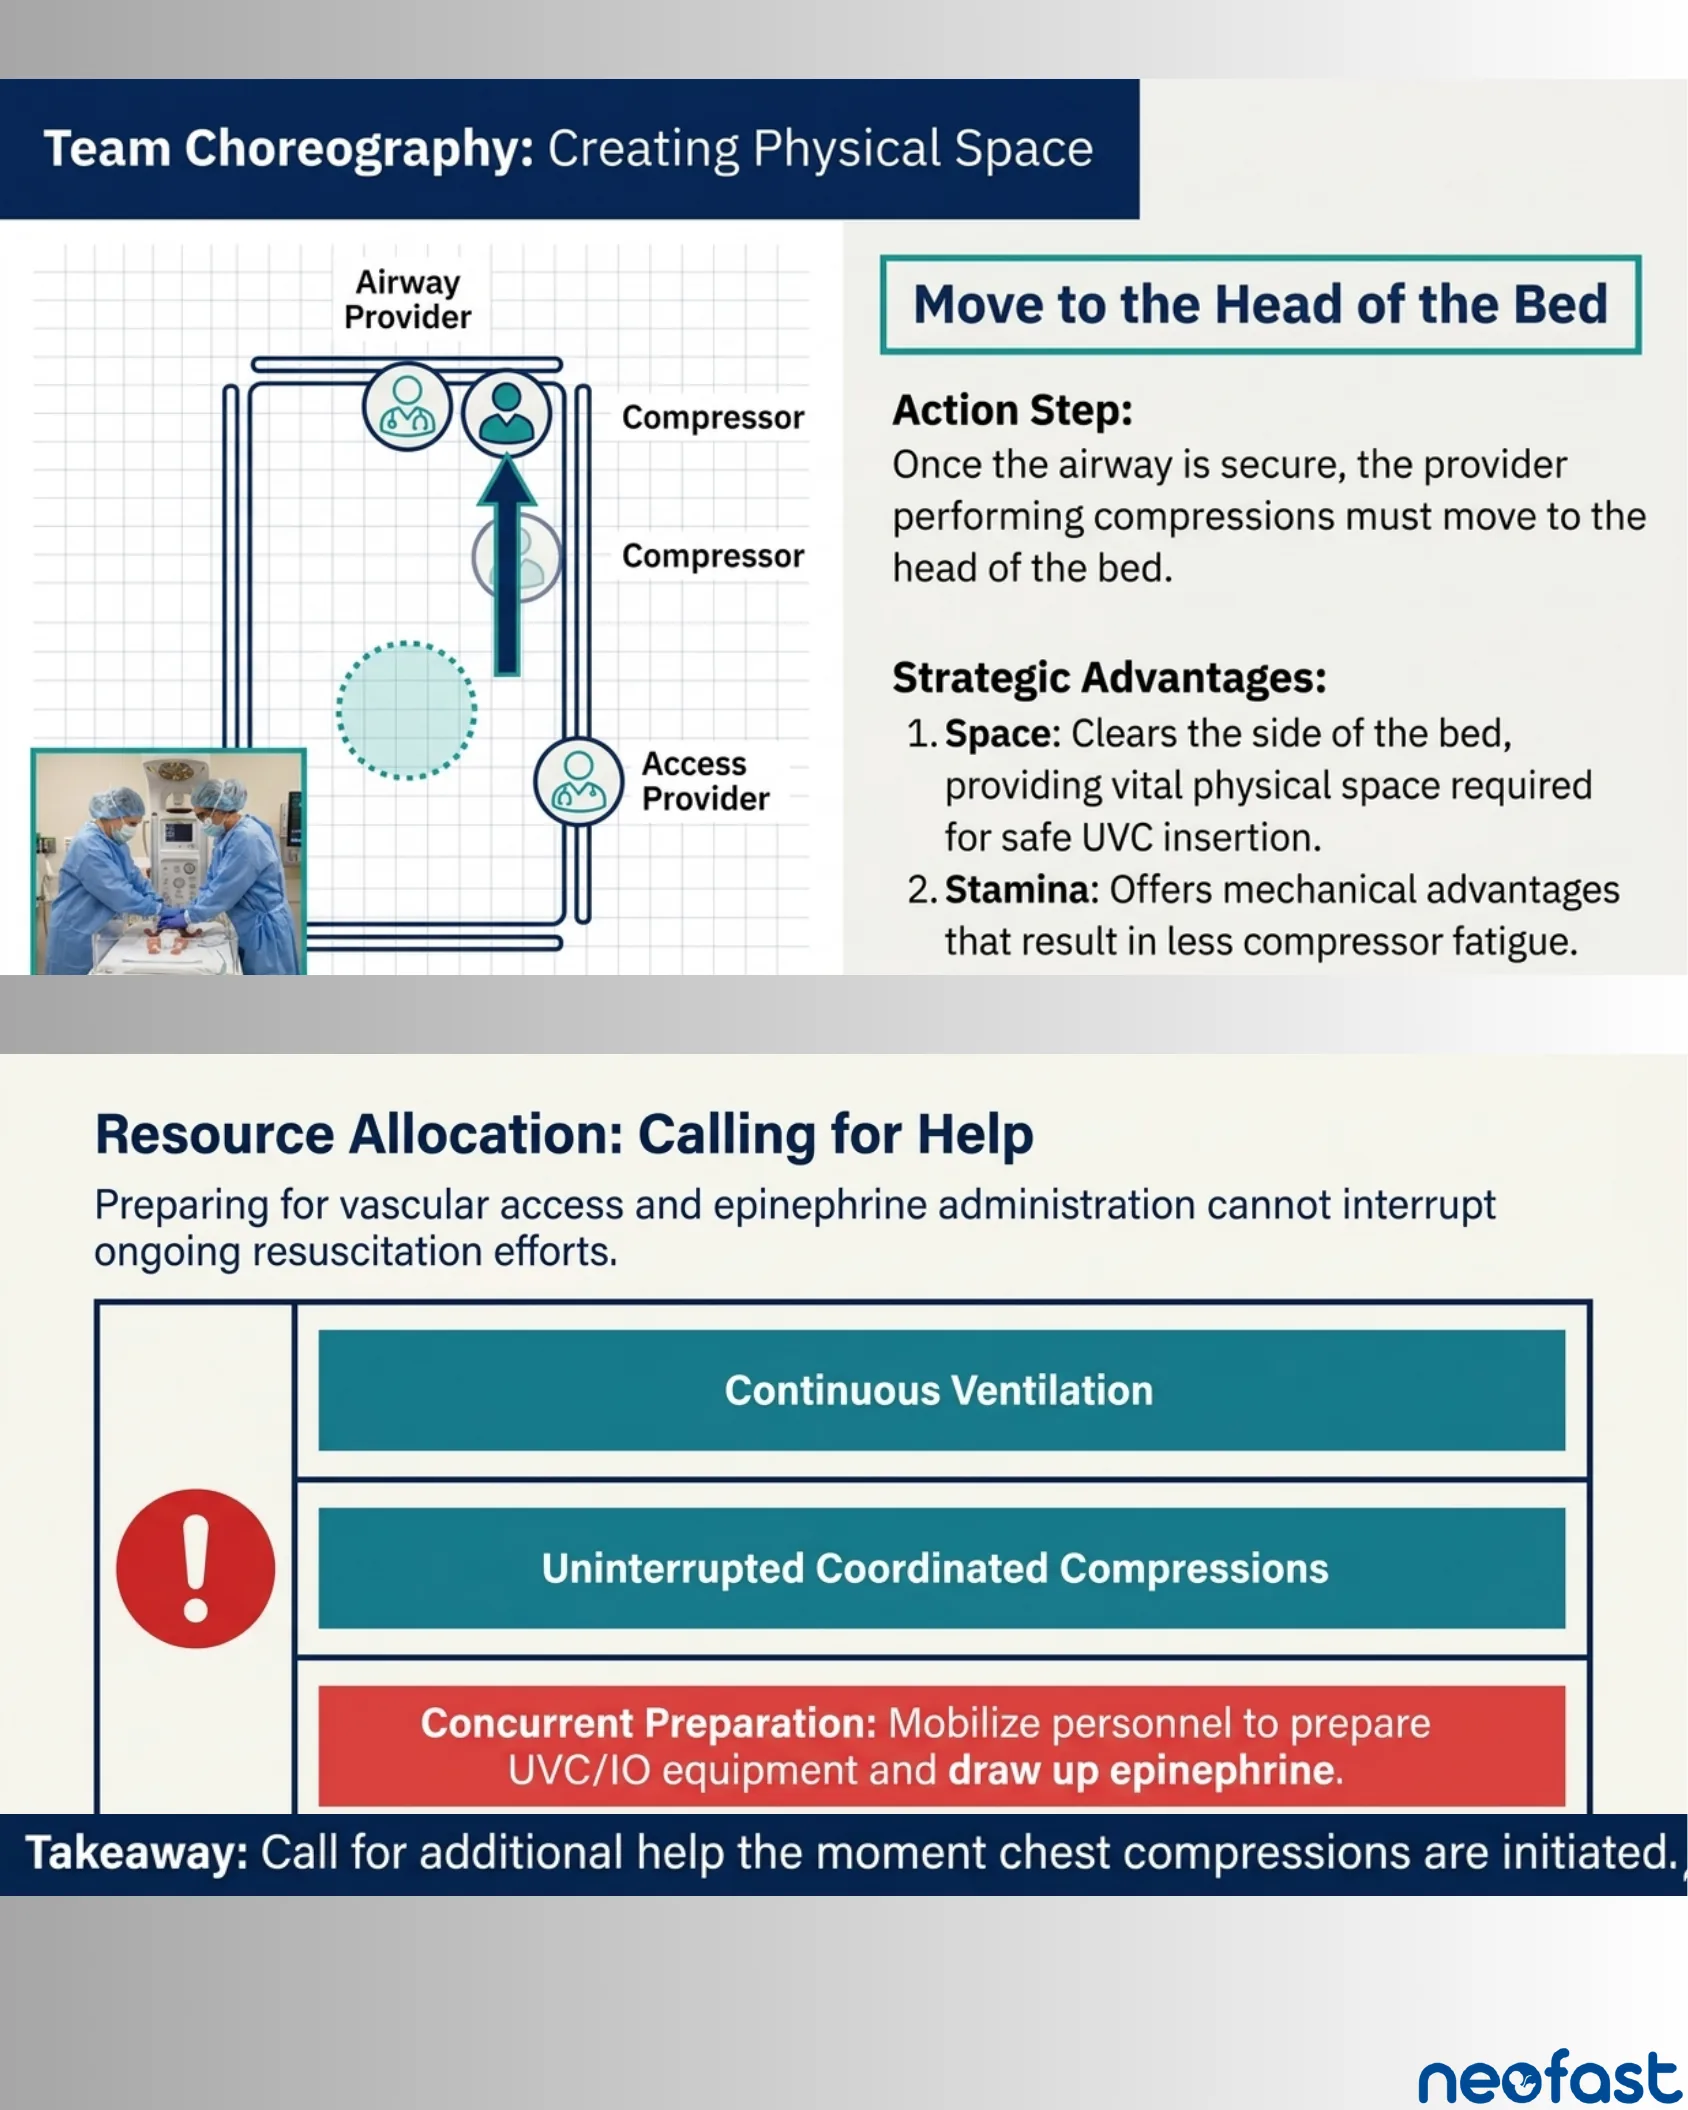
Team Choreography: Creating Physical Space
Team Choreography: Creating Physical Space
- Positions: Airway Provider, Compressor, Compressor, Access Provider
Move to the Head of the Bed
Action Step: Once the airway is secure, the provider performing compressions must move to the head of the bed.
Strategic Advantages:
- Space: Clears the side of the bed, providing vital physical space required for safe UVC insertion.
- Stamina: Offers mechanical advantages that result in less compressor fatigue.
Resource Allocation: Calling for Help
Preparing for vascular access and epinephrine administration cannot interrupt ongoing resuscitation efforts.
- Continuous Ventilation
- Uninterrupted Coordinated Compressions
- Concurrent Preparation: Mobilize personnel to prepare UVC/IO equipment and draw up epinephrine.
Takeaway: Call for additional help the moment chest compressions are initiated.
Intraosseous Access: Anatomy and Site Selection
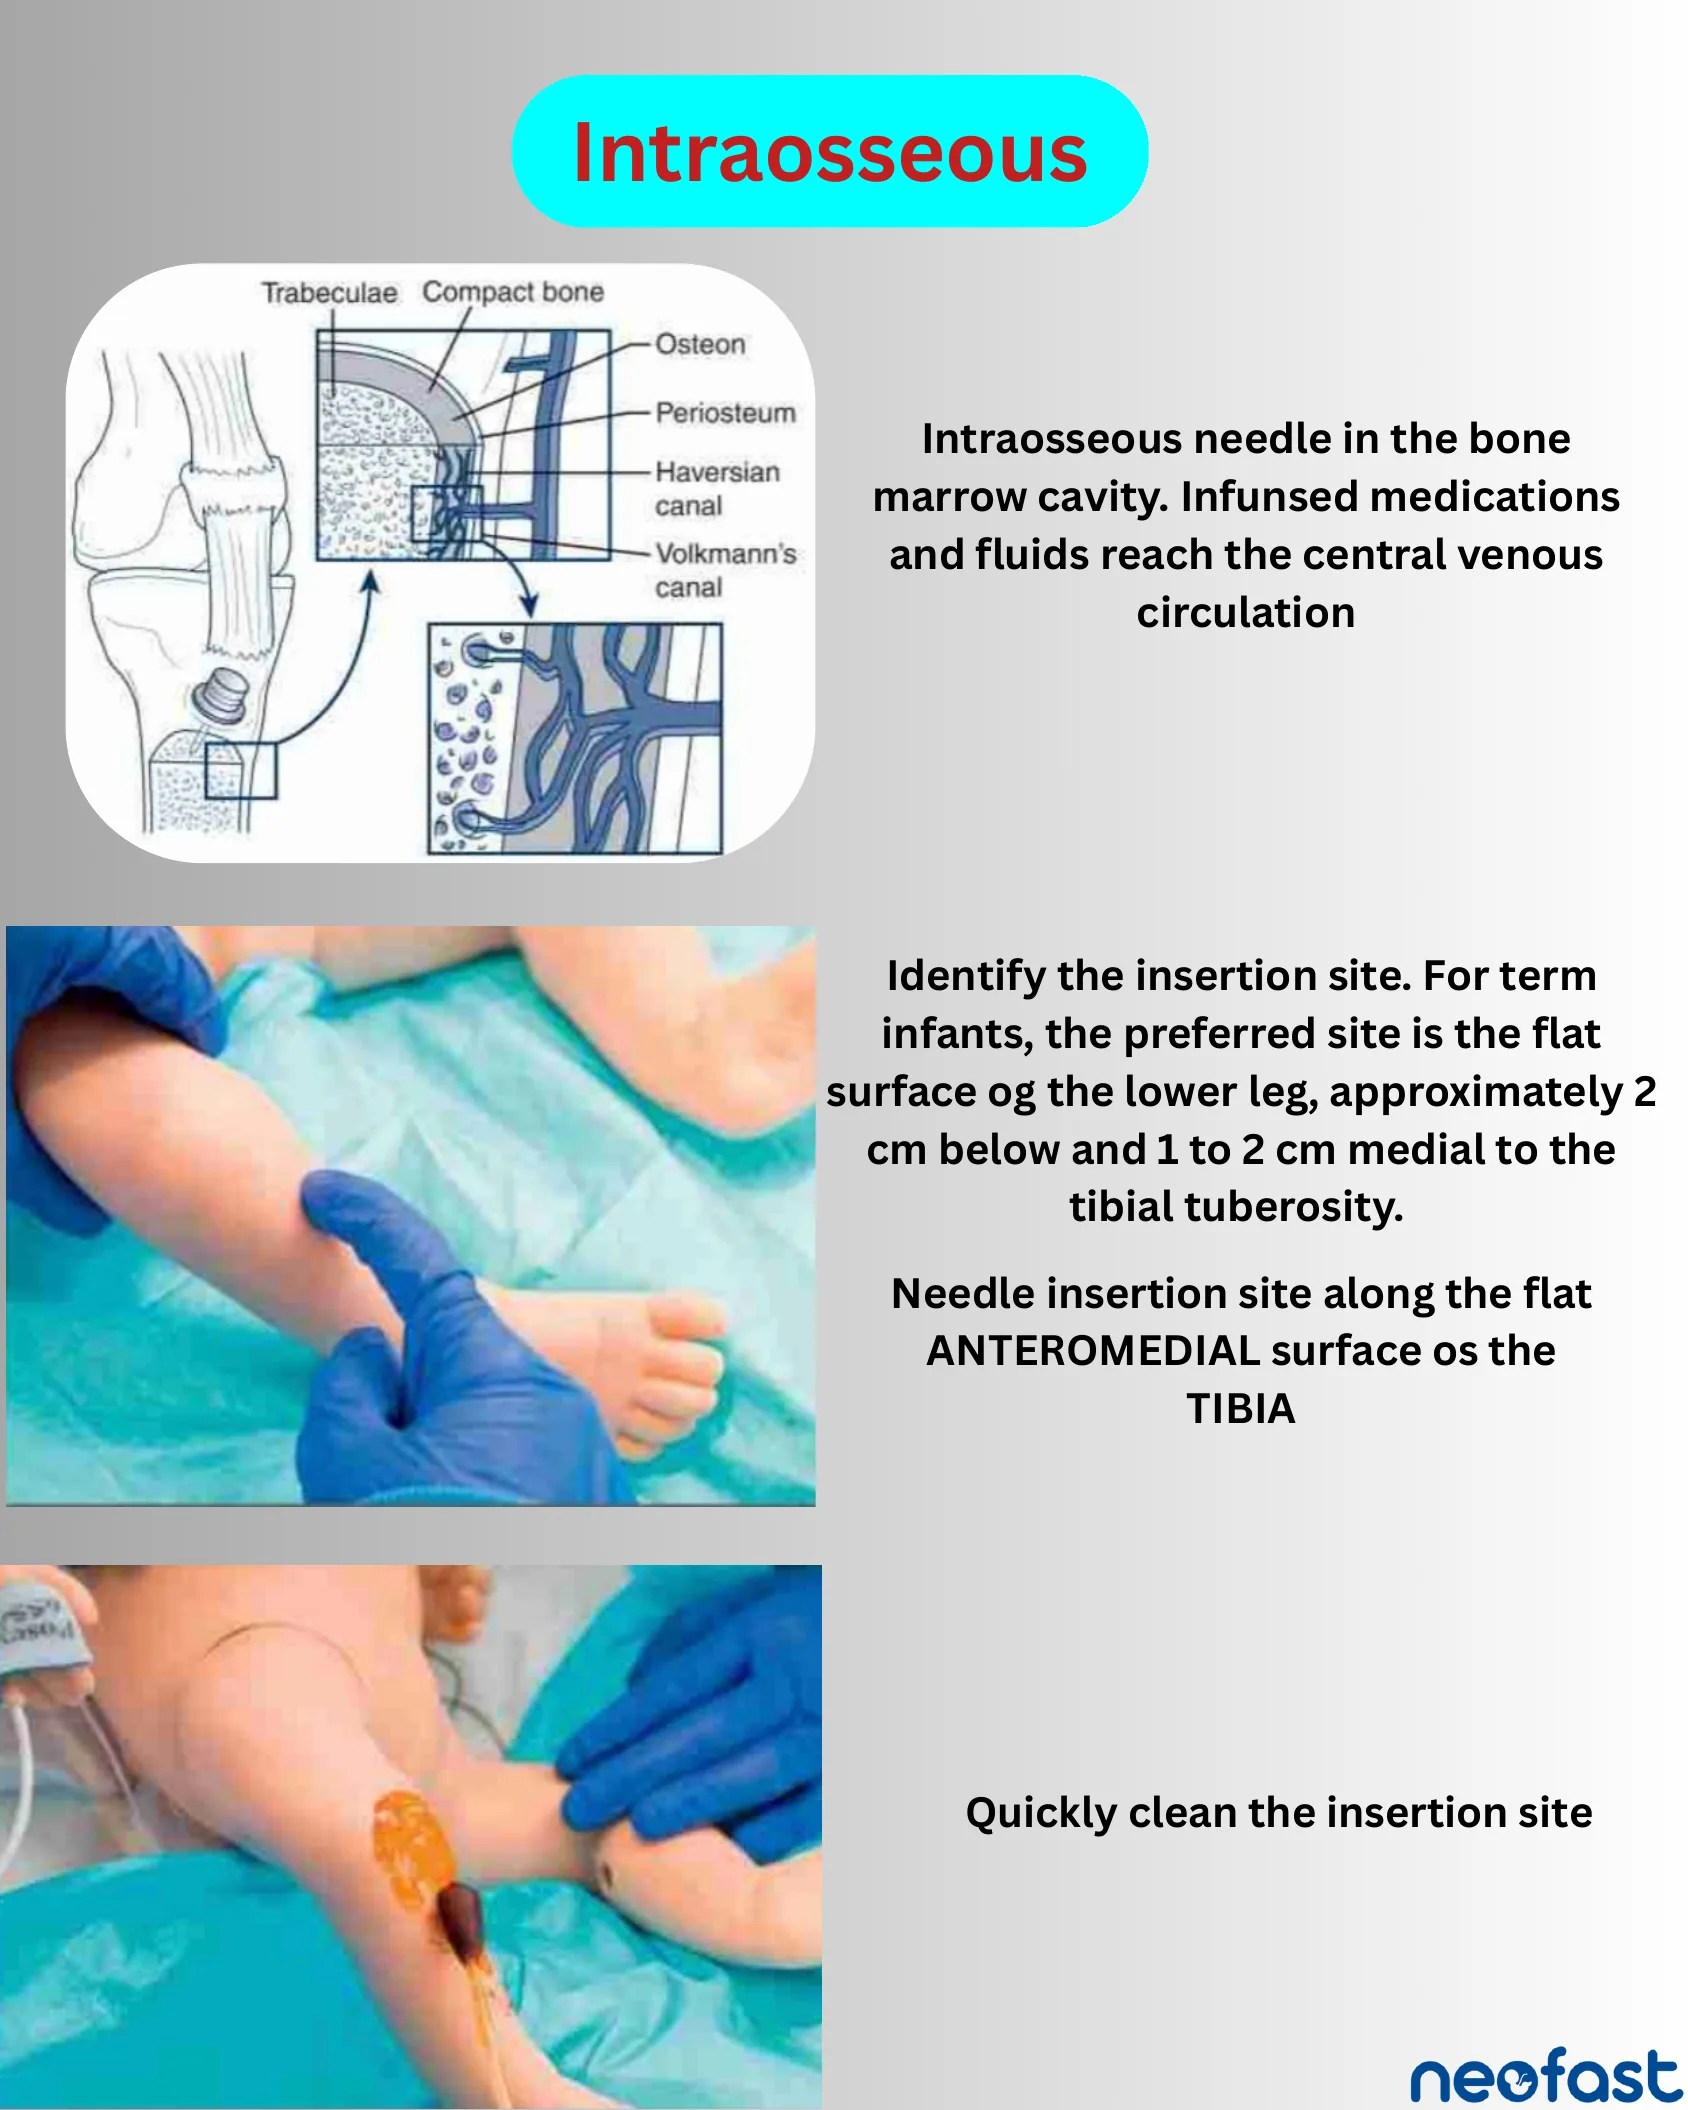
Intraosseous
Intraosseous needle in the bone marrow cavity. Infused medications and fluids reach the central venous circulation.
Identify the insertion site. For term infants, the preferred site is the flat surface of the lower leg, approximately 2 cm below and 1 to 2 cm medial to the tibial tuberosity.
Needle insertion site along the flat ANTEROMEDIAL surface of the TIBIA.
Quickly clean the insertion site.
Intraosseous Needle Insertion Technique
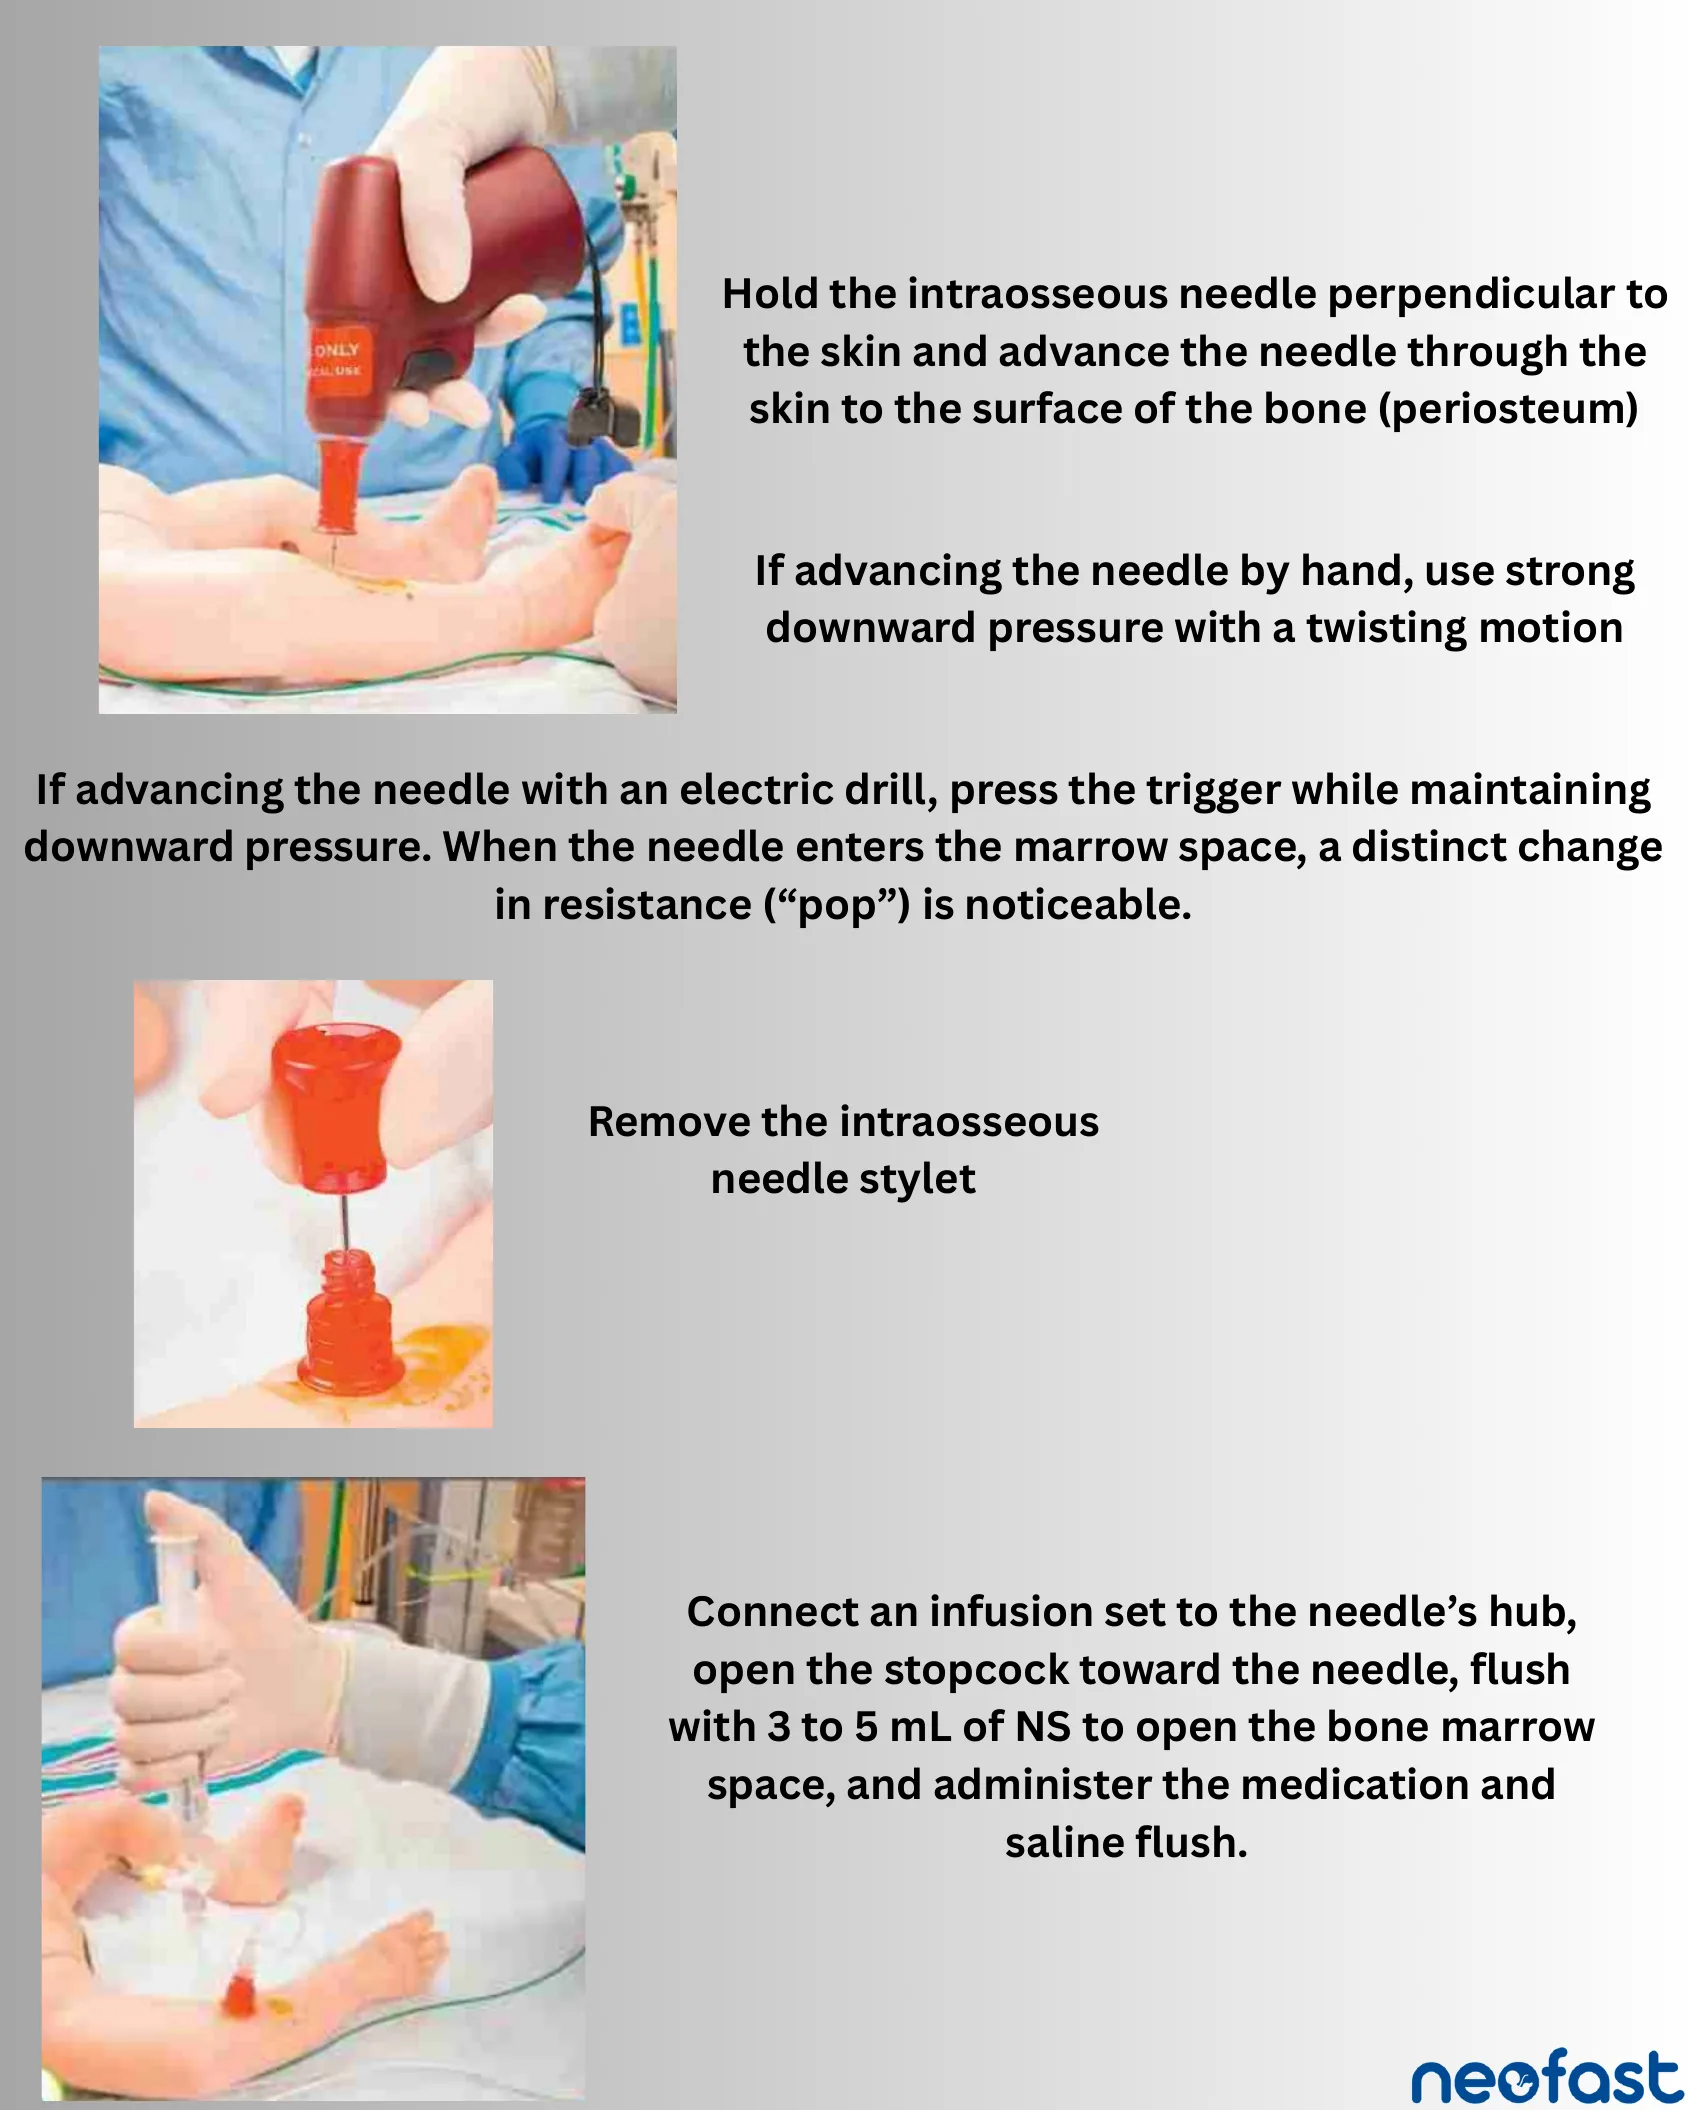
Intraosseous Needle Insertion Technique
- Hold the intraosseous needle perpendicular to the skin and advance the needle through the skin to the surface of the bone (periosteum).
- If advancing the needle by hand, use strong downward pressure with a twisting motion.
- If advancing the needle with an electric drill, press the trigger while maintaining downward pressure. When the needle enters the marrow space, a distinct change in resistance (“pop”) is noticeable.
- Remove the intraosseous needle stylet.
- Connect an infusion set to the needle’s hub, open the stopcock toward the needle, flush with 3 to 5 mL of NS to open the bone marrow space, and administer the medication and saline flush.
Utilizing Access: The Epinephrine Cycle
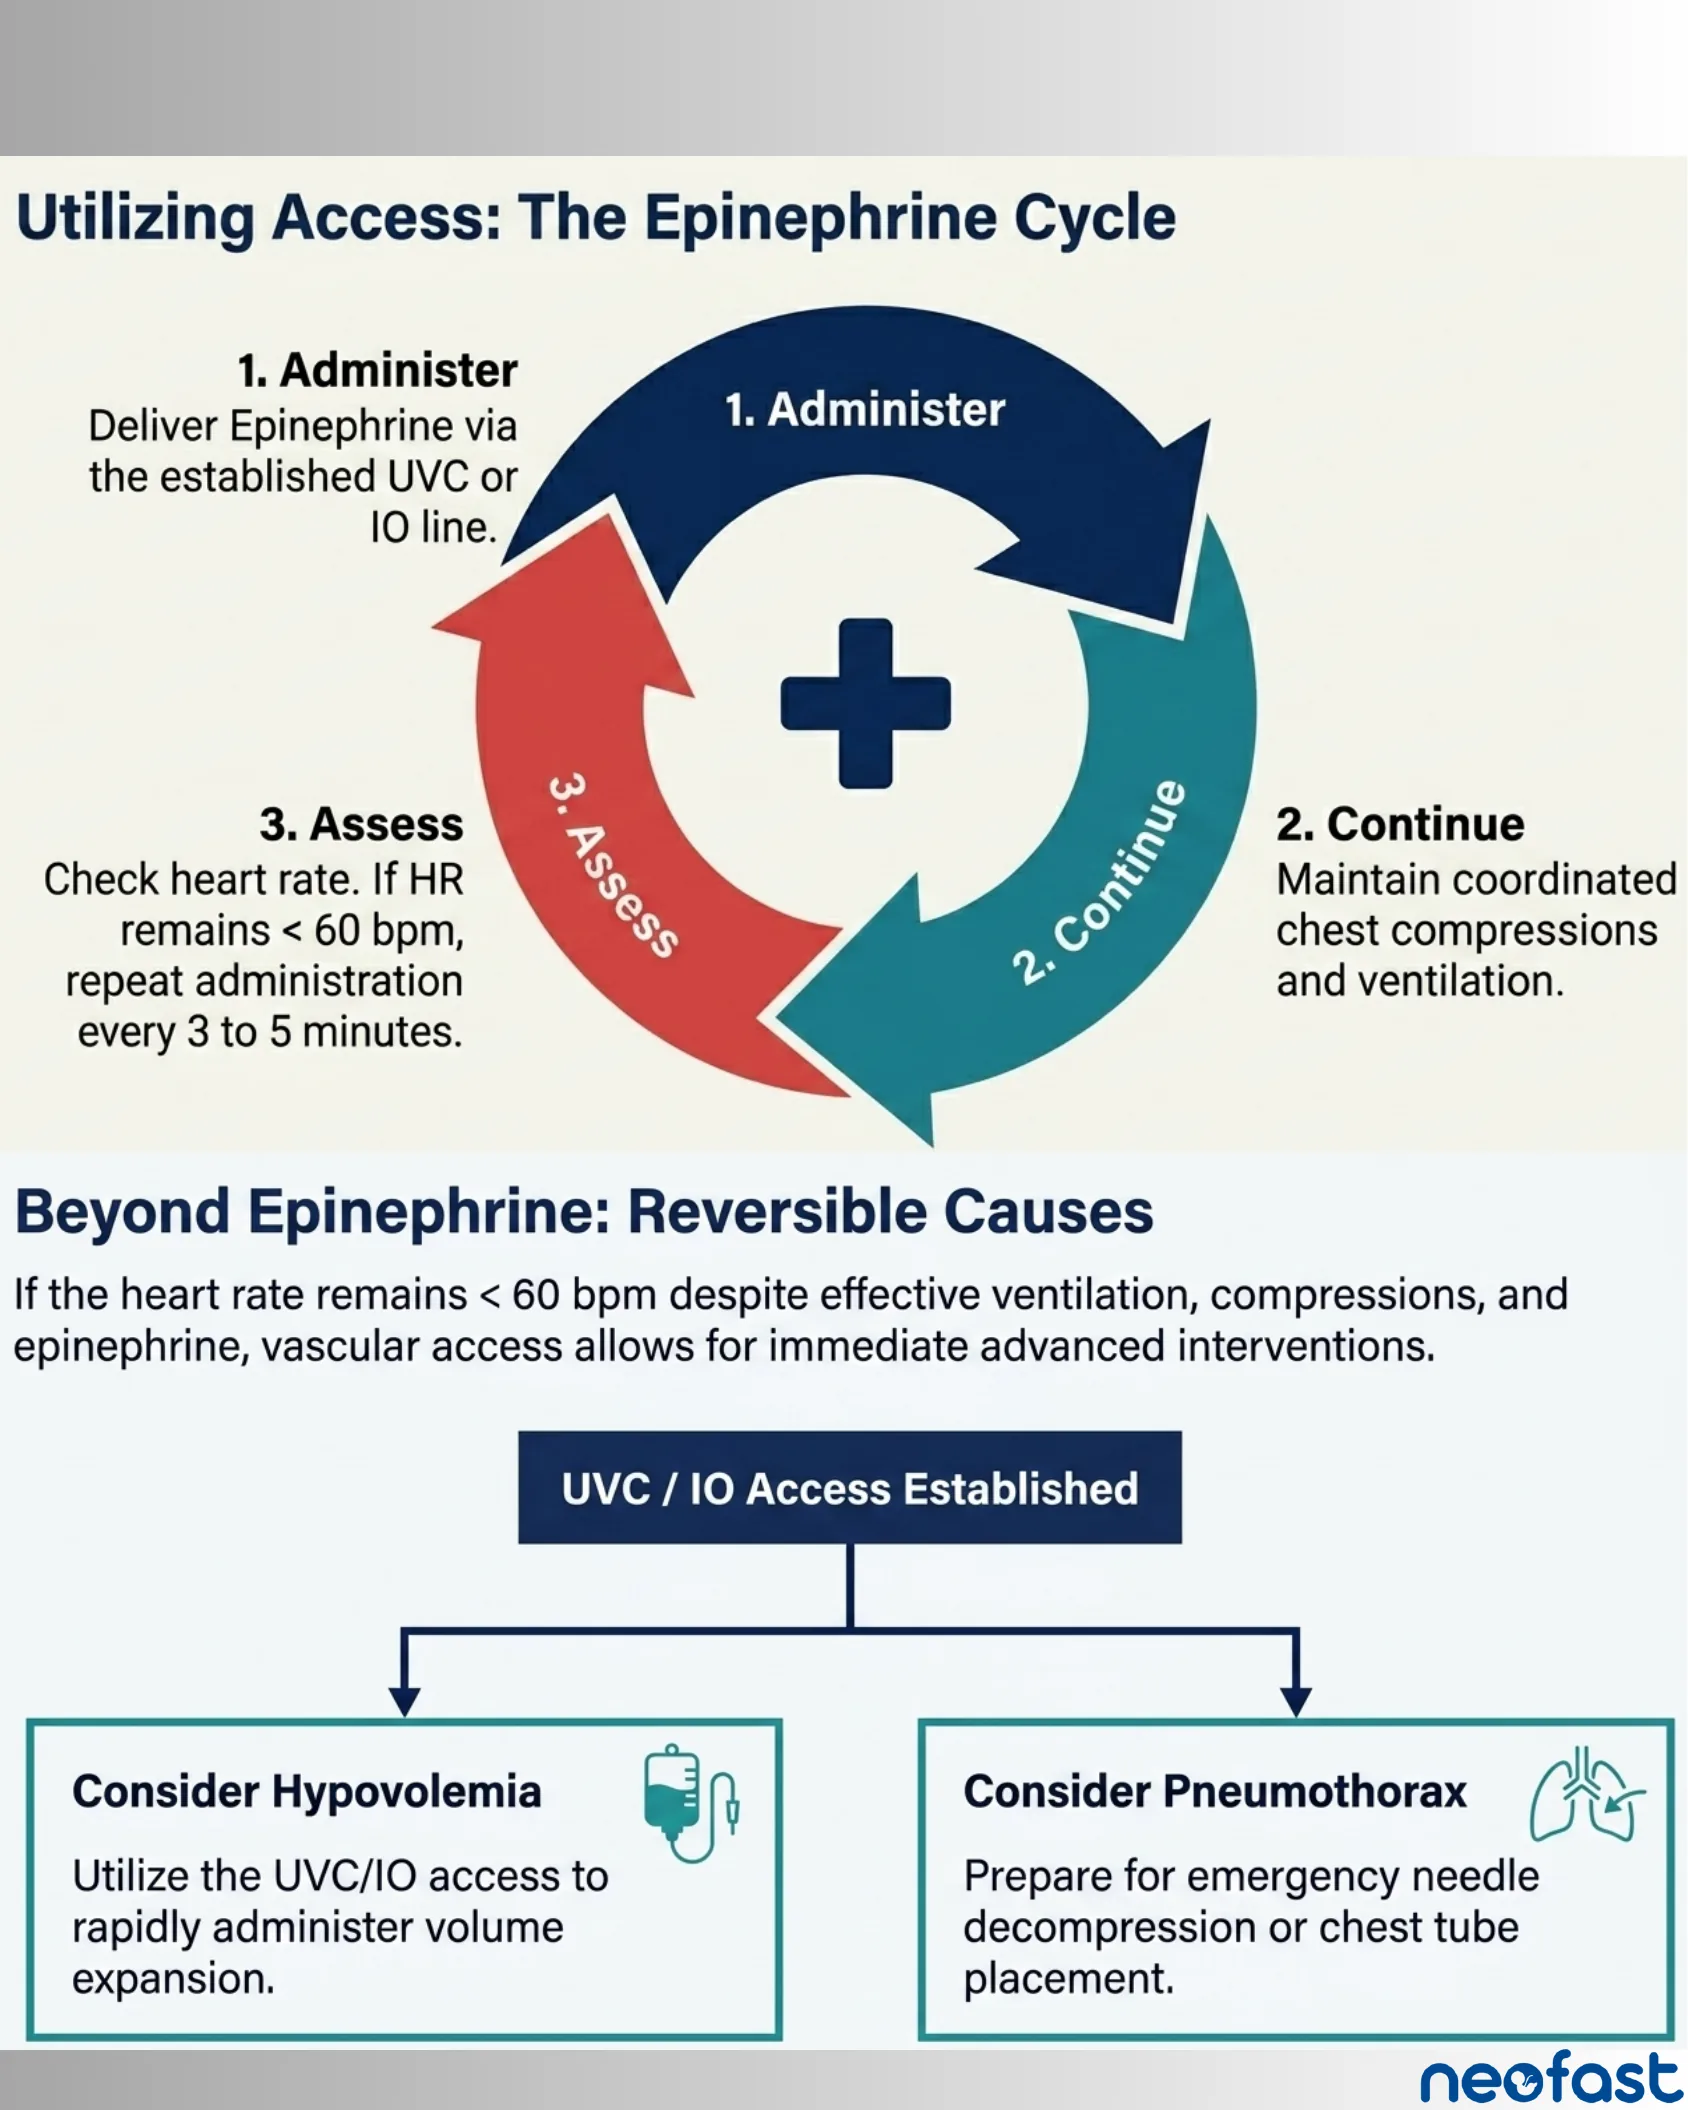
Utilizing Access: The Epinephrine Cycle
- 1. Administer: Deliver Epinephrine via the established UVC or IO line.
- 2. Continue: Maintain coordinated chest compressions and ventilation.
- 3. Assess: Check heart rate. If HR remains < 60 bpm, repeat administration every 3 to 5 minutes.
Beyond Epinephrine: Reversible Causes
If the heart rate remains < 60 bpm despite effective ventilation, compressions, and epinephrine, vascular access allows for immediate advanced interventions.
- UVC / IO Access Established
- Consider Hypovolemia: Utilize the UVC/IO access to rapidly administer volume expansion.
- Consider Pneumothorax: Prepare for emergency needle decompression or chest tube placement.
Key Takeaways: UVC & IO in NRP
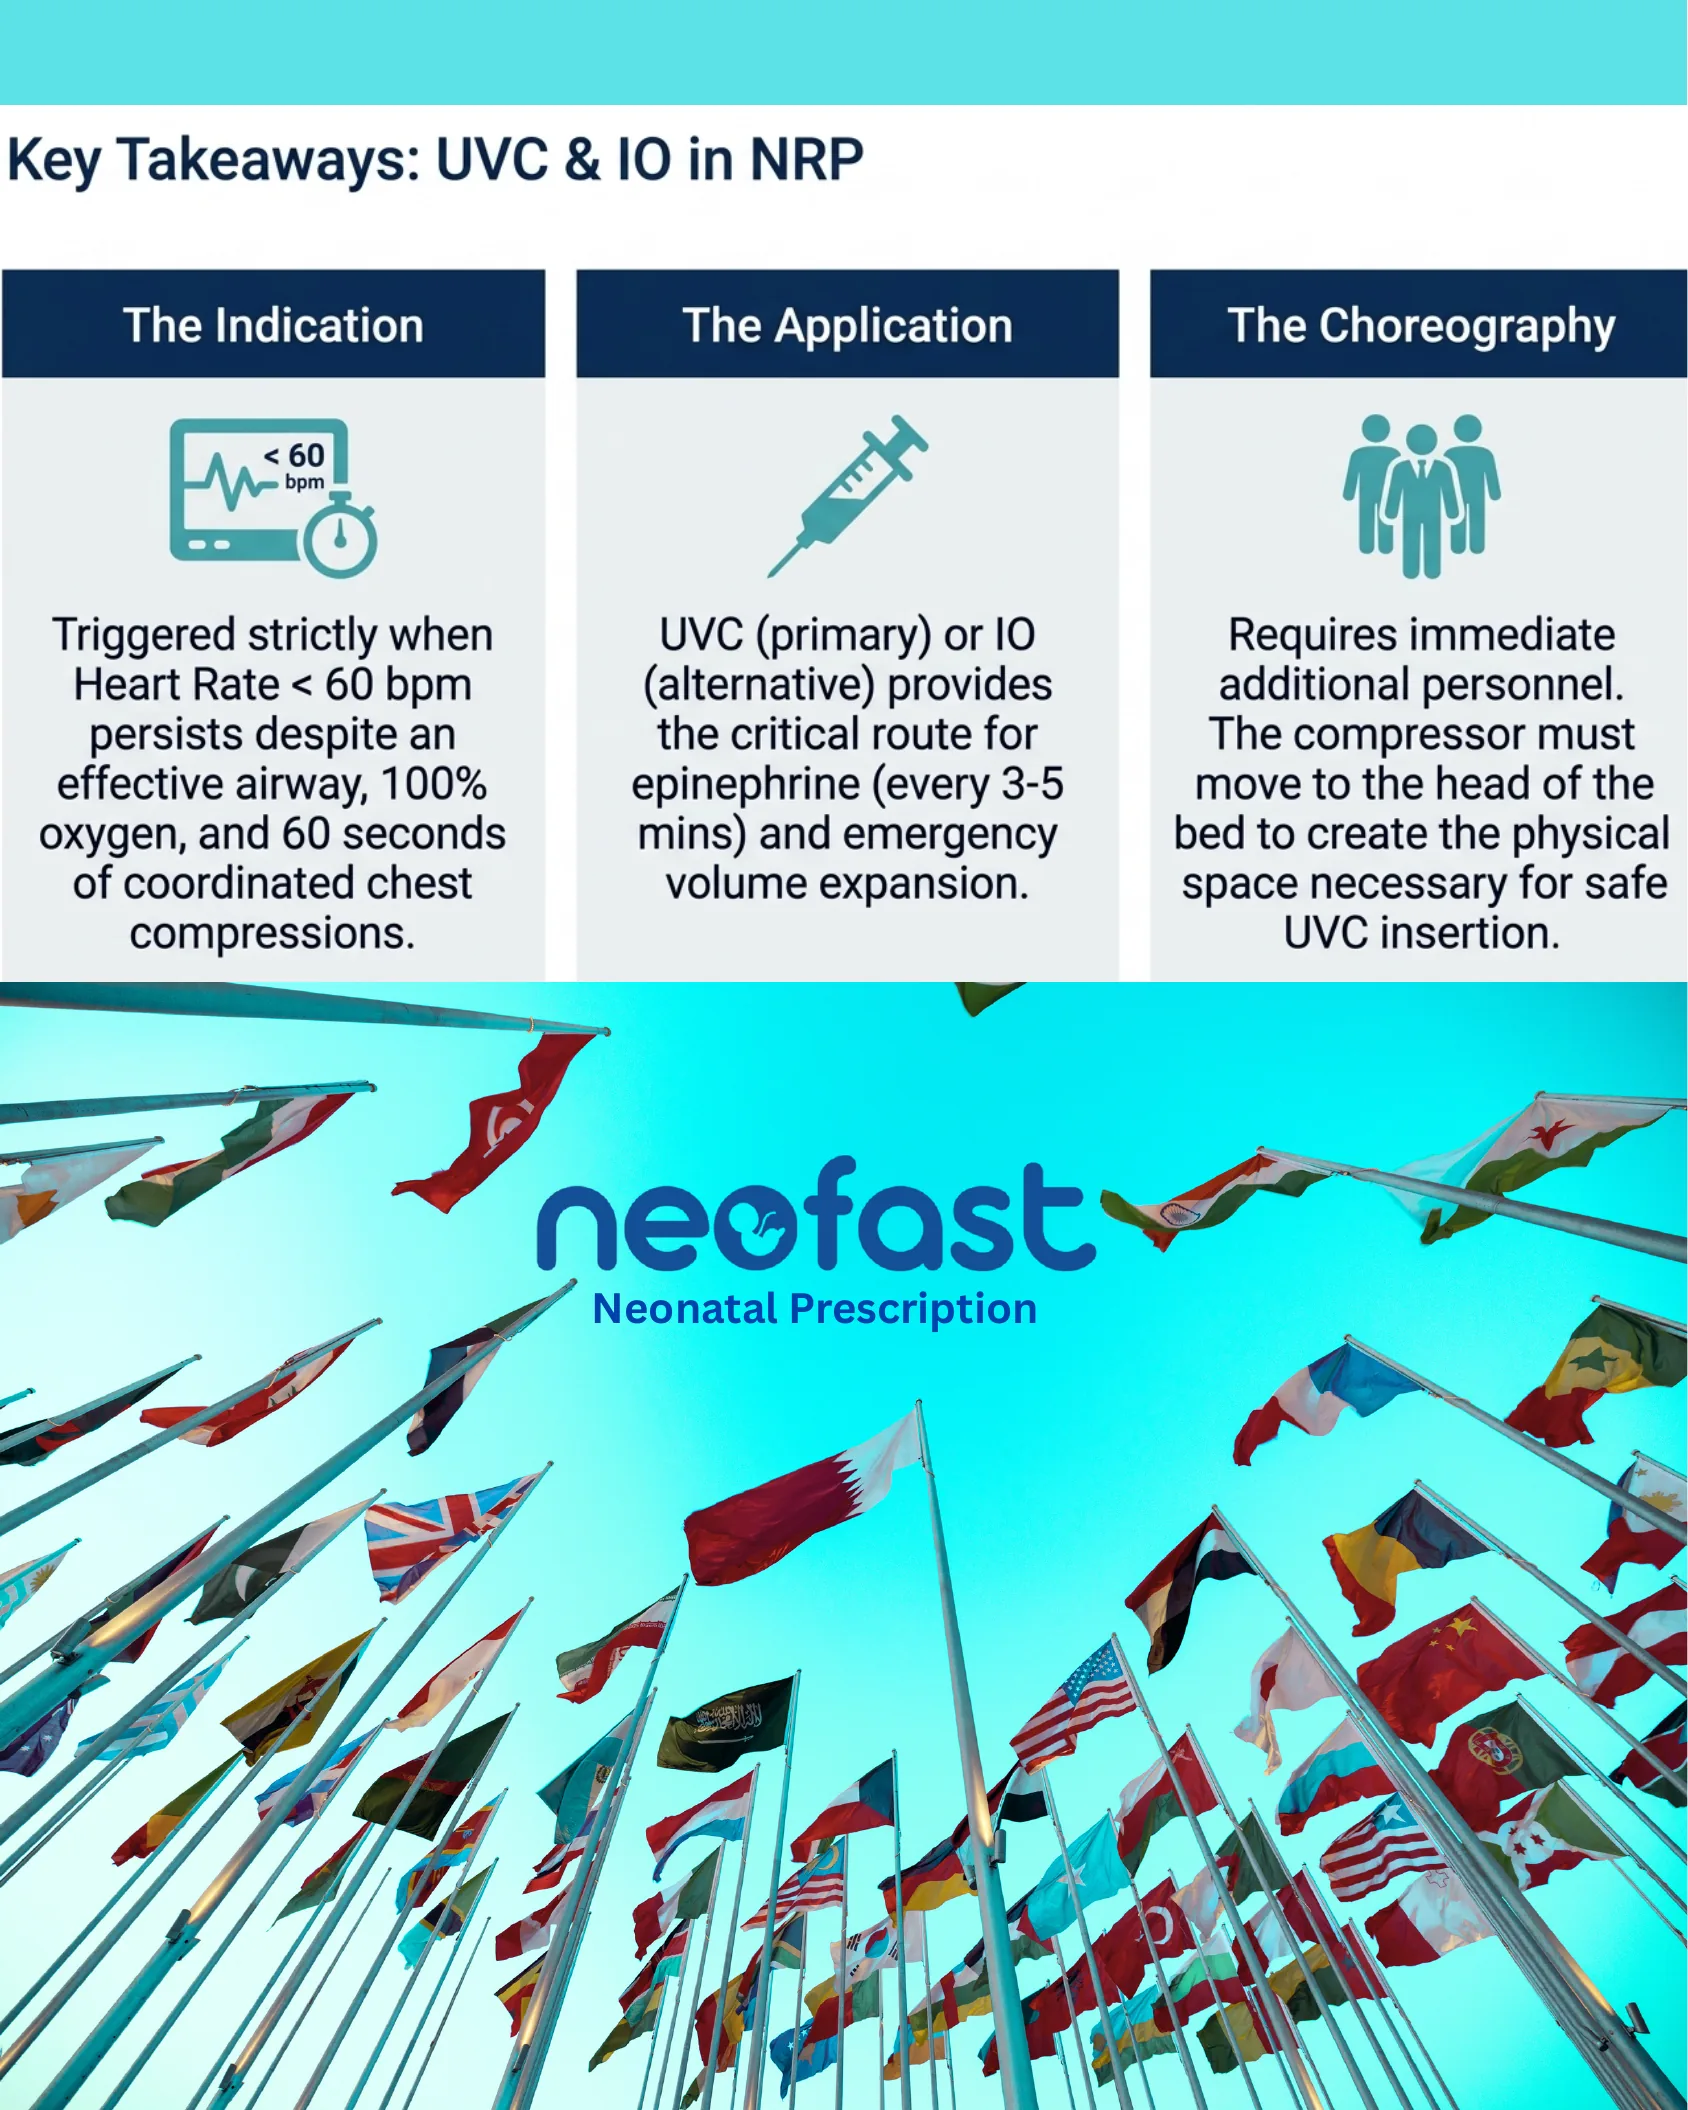
Key Takeaways: UVC & IO in NRP
- The Indication: Triggered strictly when Heart Rate < 60 bpm persists despite an effective airway, 100% oxygen, and 60 seconds of coordinated chest compressions.
- The Application: UVC (primary) or IO (alternative) provides the critical route for epinephrine (every 3-5 mins) and emergency volume expansion.
- The Choreography: Requires immediate additional personnel. The compressor must move to the head of the bed to create the physical space necessary for safe UVC insertion.
Neofast – Neonatal Prescription