


Cover
Textbook of Neonatal Resuscitation – 9th Edition
The Neonatal Resuscitation Blueprint
A Visual Guide to the First 60 Seconds (Based on NRP 9th Edition Guidelines)
Presented in partnership with the American Heart Association and American Academy of Pediatrics, Dedicated to the Health of All Children
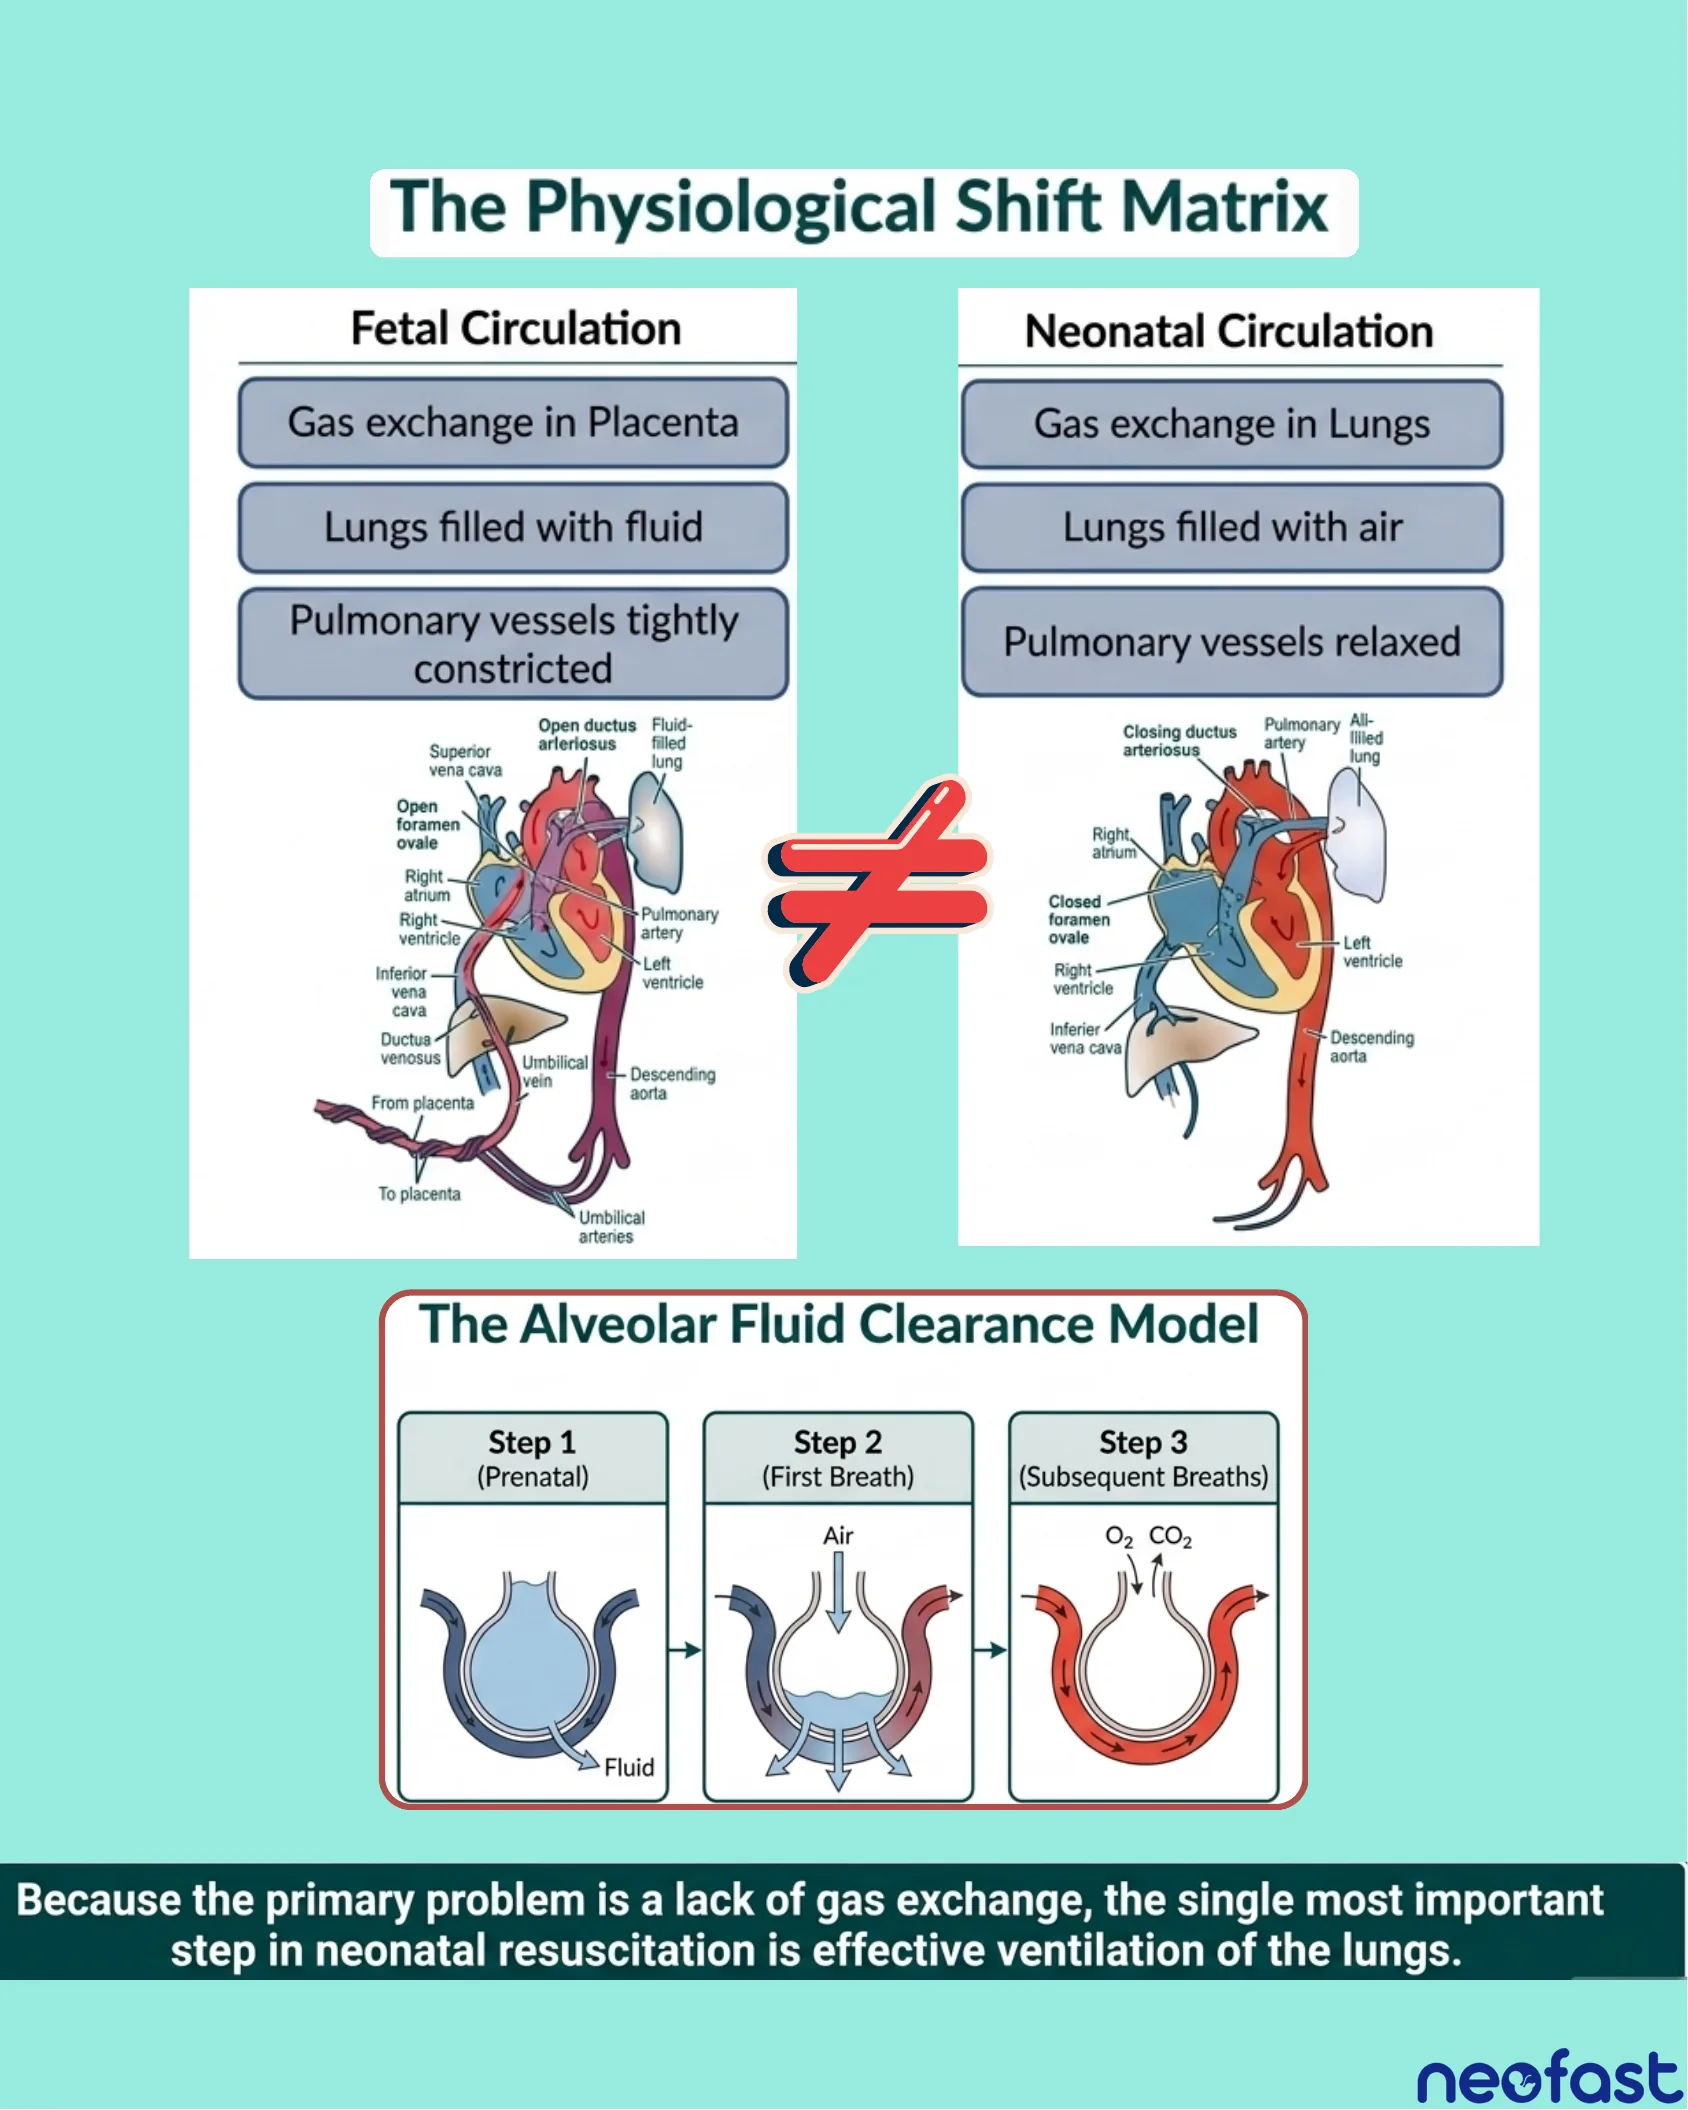
The Physiological Shift Matrix
The Physiological Shift Matrix
| Fetal Circulation | Neonatal Circulation |
|---|---|
| Gas exchange in Placenta | Gas exchange in Lungs |
| Lungs filled with fluid | Lungs filled with air |
| Pulmonary vessels tightly constricted | Pulmonary vessels relaxed |
Fetal Circulation anatomy labels:
- Superior vena cava
- Open ductus arteriosus
- Fluid-filled lung
- Open foramen ovale
- Right atrium
- Pulmonary artery
- Right ventricle
- Left ventricle
- Inferior vena cava
- Ductus venosus
- Descending aorta
- From placenta
- To placenta
- Umbilical vein
- Umbilical arteries
Neonatal Circulation anatomy labels:
- Closing ductus arteriosus
- Pulmonary artery
- All-filled lung
- Right atrium
- Closed foramen ovale
- Left ventricle
- Right ventricle
- Inferior vena cava
- Descending aorta
The Alveolar Fluid Clearance Model
- Step 1 (Prenatal): Fluid fills the airway structure
- Step 2 (First Breath): Air enters, displacing fluid outward
- Step 3 (Subsequent Breaths): O2 and CO2 exchange occurs across the airway
Because the primary problem is a lack of gas exchange, the single most important step in neonatal resuscitation is effective ventilation of the lungs.
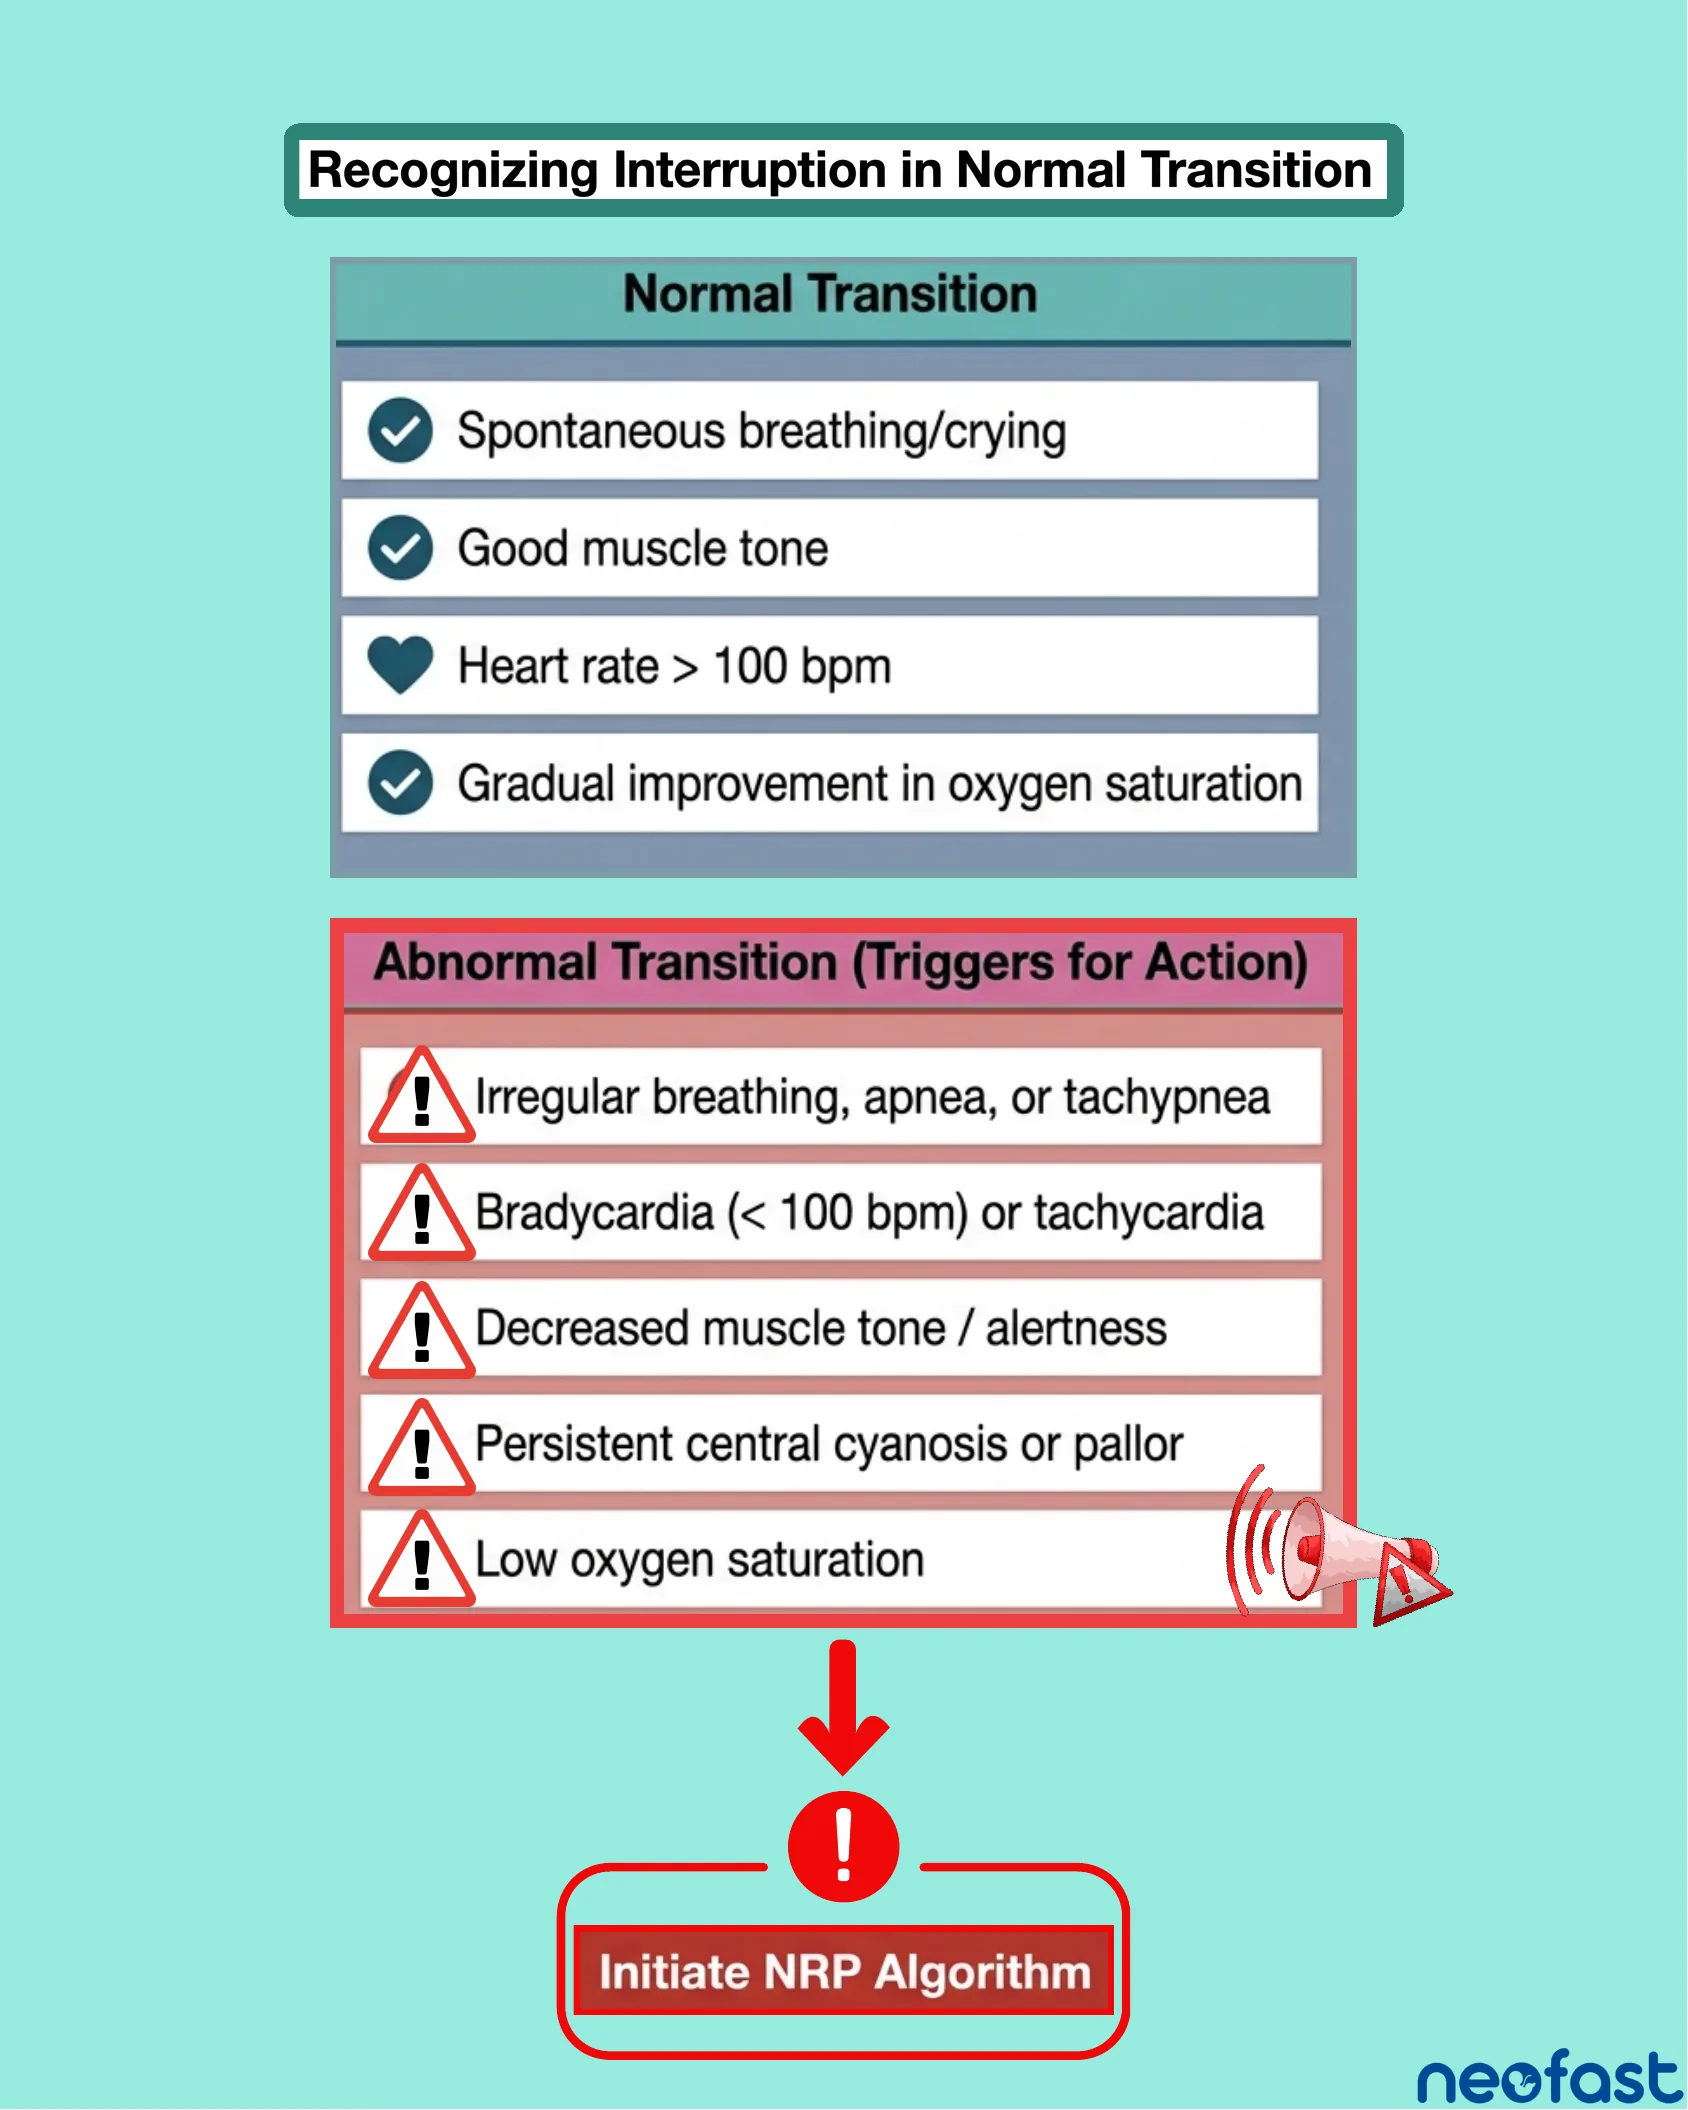
Recognizing Interruption in Normal Transition
Recognizing Interruption in Normal Transition
Normal Transition
- Spontaneous breathing/crying
- Good muscle tone
- Heart rate > 100 bpm
- Gradual improvement in oxygen saturation
Abnormal Transition (Triggers for Action)
- Irregular breathing, apnea, or tachypnea
- Bradycardia (< 100 bpm) or tachycardia
- Decreased muscle tone / alertness
- Persistent central cyanosis or pallor
- Low oxygen saturation
Initiate NRP Algorithm
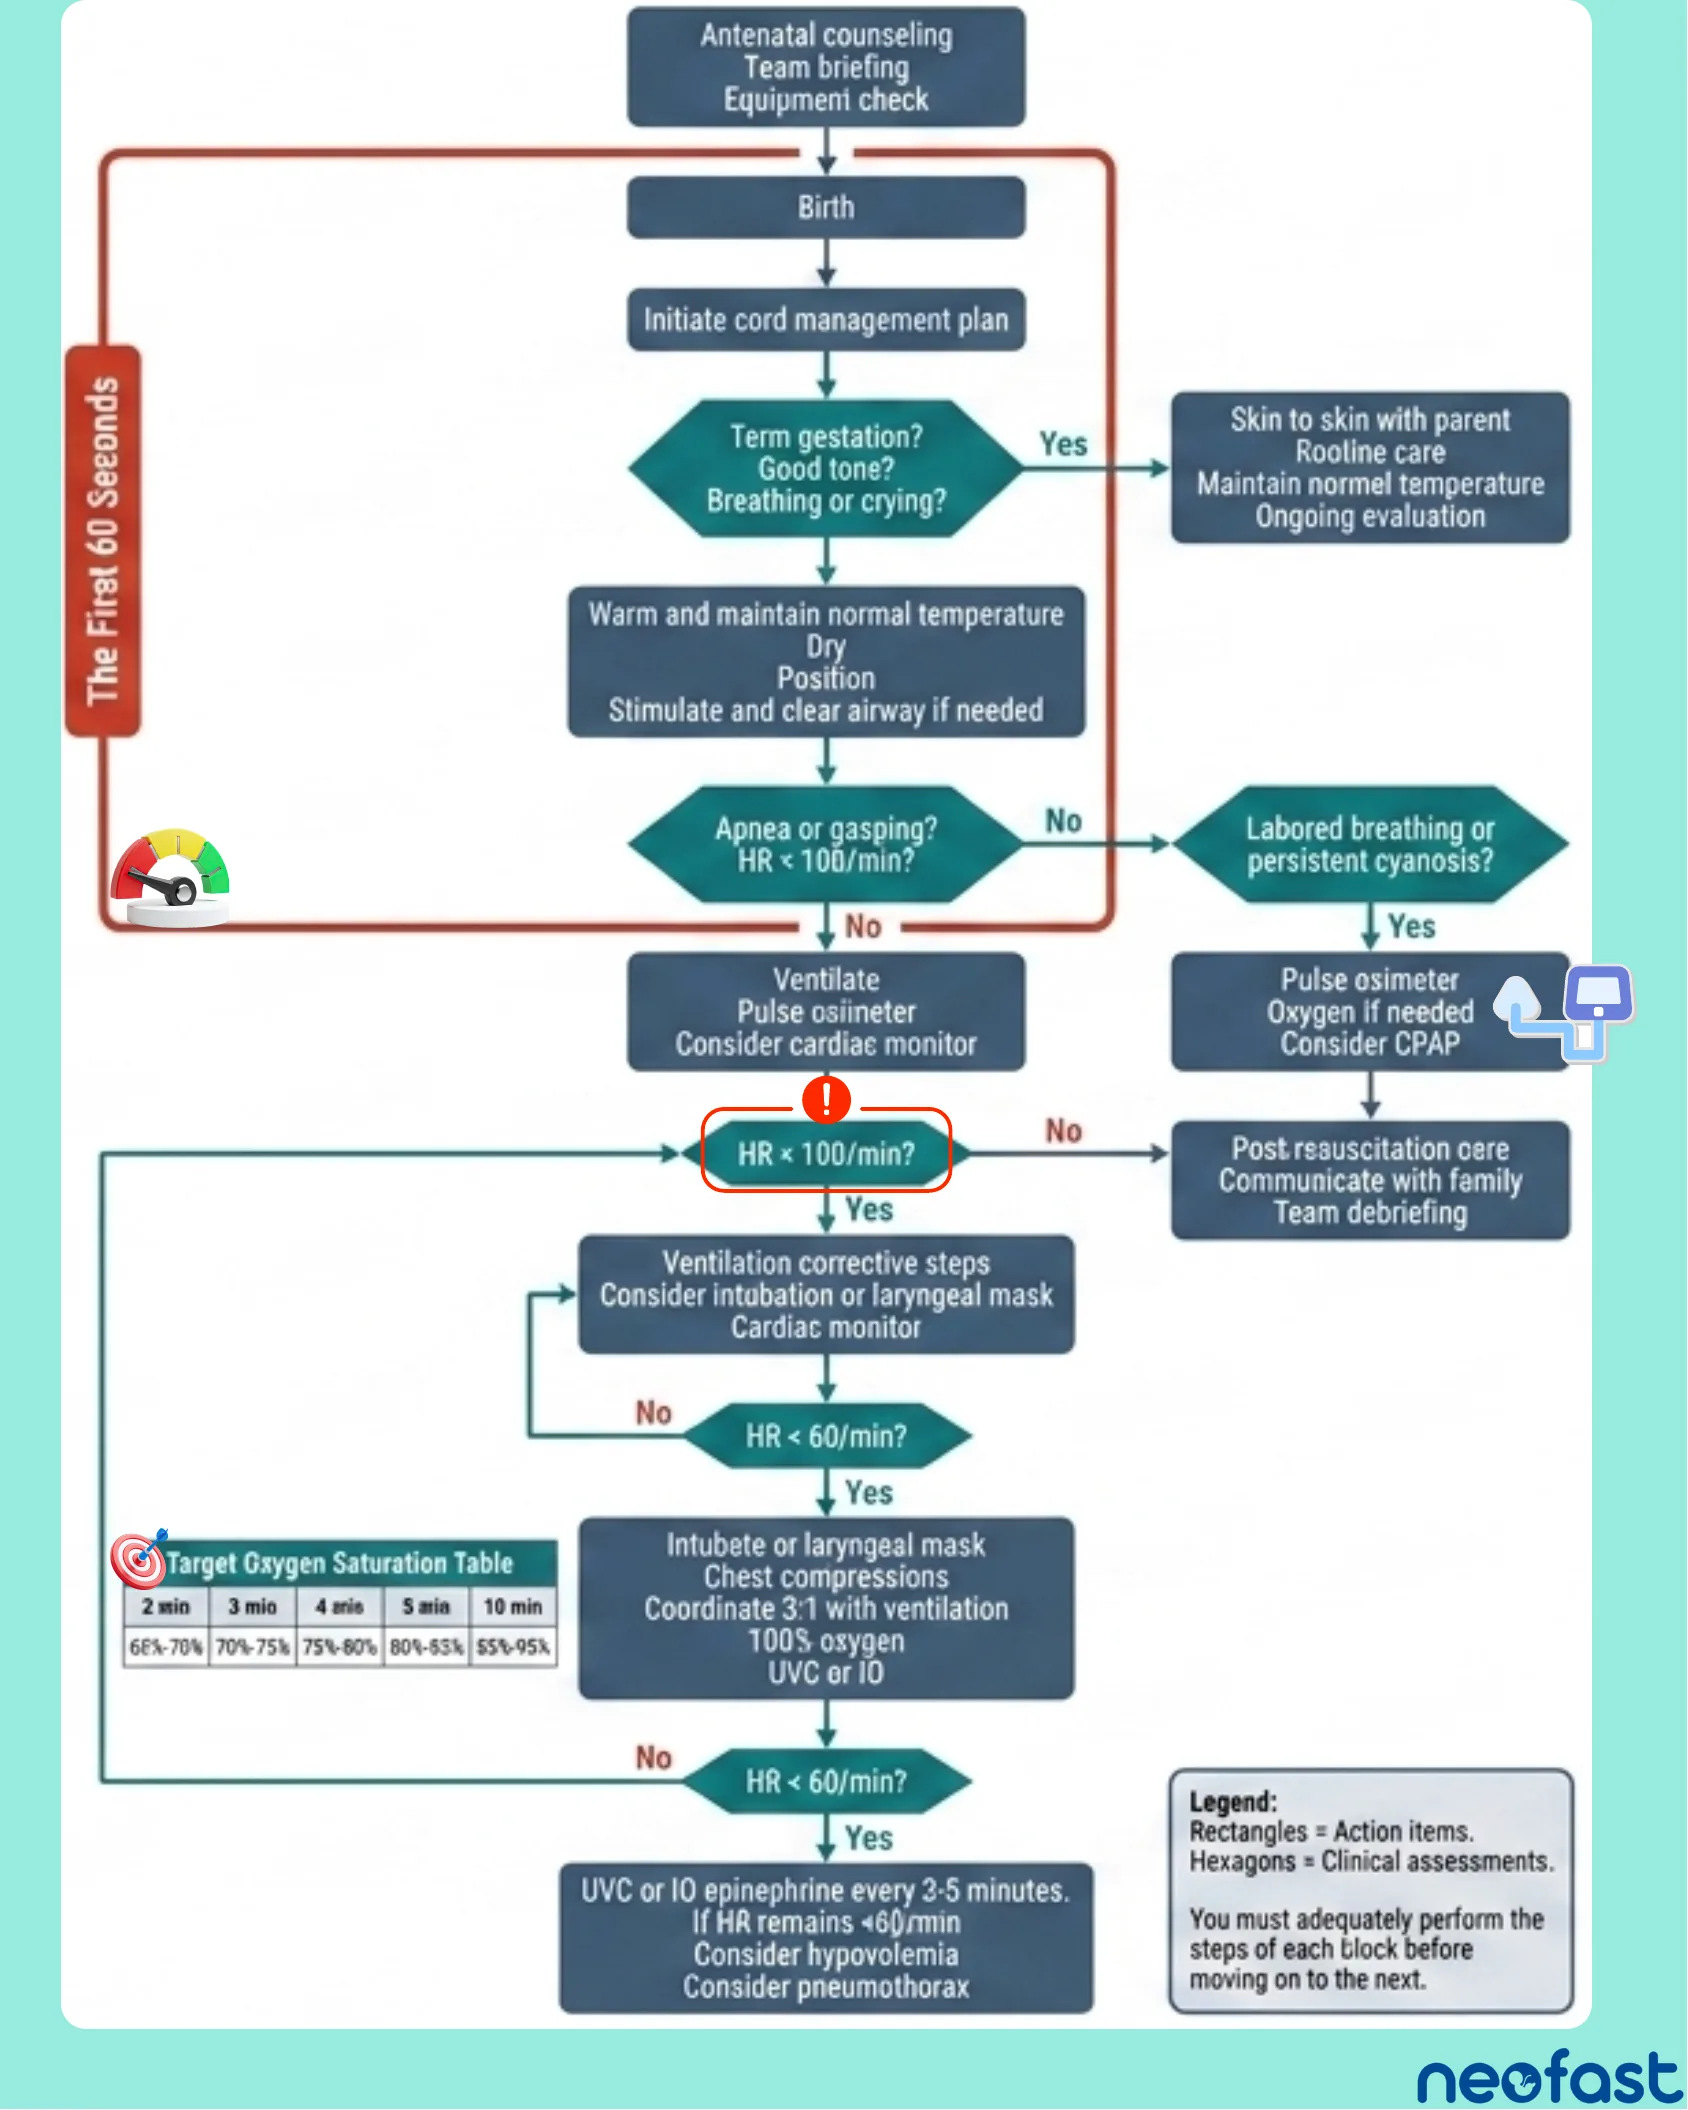
NRP Algorithm Flowchart
NRP Algorithm
- Antenatal counseling, Team briefing, Equipment check
- Birth
- Initiate cord management plan
Term gestation? Good tone? Breathing or crying?
- Yes → Skin to skin with parent, Routine care, Maintain normal temperature, Ongoing evaluation
- No → Continue to initial steps (within The First 60 Seconds)
Warm and maintain normal temperature, Dry, Position, Stimulate and clear airway if needed
Apnea or gasping? HR < 100/min?
- No → Labored breathing or persistent cyanosis?
- Yes → Pulse oximeter, Oxygen if needed, Consider CPAP → Post resuscitation care, Communicate with family, Team debriefing
- (Yes/continue) → Ventilate, Pulse oximeter, Consider cardiac monitor
HR ≥ 100/min?
- No → Post resuscitation care, Communicate with family, Team debriefing
- Yes → Ventilation corrective steps, Consider intubation or laryngeal mask, Cardiac monitor
HR < 60/min?
- No → Loop back to ventilation corrective steps
- Yes → Intubate or laryngeal mask, Chest compressions, Coordinate 3:1 with ventilation, 100% oxygen, UVC or IO
HR < 60/min?
- Yes → UVC or IO epinephrine every 3-5 minutes. If HR remains <60/min, Consider hypovolemia, Consider pneumothorax
Target Oxygen Saturation Table
| 2 min | 3 min | 4 min | 5 min | 10 min |
|---|---|---|---|---|
| 60%-70% | 70%-75% | 75%-80% | 80%-85% | 85%-95% |
Legend
- Rectangles = Action items.
- Hexagons = Clinical assessments.
- You must adequately perform the steps of each block before moving on to the next.
The Gestational Viability Matrix
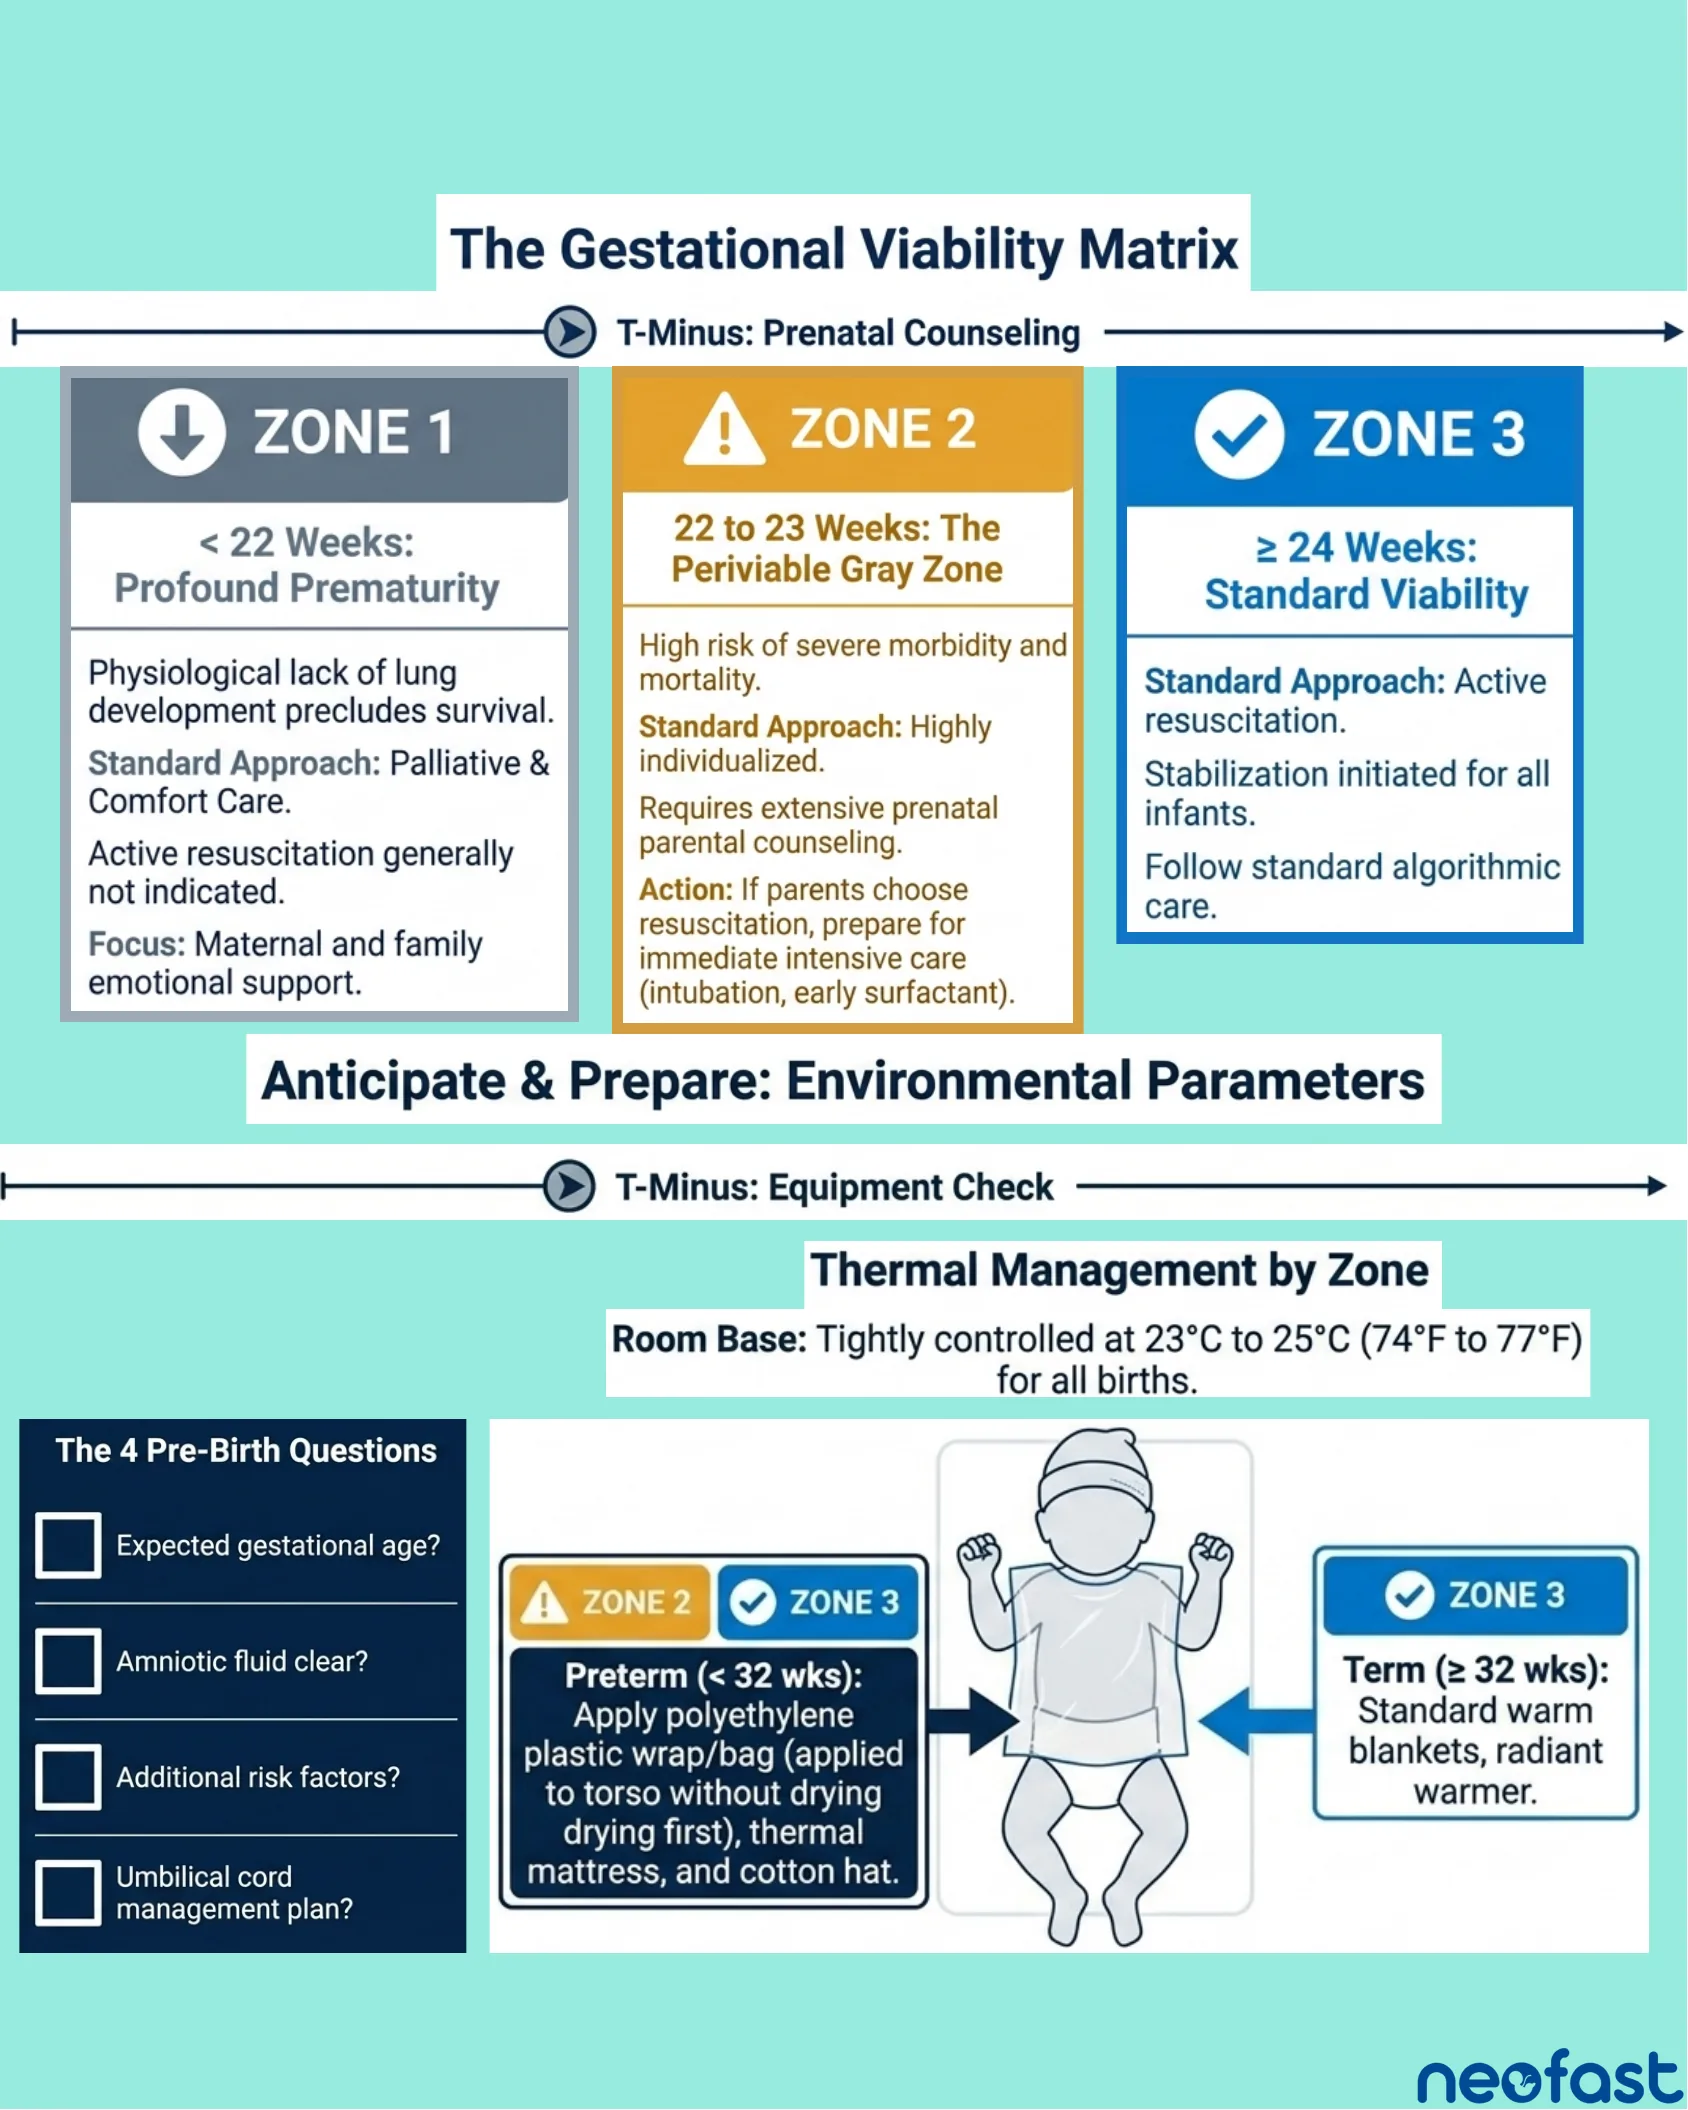
The Gestational Viability Matrix
T-Minus: Prenatal Counseling
ZONE 1: < 22 Weeks: Profound Prematurity
- Physiological lack of lung development precludes survival.
- Standard Approach: Palliative & Comfort Care.
- Active resuscitation generally not indicated.
- Focus: Maternal and family emotional support.
ZONE 2: 22 to 23 Weeks: The Periviable Gray Zone
- High risk of severe morbidity and mortality.
- Standard Approach: Highly individualized.
- Requires extensive prenatal parental counseling.
- Action: If parents choose resuscitation, prepare for immediate intensive care (intubation, early surfactant).
ZONE 3: ≥ 24 Weeks: Standard Viability
- Standard Approach: Active resuscitation.
- Stabilization initiated for all infants.
- Follow standard algorithmic care.
Anticipate & Prepare: Environmental Parameters
T-Minus: Equipment Check
Thermal Management by Zone
Room Base: Tightly controlled at 23°C to 25°C (74°F to 77°F) for all births.
The 4 Pre-Birth Questions
- Expected gestational age?
- Amniotic fluid clear?
- Additional risk factors?
- Umbilical cord management plan?
- Zone 2 / Zone 3 Preterm (< 32 wks): Apply polyethylene plastic wrap/bag (applied to torso without drying first), thermal mattress, and cotton hat.
- Zone 3 Term (≥ 32 wks): Standard warm blankets, radiant warmer.
NRP Quick Supplies & Equipment Station
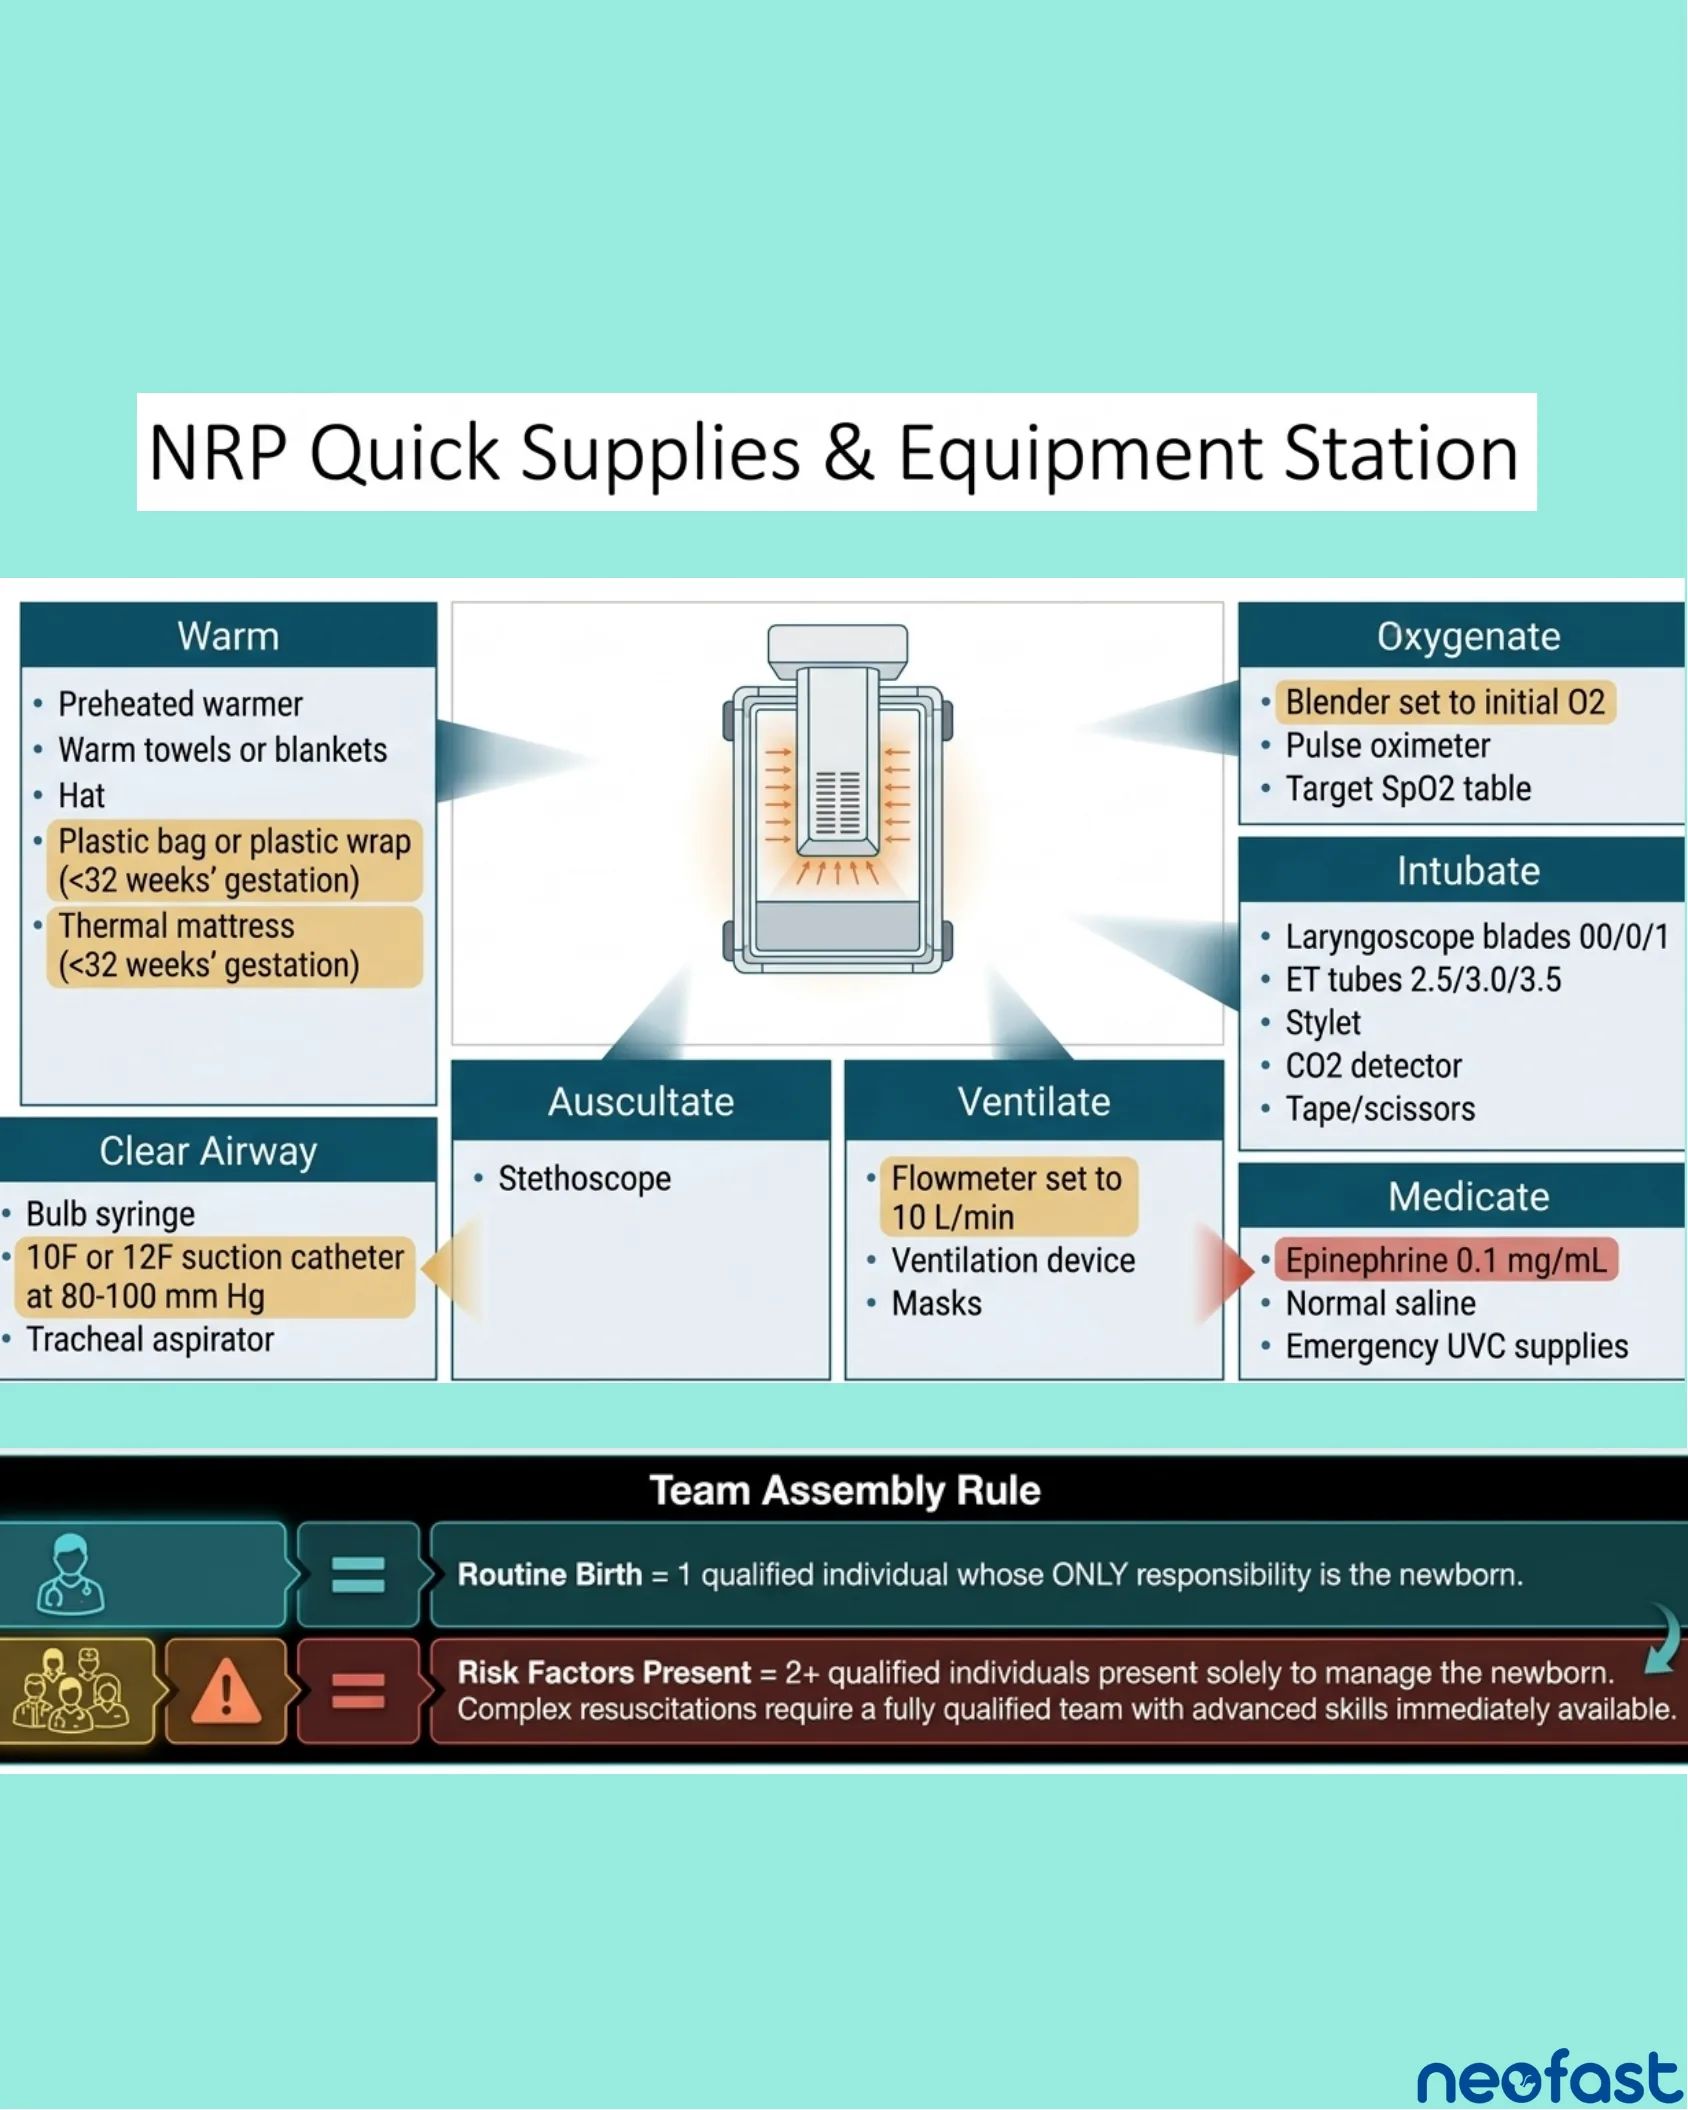
NRP Quick Supplies & Equipment Station
Warm
- Preheated warmer
- Warm towels or blankets
- Hat
- Plastic bag or plastic wrap (<32 weeks’ gestation)
- Thermal mattress (<32 weeks’ gestation)
Clear Airway
- Bulb syringe
- 10F or 12F suction catheter at 80-100 mm Hg
- Tracheal aspirator
Auscultate
- Stethoscope
Ventilate
- Flowmeter set to 10 L/min
- Ventilation device
- Masks
Oxygenate
- Blender set to initial O2
- Pulse oximeter
- Target SpO2 table
Intubate
- Laryngoscope blades 00/0/1
- ET tubes 2.5/3.0/3.5
- Stylet
- CO2 detector
- Tape/scissors
Medicate
- Epinephrine 0.1 mg/mL
- Normal saline
- Emergency UVC supplies
Team Assembly Rule
- Routine Birth = 1 qualified individual whose ONLY responsibility is the newborn.
- Risk Factors Present = 2+ qualified individuals present solely to manage the newborn. Complex resuscitations require a fully qualified team with advanced skills immediately available.
Time 0: Umbilical Cord Management
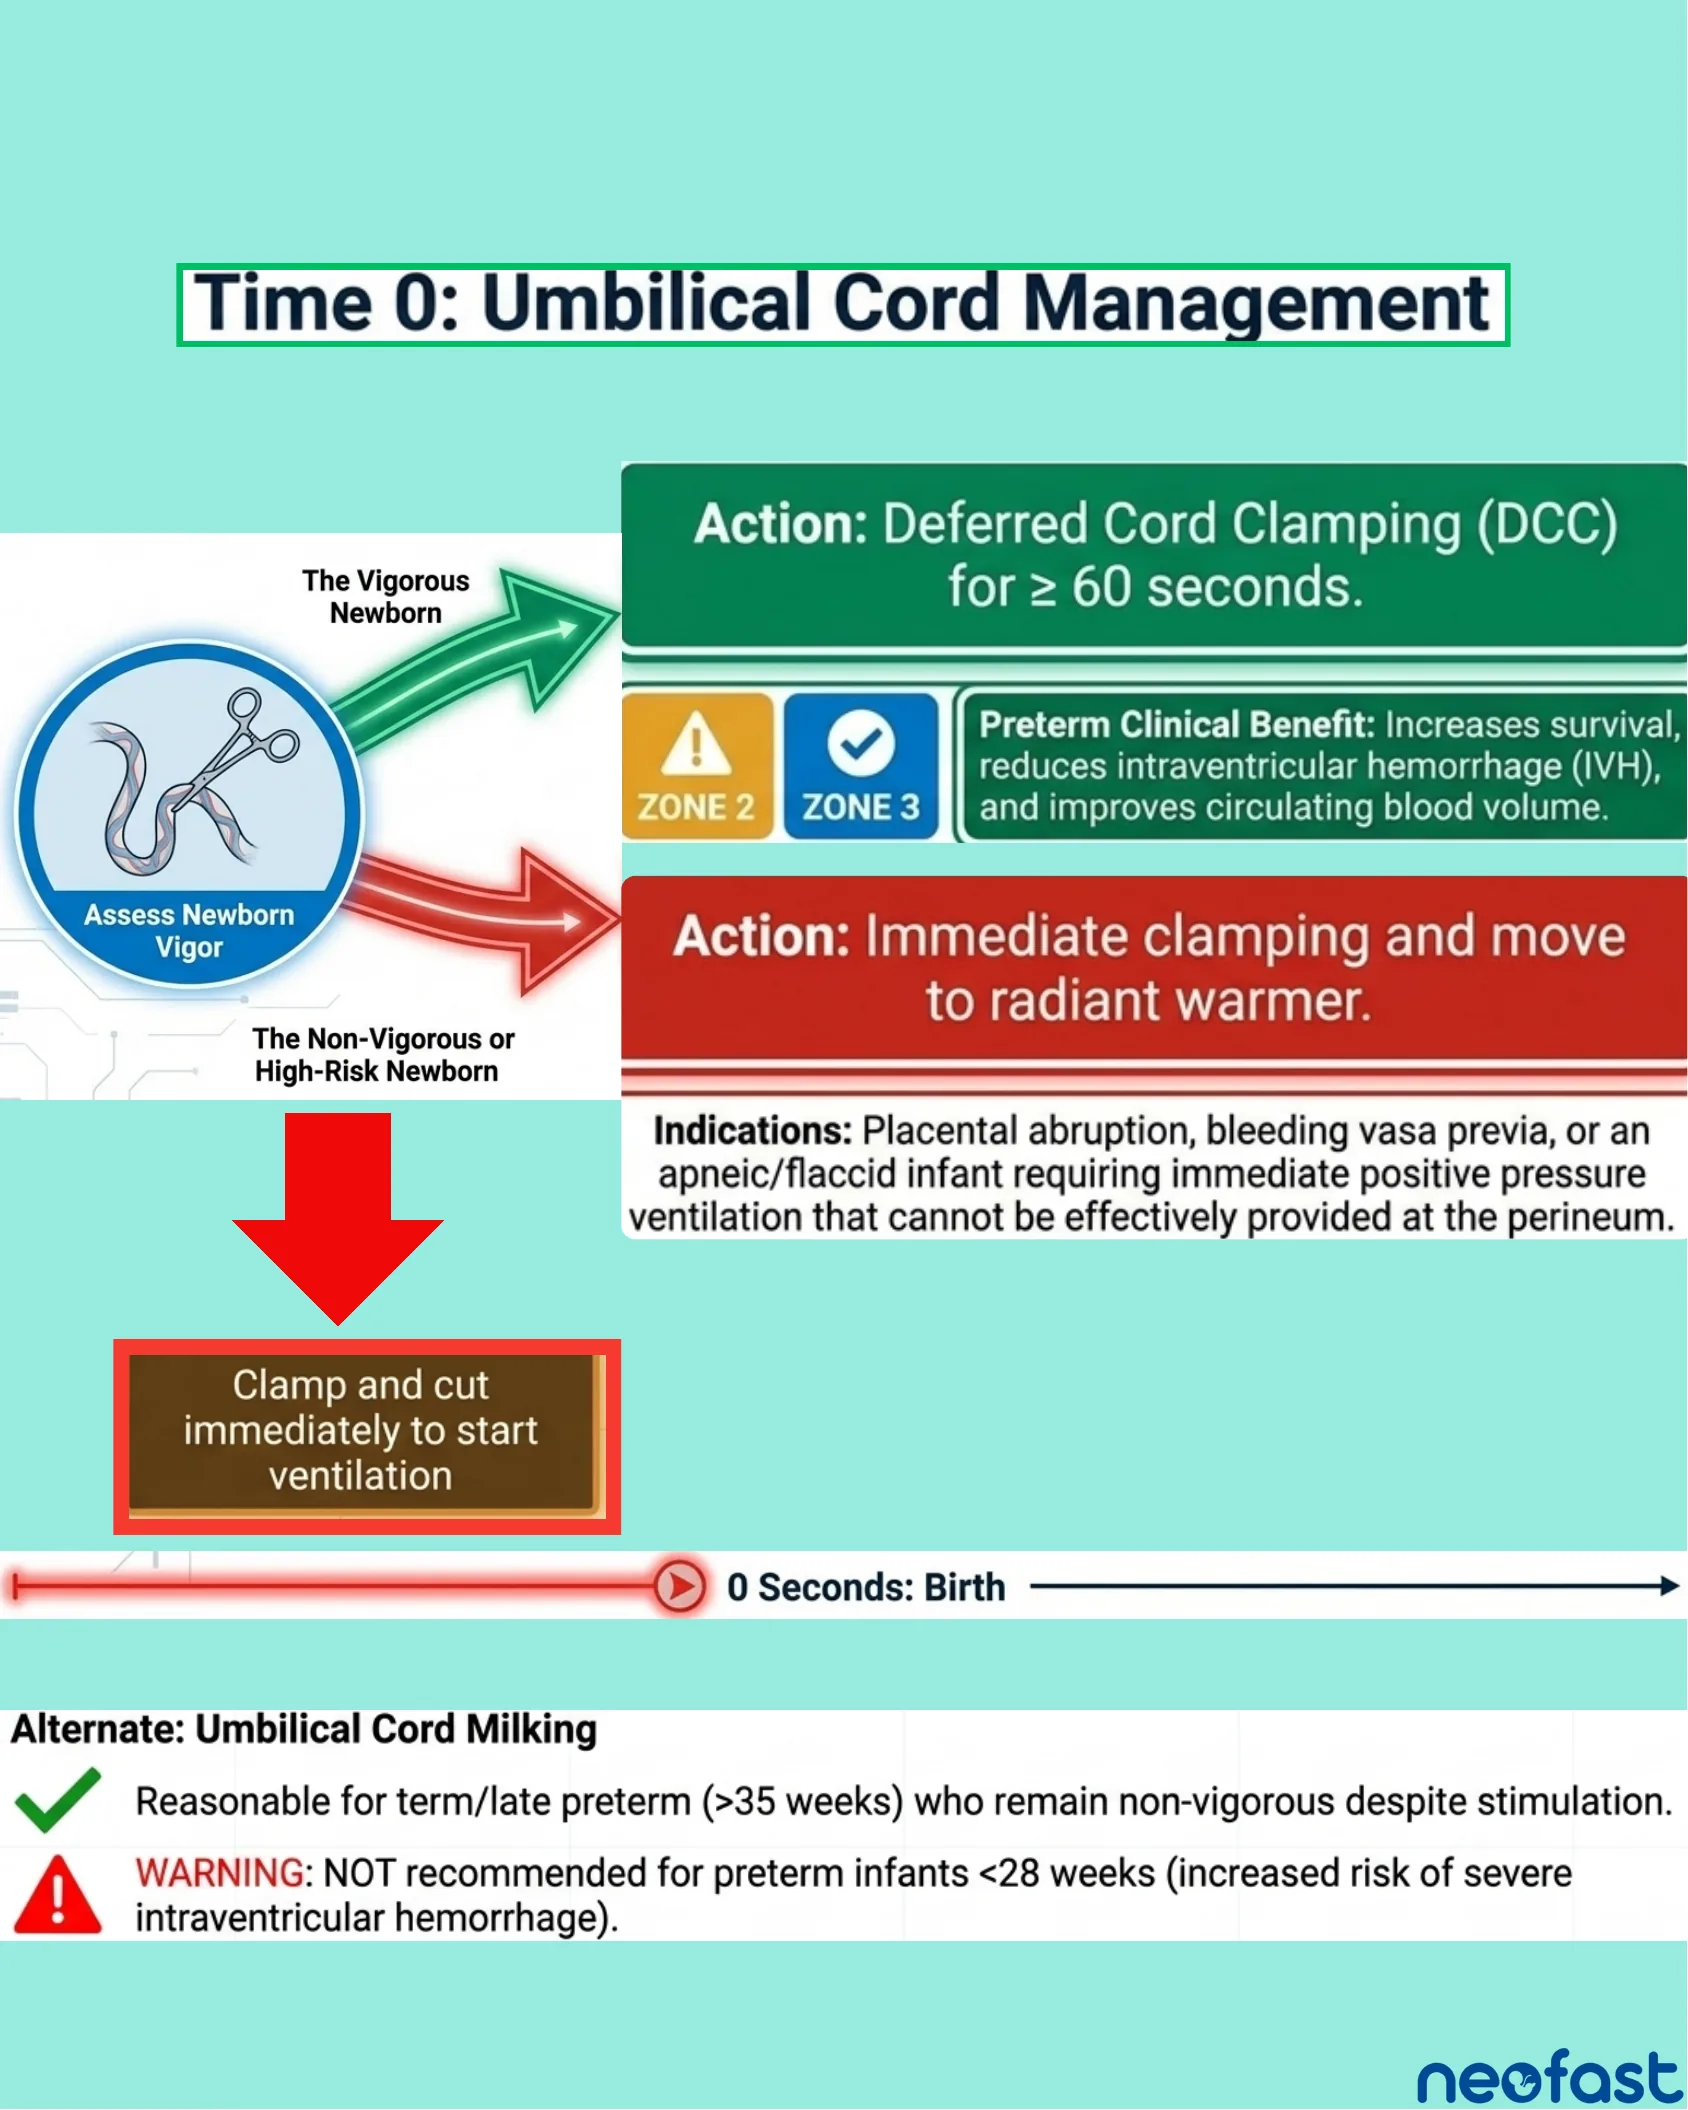
Time 0: Umbilical Cord Management
Assess Newborn Vigor
- The Vigorous Newborn →
Action: Deferred Cord Clamping (DCC) for ≥ 60 seconds.
- Zone 2 / Zone 3 – Preterm Clinical Benefit: Increases survival, reduces intraventricular hemorrhage (IVH), and improves circulating blood volume.
- The Non-Vigorous or High-Risk Newborn →
Action: Immediate clamping and move to radiant warmer.
Indications: Placental abruption, bleeding vasa previa, or an apneic/flaccid infant requiring immediate positive pressure ventilation that cannot be effectively provided at the perineum.
Clamp and cut immediately to start ventilation
0 Seconds: Birth
Alternate: Umbilical Cord Milking
- Reasonable for term/late preterm (>35 weeks) who remain non-vigorous despite stimulation.
- WARNING: NOT recommended for preterm infants <28 weeks (increased risk of severe intraventricular hemorrhage).
The Rapid Initial Evaluation
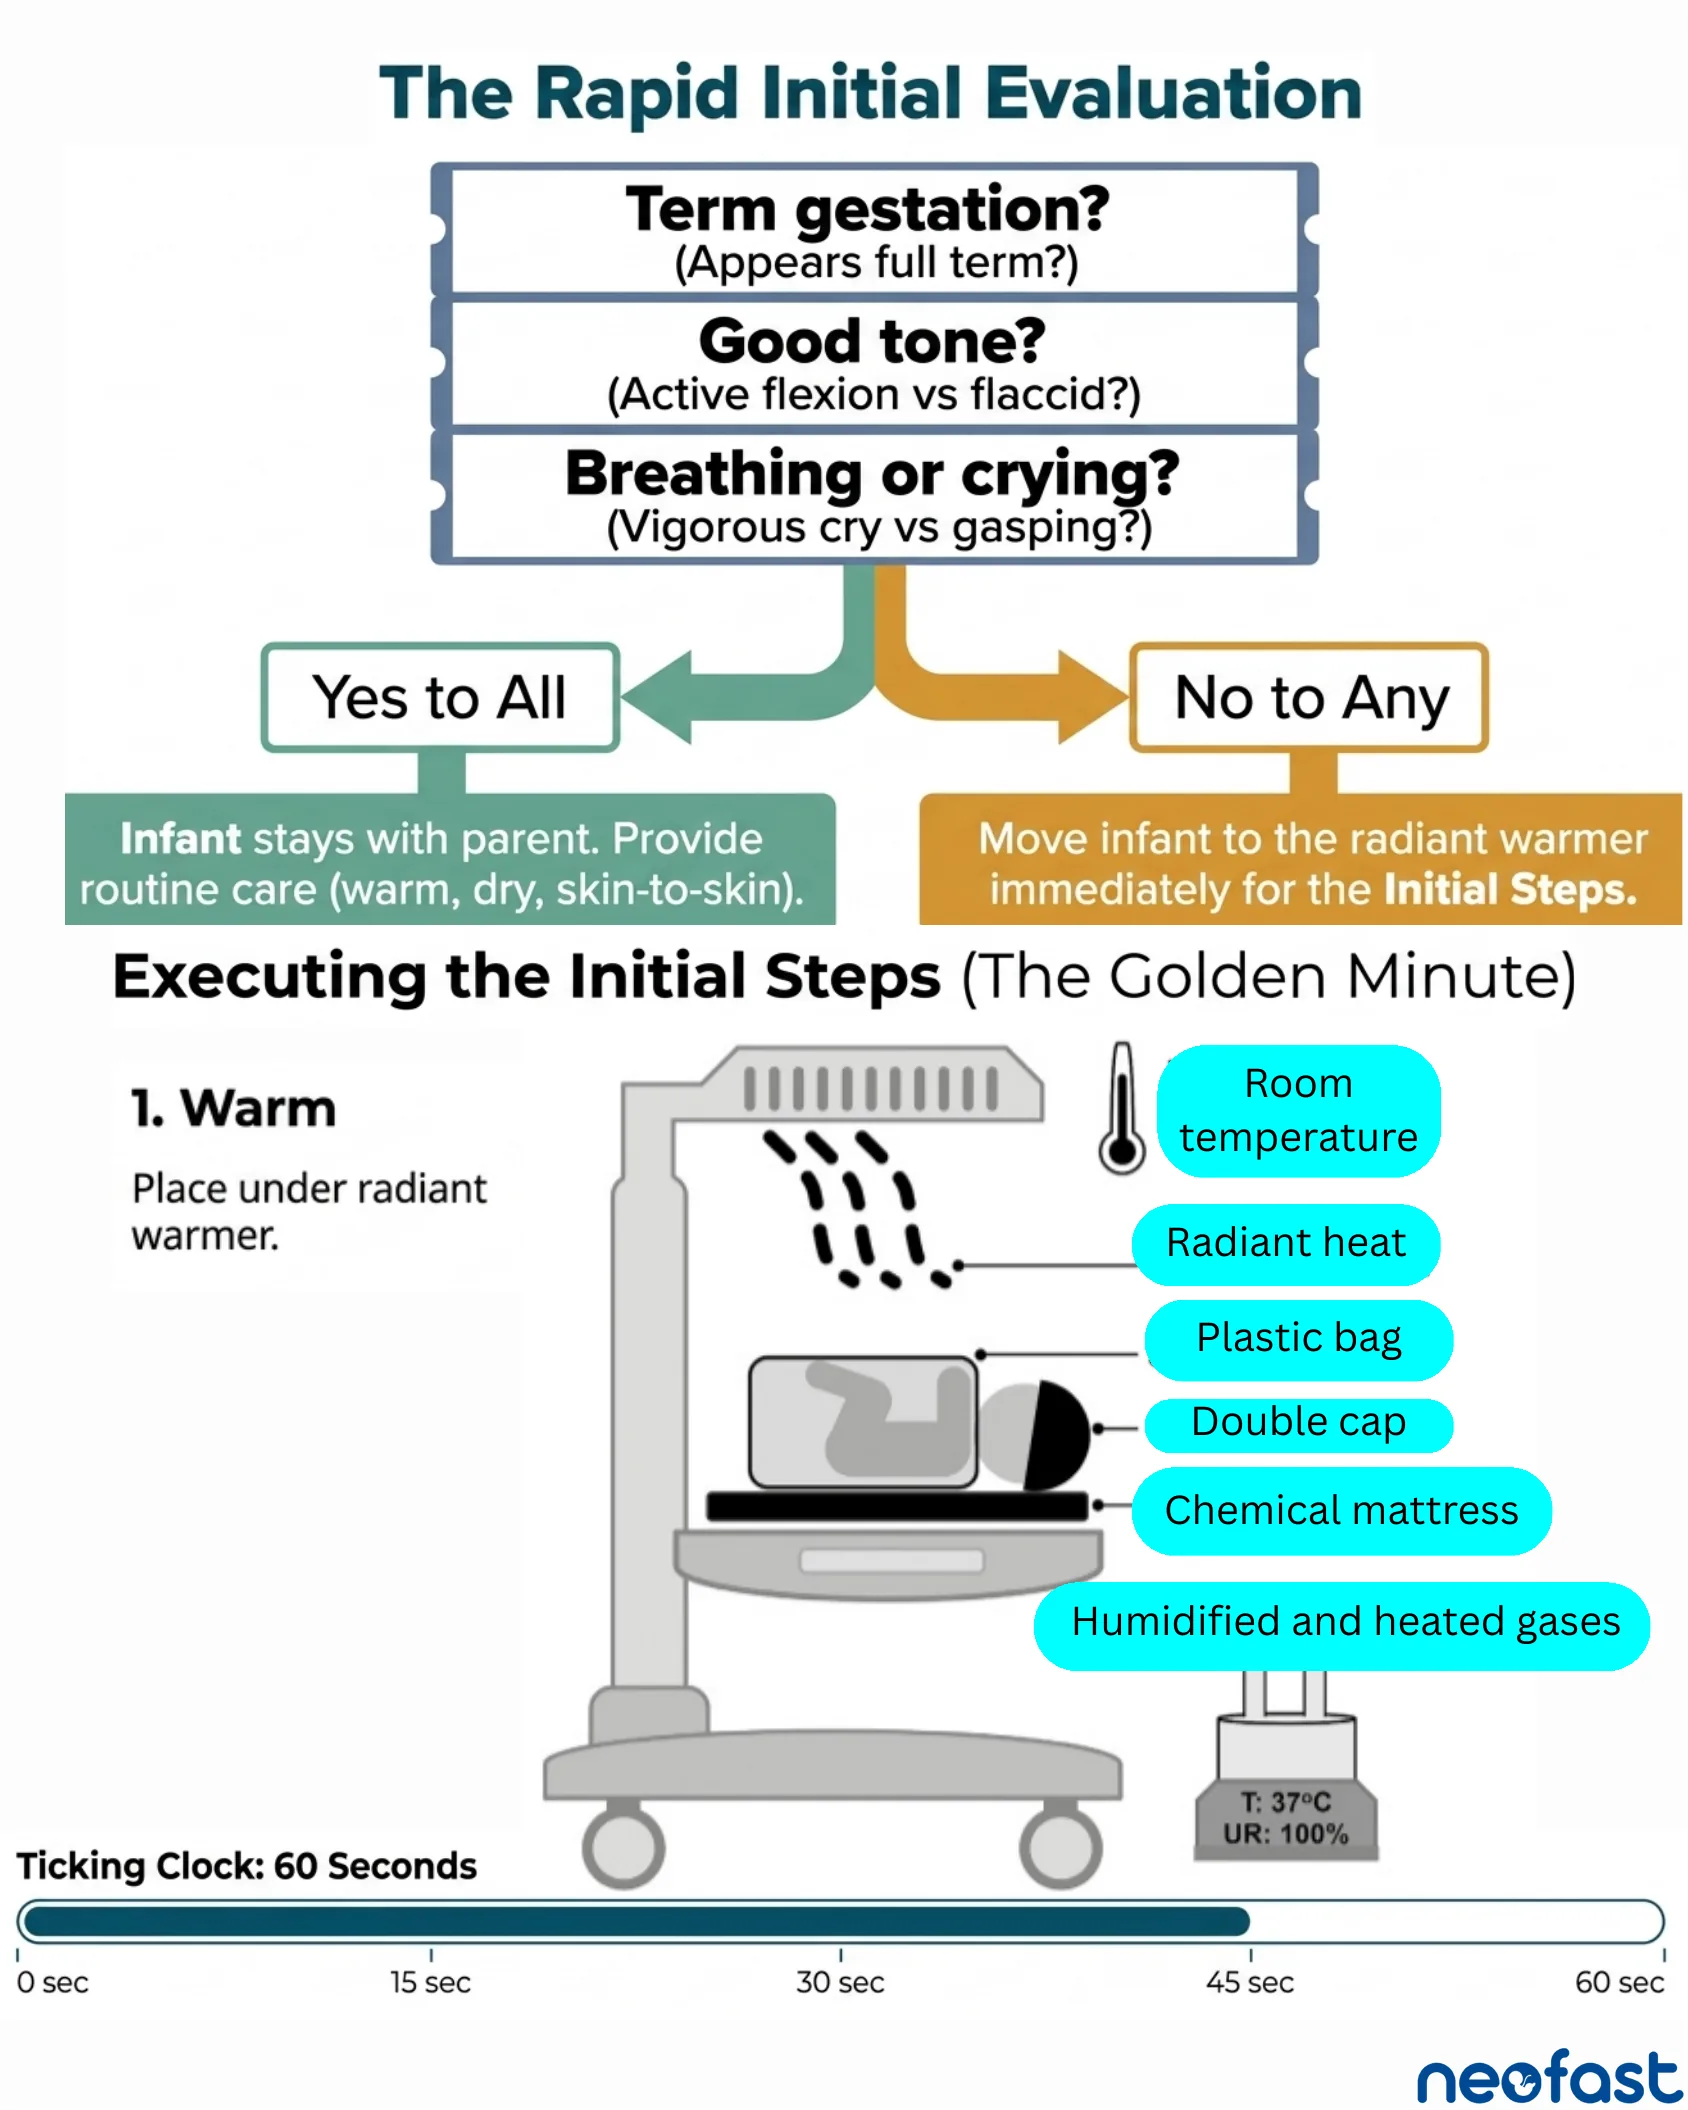
The Rapid Initial Evaluation
- Term gestation? (Appears full term?)
- Good tone? (Active flexion vs flaccid?)
- Breathing or crying? (Vigorous cry vs gasping?)
- Yes to All → Infant stays with parent. Provide routine care (warm, dry, skin-to-skin).
- No to Any → Move infant to the radiant warmer immediately for the Initial Steps.
Executing the Initial Steps (The Golden Minute)
1. Warm
Place under radiant warmer.
- Room temperature
- Radiant heat
- Plastic bag
- Double cap
- Chemical mattress
- Humidified and heated gases
T: 37°C, UR: 100%
Ticking Clock: 60 Seconds
0 sec — 15 sec — 30 sec — 45 sec — 60 sec
Initial Steps: Dry, Stimulate, Clear Airway
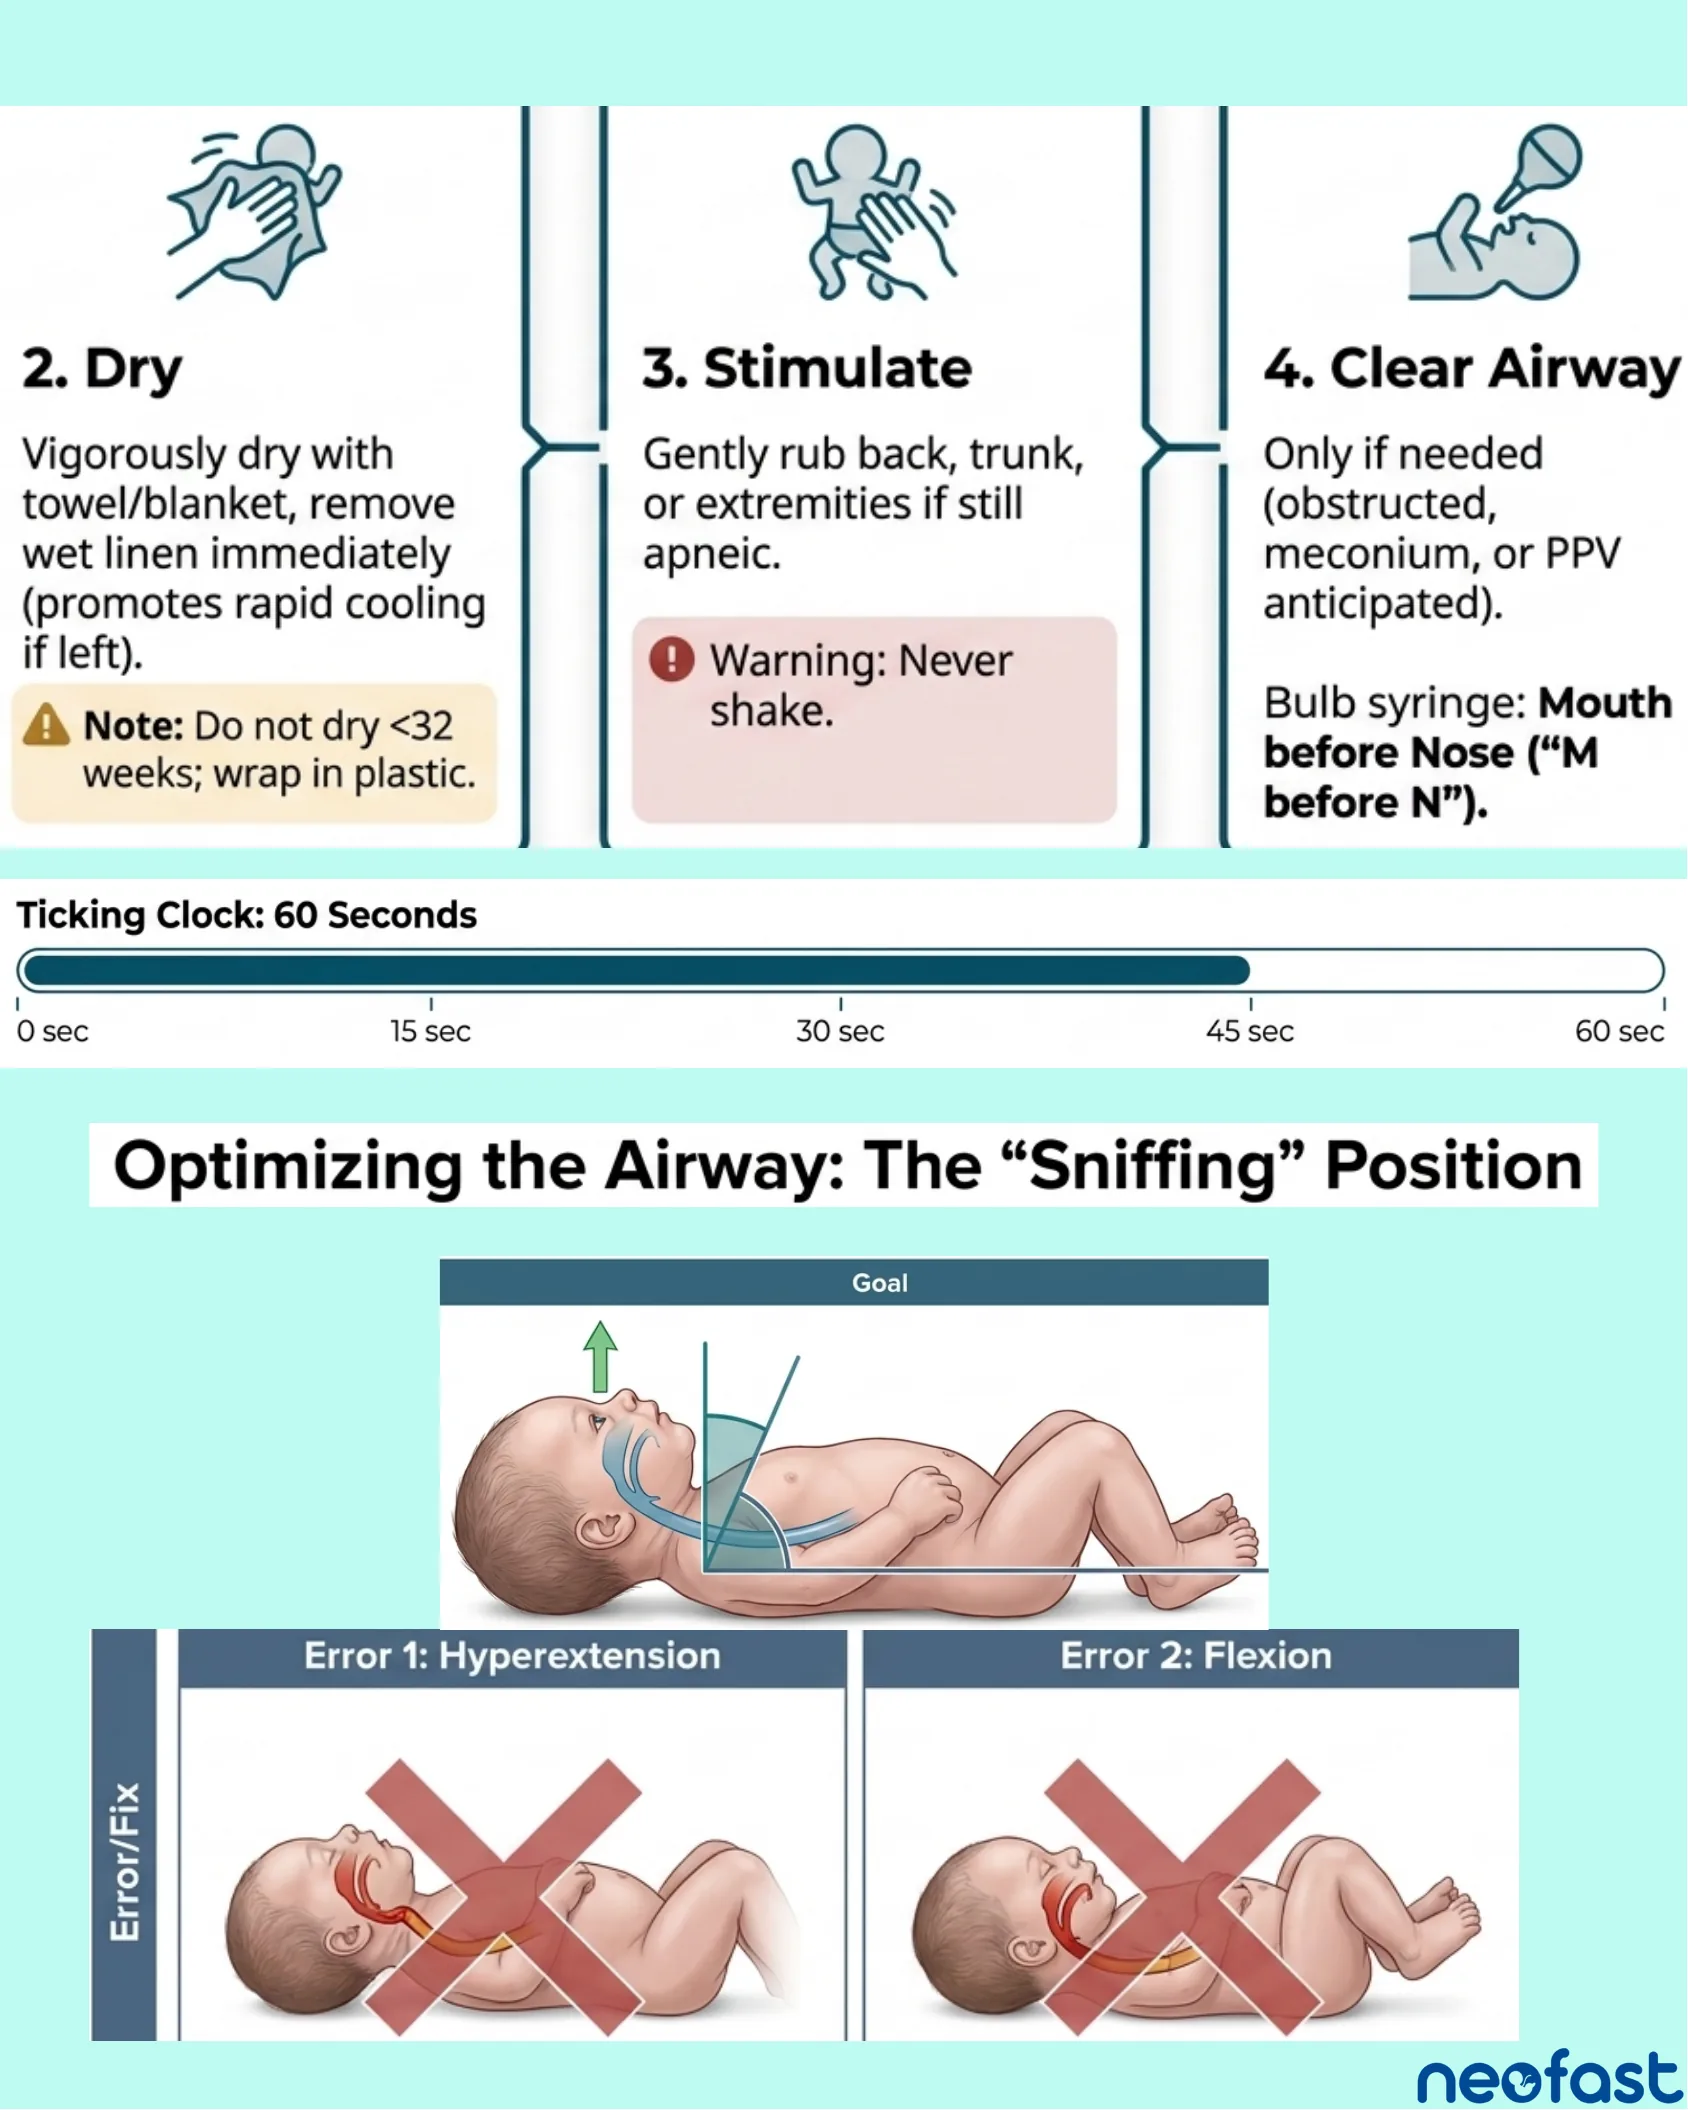
2. Dry
- Vigorously dry with towel/blanket, remove wet linen immediately (promotes rapid cooling if left).
Note: Do not dry <32 weeks; wrap in plastic.
3. Stimulate
- Gently rub back, trunk, or extremities if still apneic.
Warning: Never shake.
4. Clear Airway
- Only if needed (obstructed, meconium, or PPV anticipated).
- Bulb syringe: Mouth before Nose (“M before N”).
Ticking Clock: 60 Seconds
- 0 sec
- 15 sec
- 30 sec
- 45 sec
- 60 sec
Optimizing the Airway: The “Sniffing” Position
Goal: Neutral neck position with slight extension to align airway.
Error 1: Hyperextension
Incorrect positioning with the neck overly extended.
Error 2: Flexion
Incorrect positioning with the neck flexed forward.
Managing Meconium-Stained Fluid
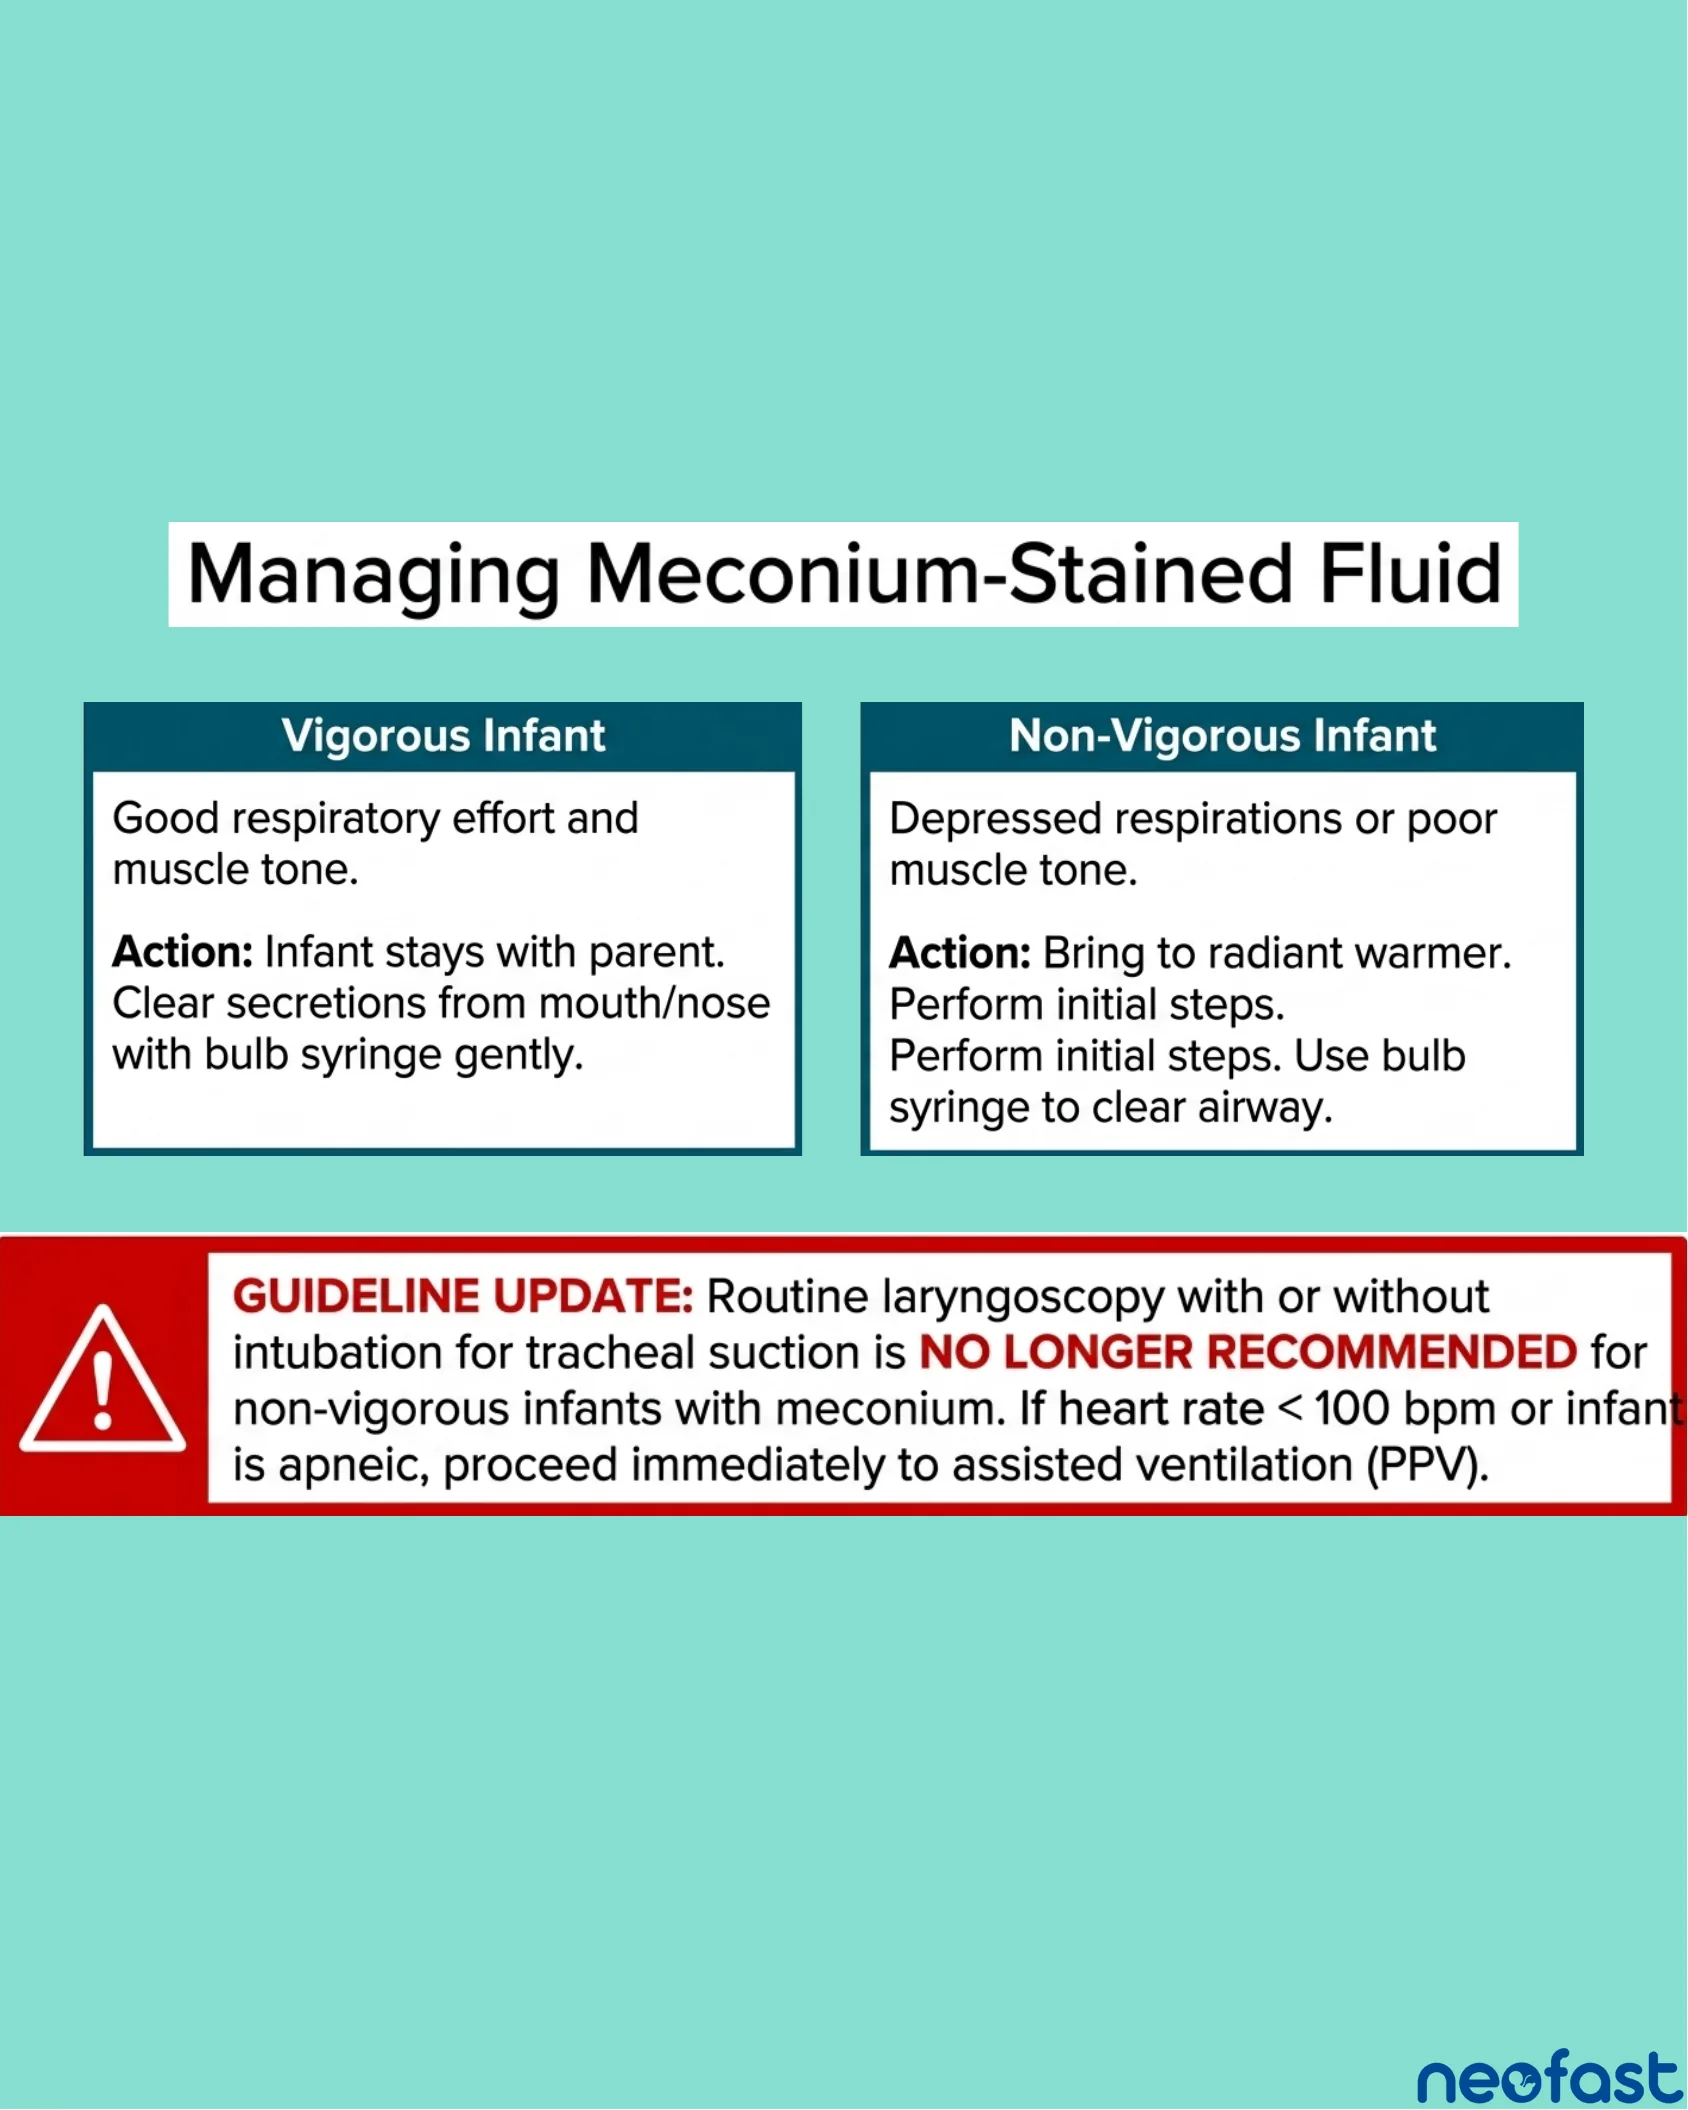
Managing Meconium-Stained Fluid
| Vigorous Infant | Non-Vigorous Infant |
|---|---|
| Good respiratory effort and muscle tone. Action: Infant stays with parent. Clear secretions from mouth/nose with bulb syringe gently. | Depressed respirations or poor muscle tone. Action: Bring to radiant warmer. Perform initial steps. Perform initial steps. Use bulb syringe to clear airway. |
GUIDELINE UPDATE: Routine laryngoscopy with or without intubation for tracheal suction is NO LONGER RECOMMENDED for non-vigorous infants with meconium. If heart rate < 100 bpm or infant is apneic, proceed immediately to assisted ventilation (PPV).
Oxygenation Takes Time (SpO2 Targets)
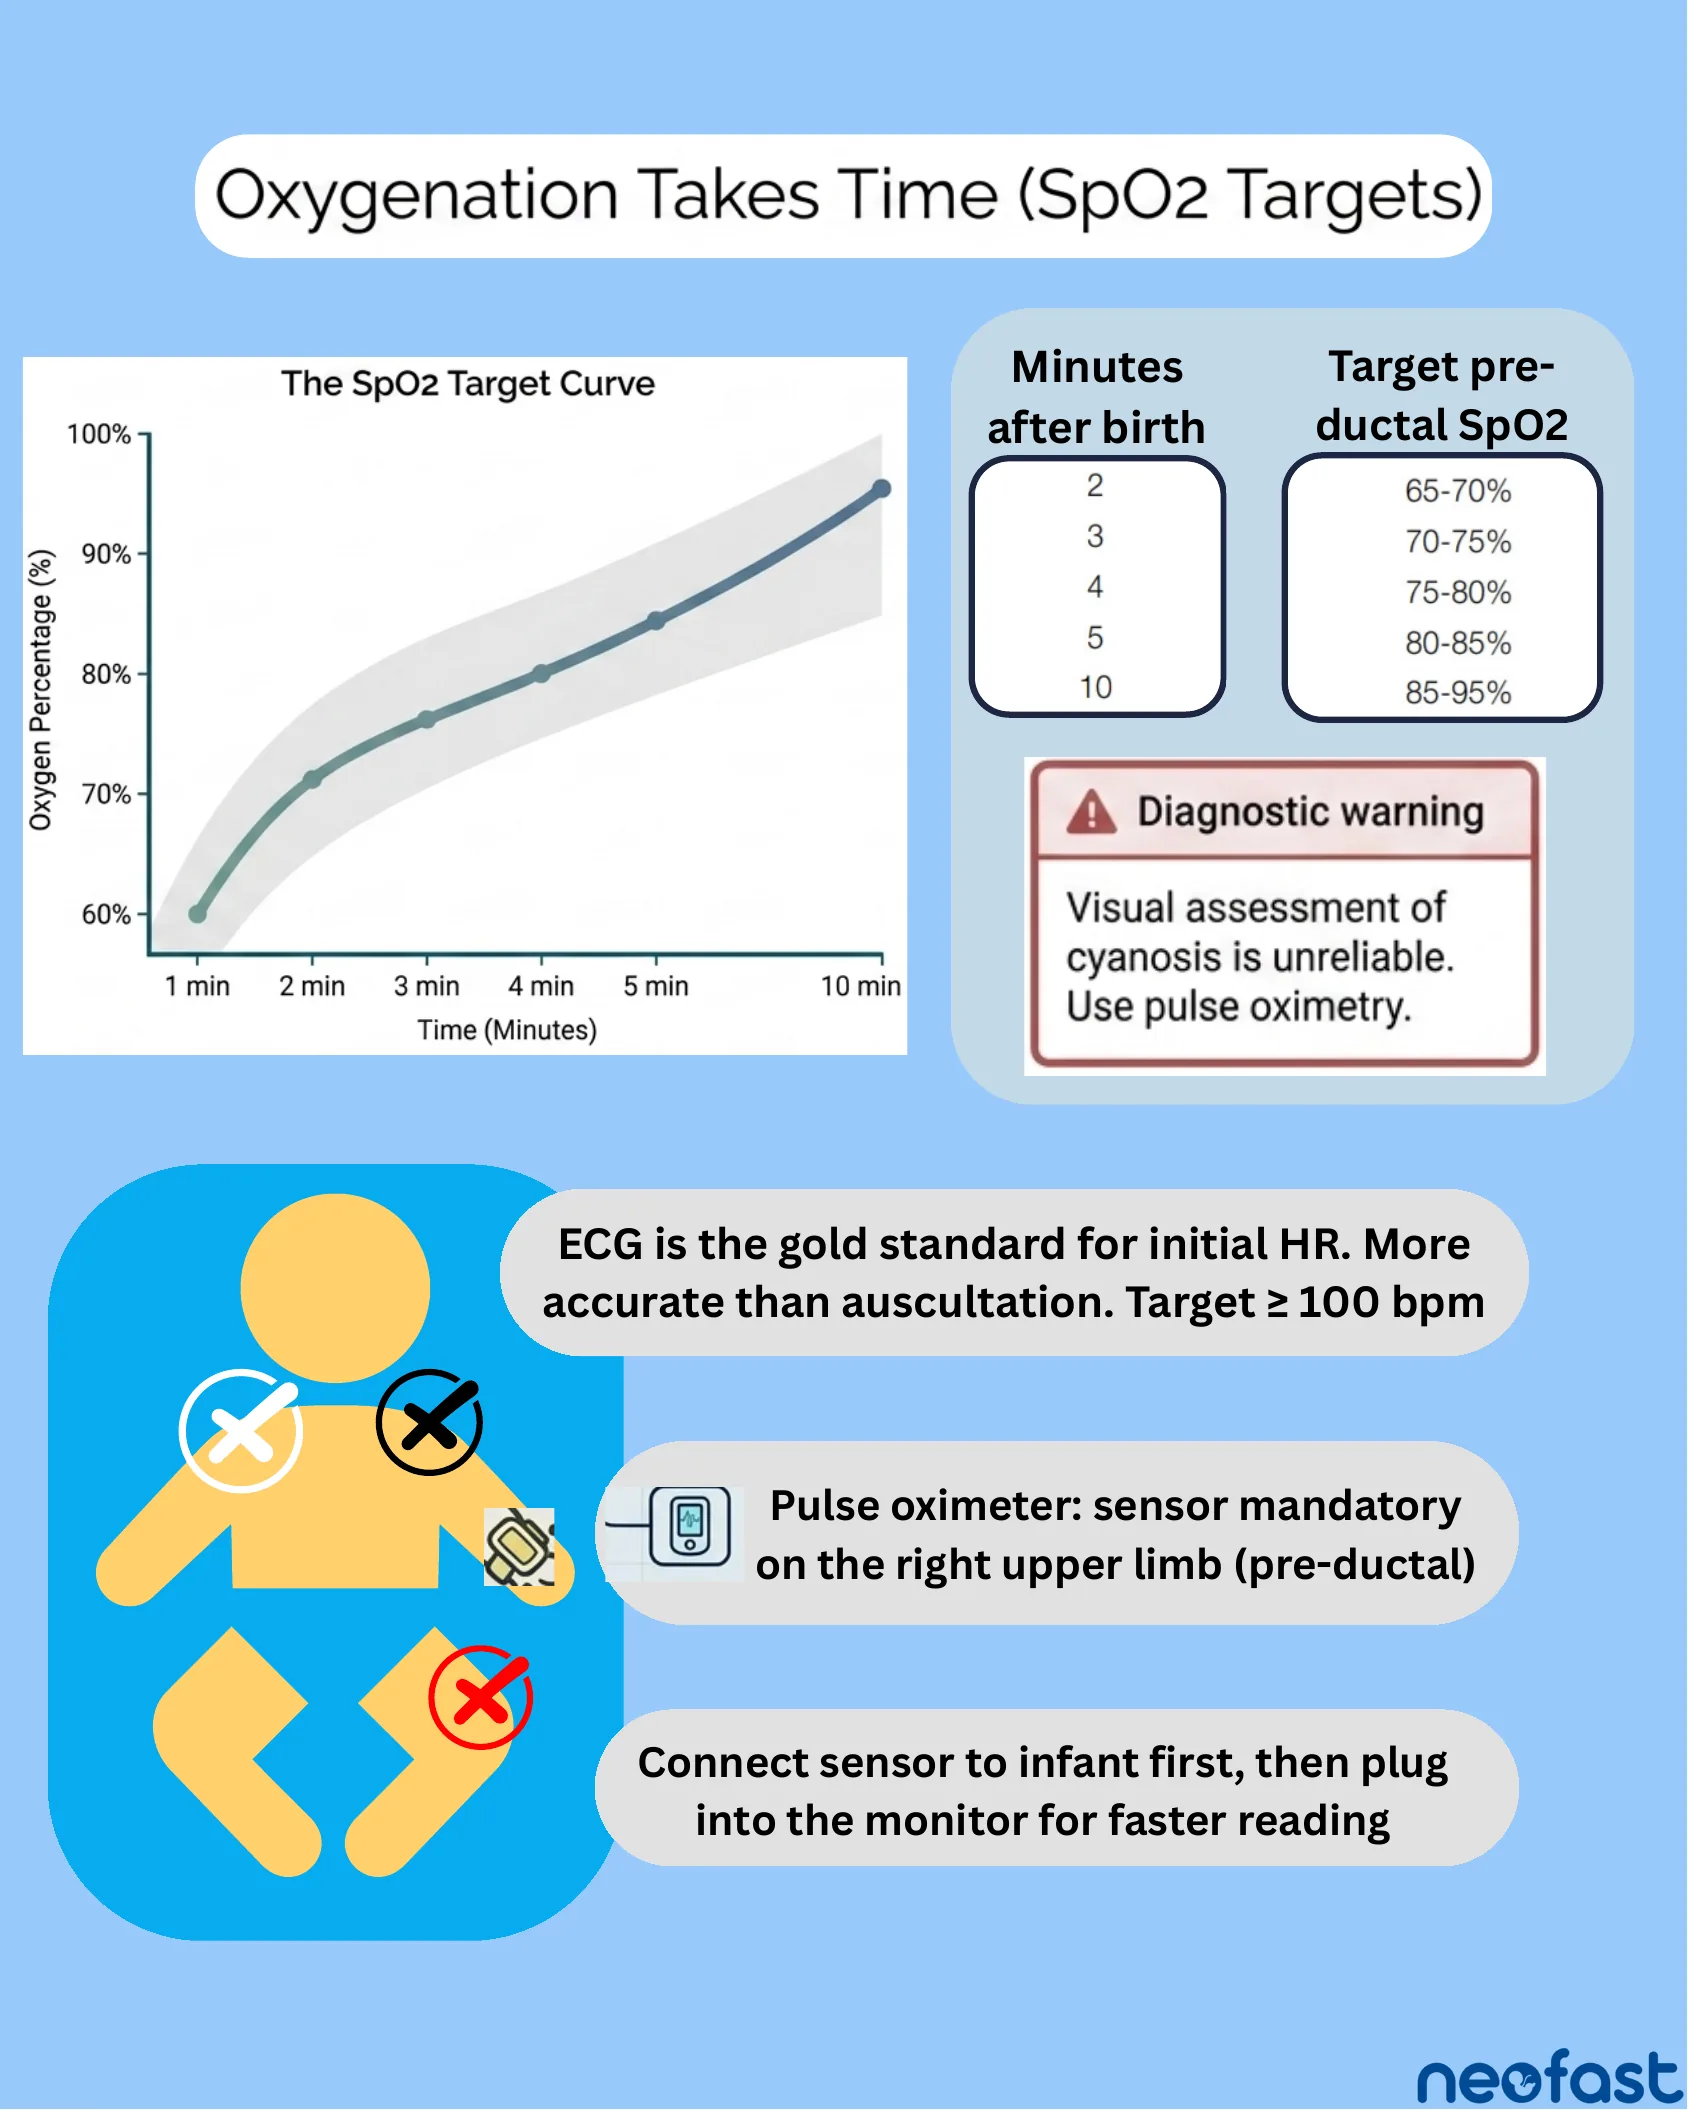
Oxygenation Takes Time (SpO2 Targets)
The SpO2 Target Curve: Oxygen percentage rises gradually from about 60% at 1 minute to about 95% at 10 minutes after birth.
| Minutes after birth | Target pre-ductal SpO2 |
|---|---|
| 2 | 65-70% |
| 3 | 70-75% |
| 4 | 75-80% |
| 5 | 80-85% |
| 10 | 85-95% |
Diagnostic warning: Visual assessment of cyanosis is unreliable. Use pulse oximetry.
- ECG is the gold standard for initial HR. More accurate than auscultation. Target ≥ 100 bpm.
- Pulse oximeter: sensor mandatory on the right upper limb (pre-ductal).
- Connect sensor to infant first, then plug into the monitor for faster reading.
The Golden Minute & Integrated Clinical Assessment
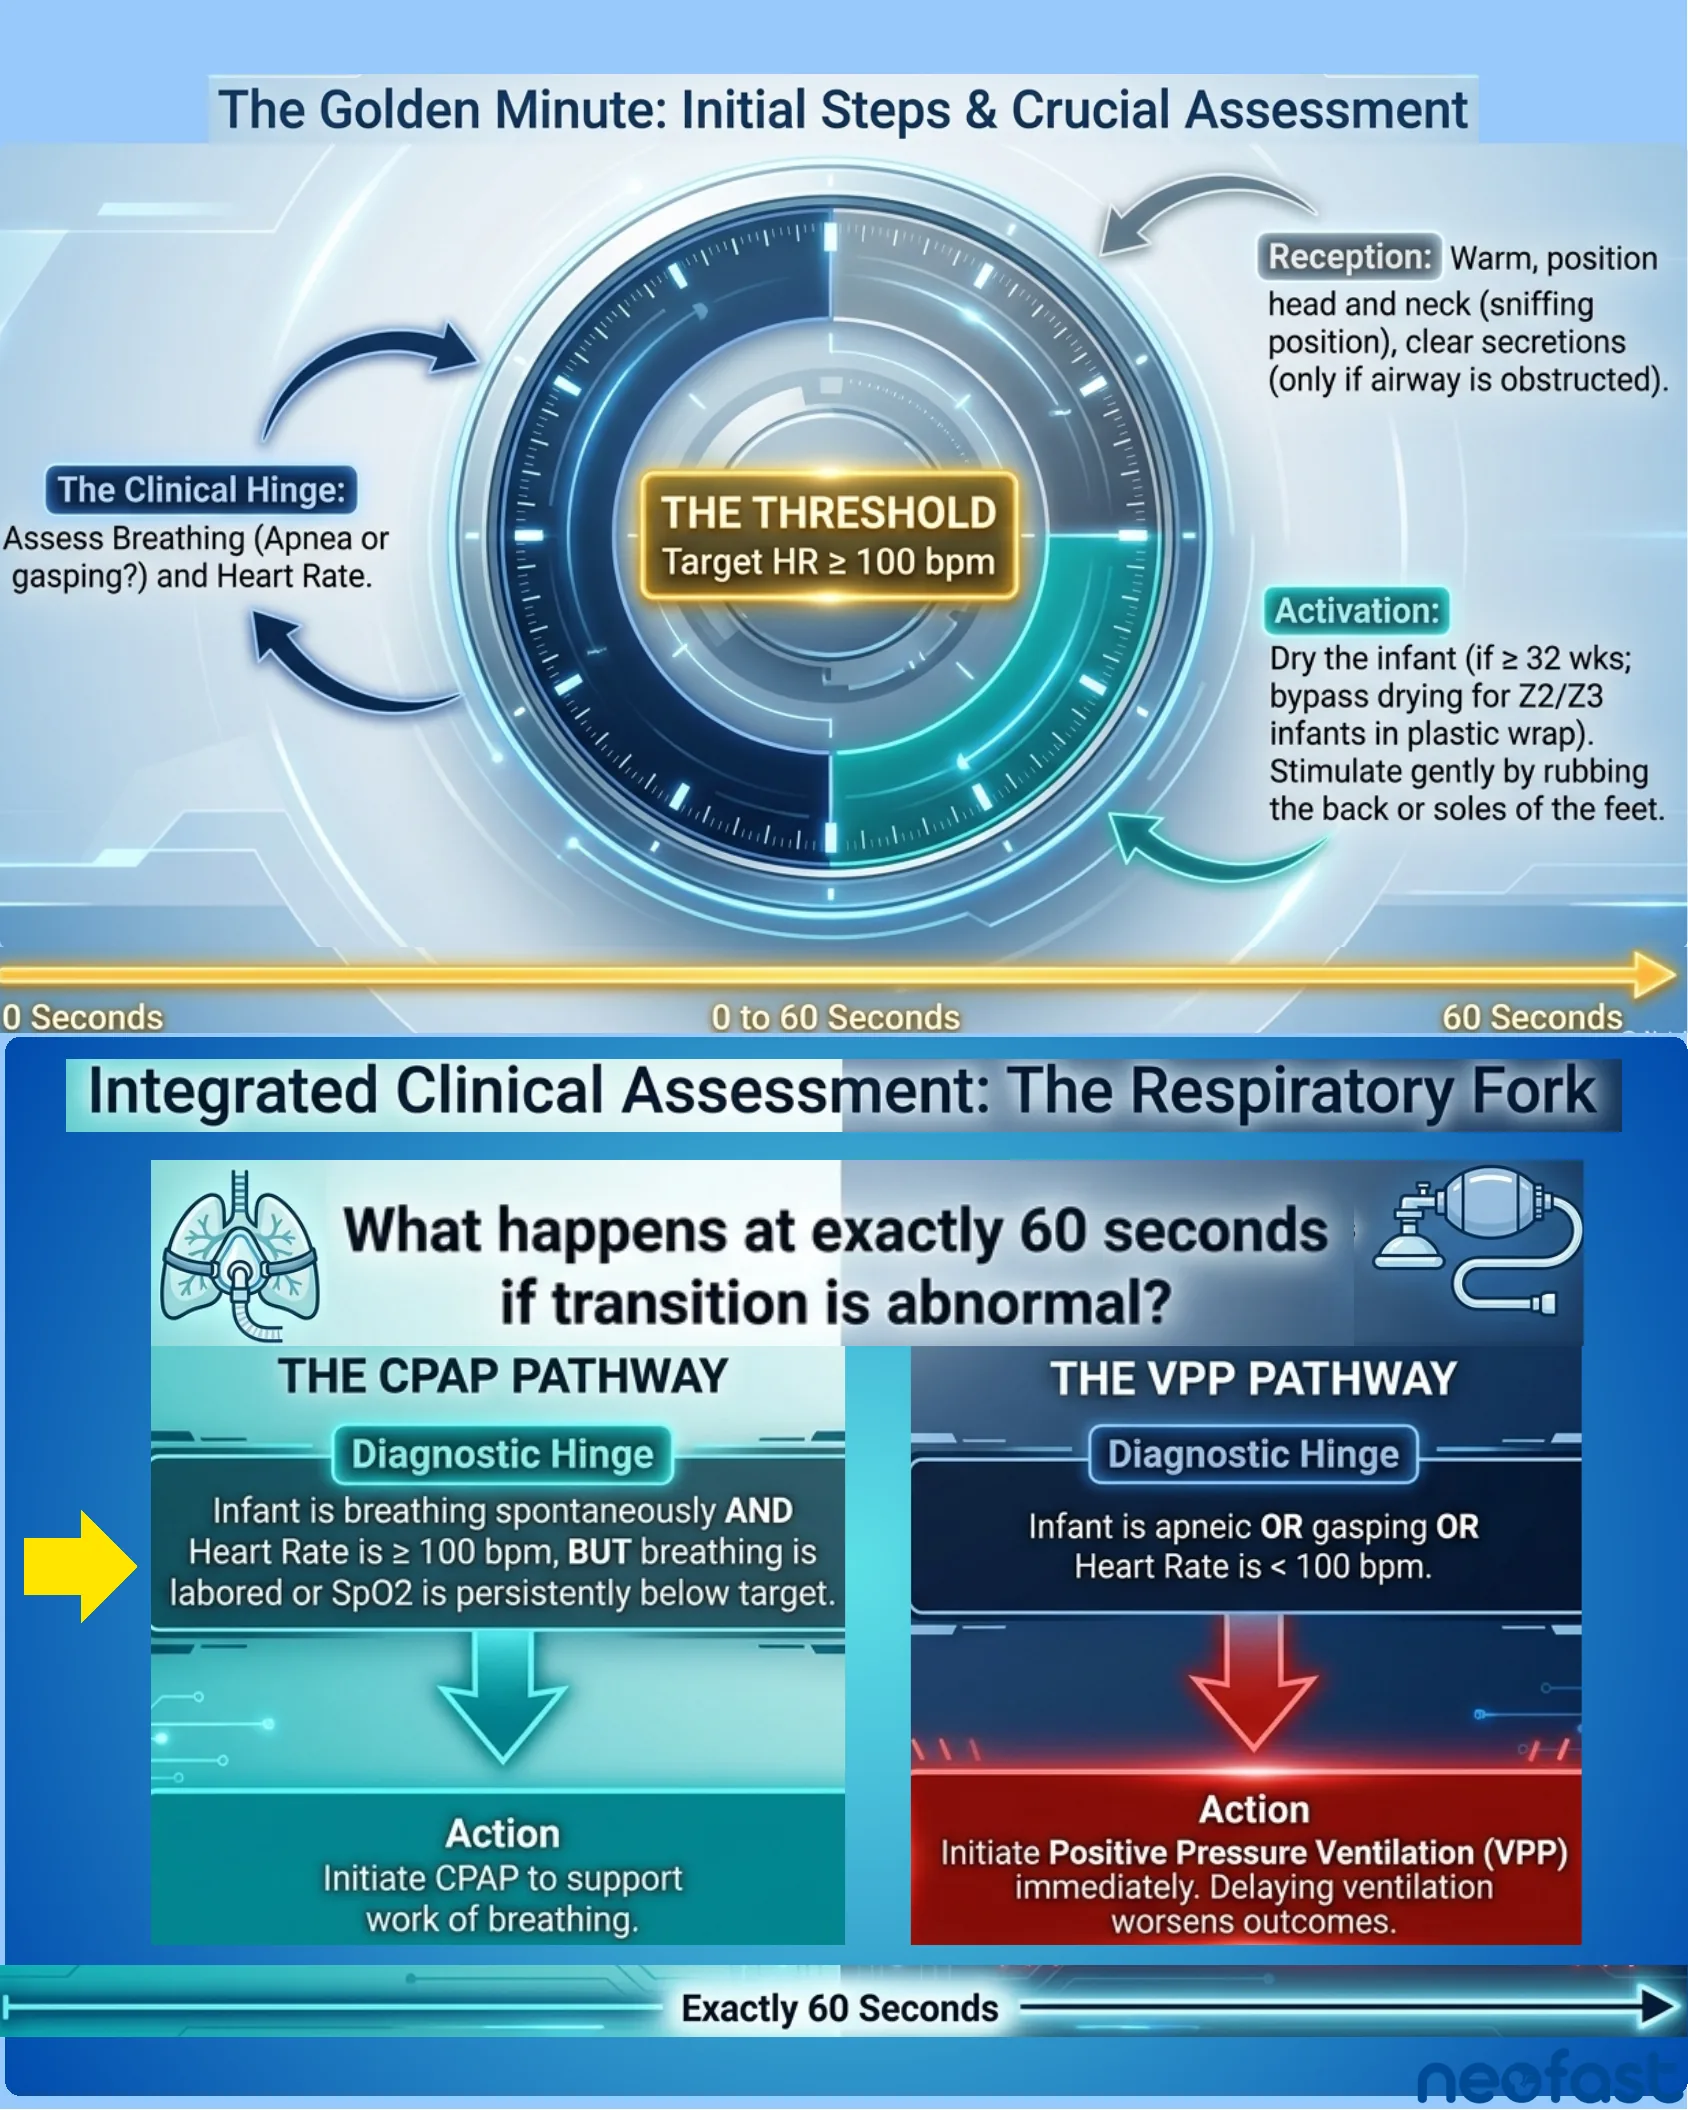
The Golden Minute: Initial Steps & Crucial Assessment
- Reception: Warm, position head and neck (sniffing position), clear secretions (only if airway is obstructed).
- Activation: Dry the infant (if ≥ 32 wks; bypass drying for Z2/Z3 infants in plastic wrap). Stimulate gently by rubbing the back or soles of the feet.
- The Clinical Hinge: Assess Breathing (Apnea or gasping?) and Heart Rate.
- THE THRESHOLD: Target HR ≥ 100 bpm.
Timeline: 0 Seconds — 0 to 60 Seconds — 60 Seconds
Integrated Clinical Assessment: The Respiratory Fork
What happens at exactly 60 seconds if transition is abnormal?
THE CPAP PATHWAY
Diagnostic Hinge: Infant is breathing spontaneously AND Heart Rate is ≥ 100 bpm, BUT breathing is labored or SpO2 is persistently below target.
Action: Initiate CPAP to support work of breathing.
THE VPP PATHWAY
Diagnostic Hinge: Infant is apneic OR gasping OR Heart Rate is < 100 bpm.
Action: Initiate Positive Pressure Ventilation (VPP) immediately. Delaying ventilation worsens outcomes.
Timeline: Exactly 60 Seconds
Supporting Labored Breathing (HR > 100 bpm)
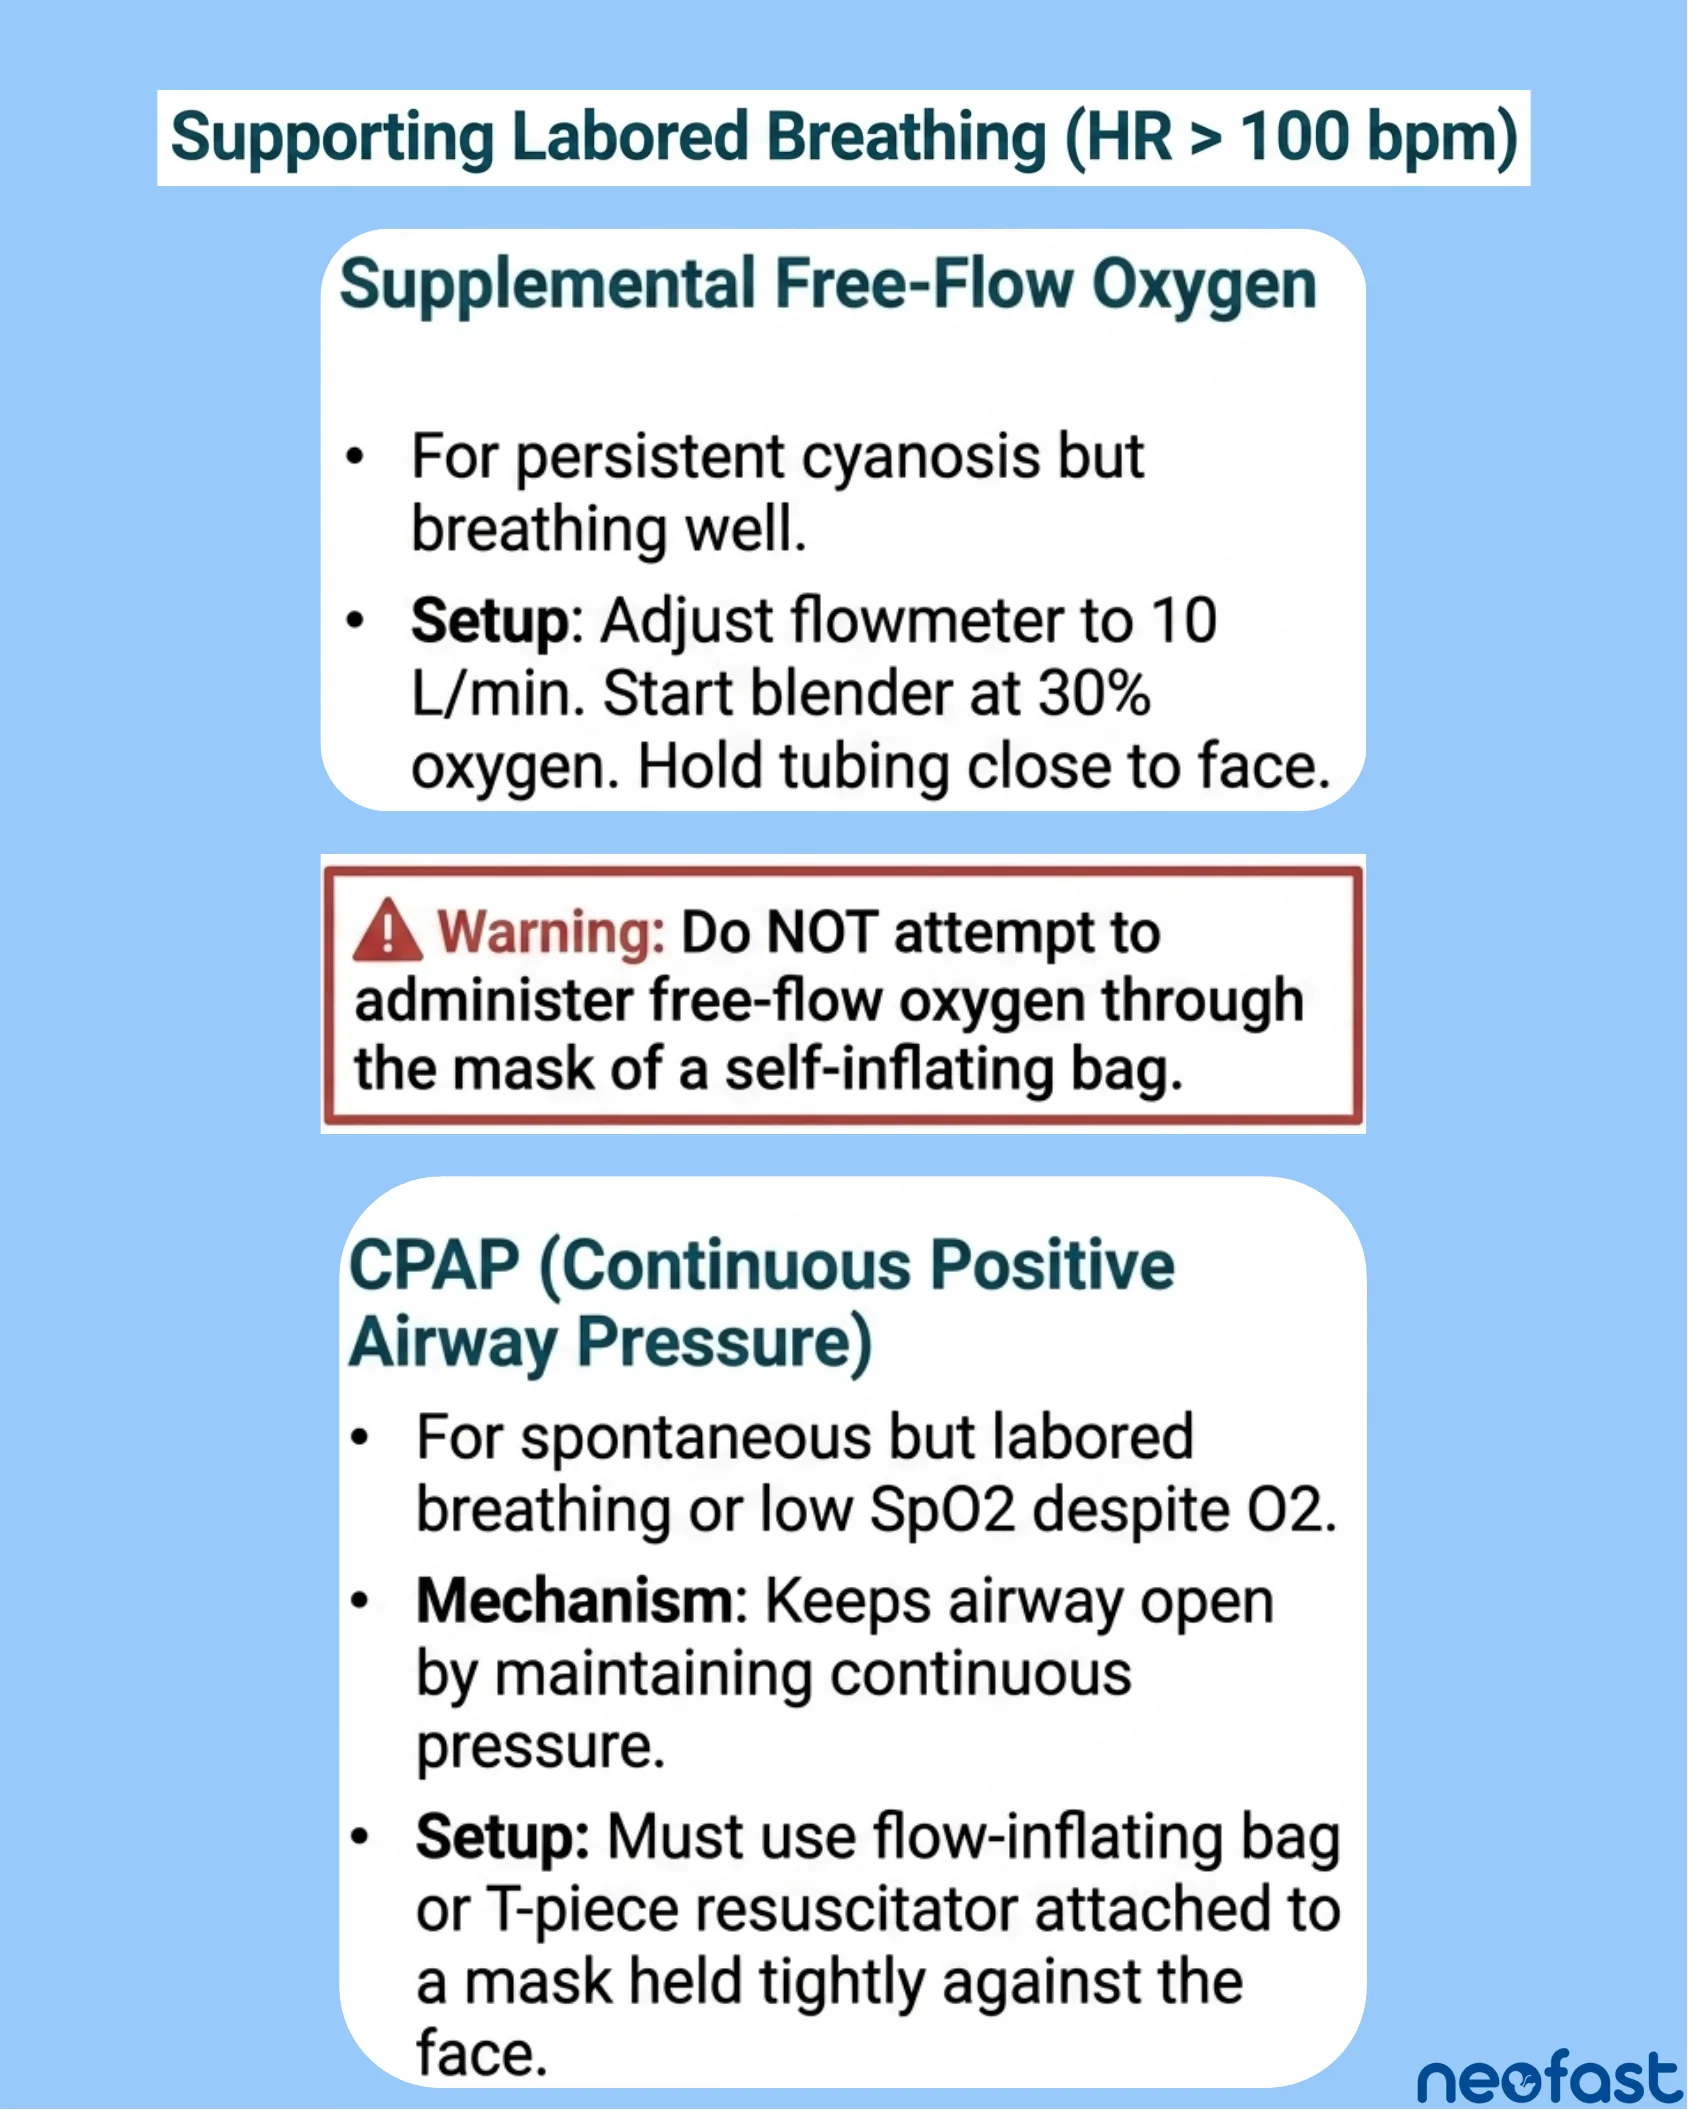
Supporting Labored Breathing (HR > 100 bpm)
Supplemental Free-Flow Oxygen
- For persistent cyanosis but breathing well.
- Setup: Adjust flowmeter to 10 L/min. Start blender at 30% oxygen. Hold tubing close to face.
Warning: Do NOT attempt to administer free-flow oxygen through the mask of a self-inflating bag.
CPAP (Continuous Positive Airway Pressure)
- For spontaneous but labored breathing or low SpO2 despite O2.
- Mechanism: Keeps airway open by maintaining continuous pressure.
- Setup: Must use flow-inflating bag or T-piece resuscitator attached to a mask held tightly against the face.
Non-Invasive Support: CPAP Protocol & Mechanics
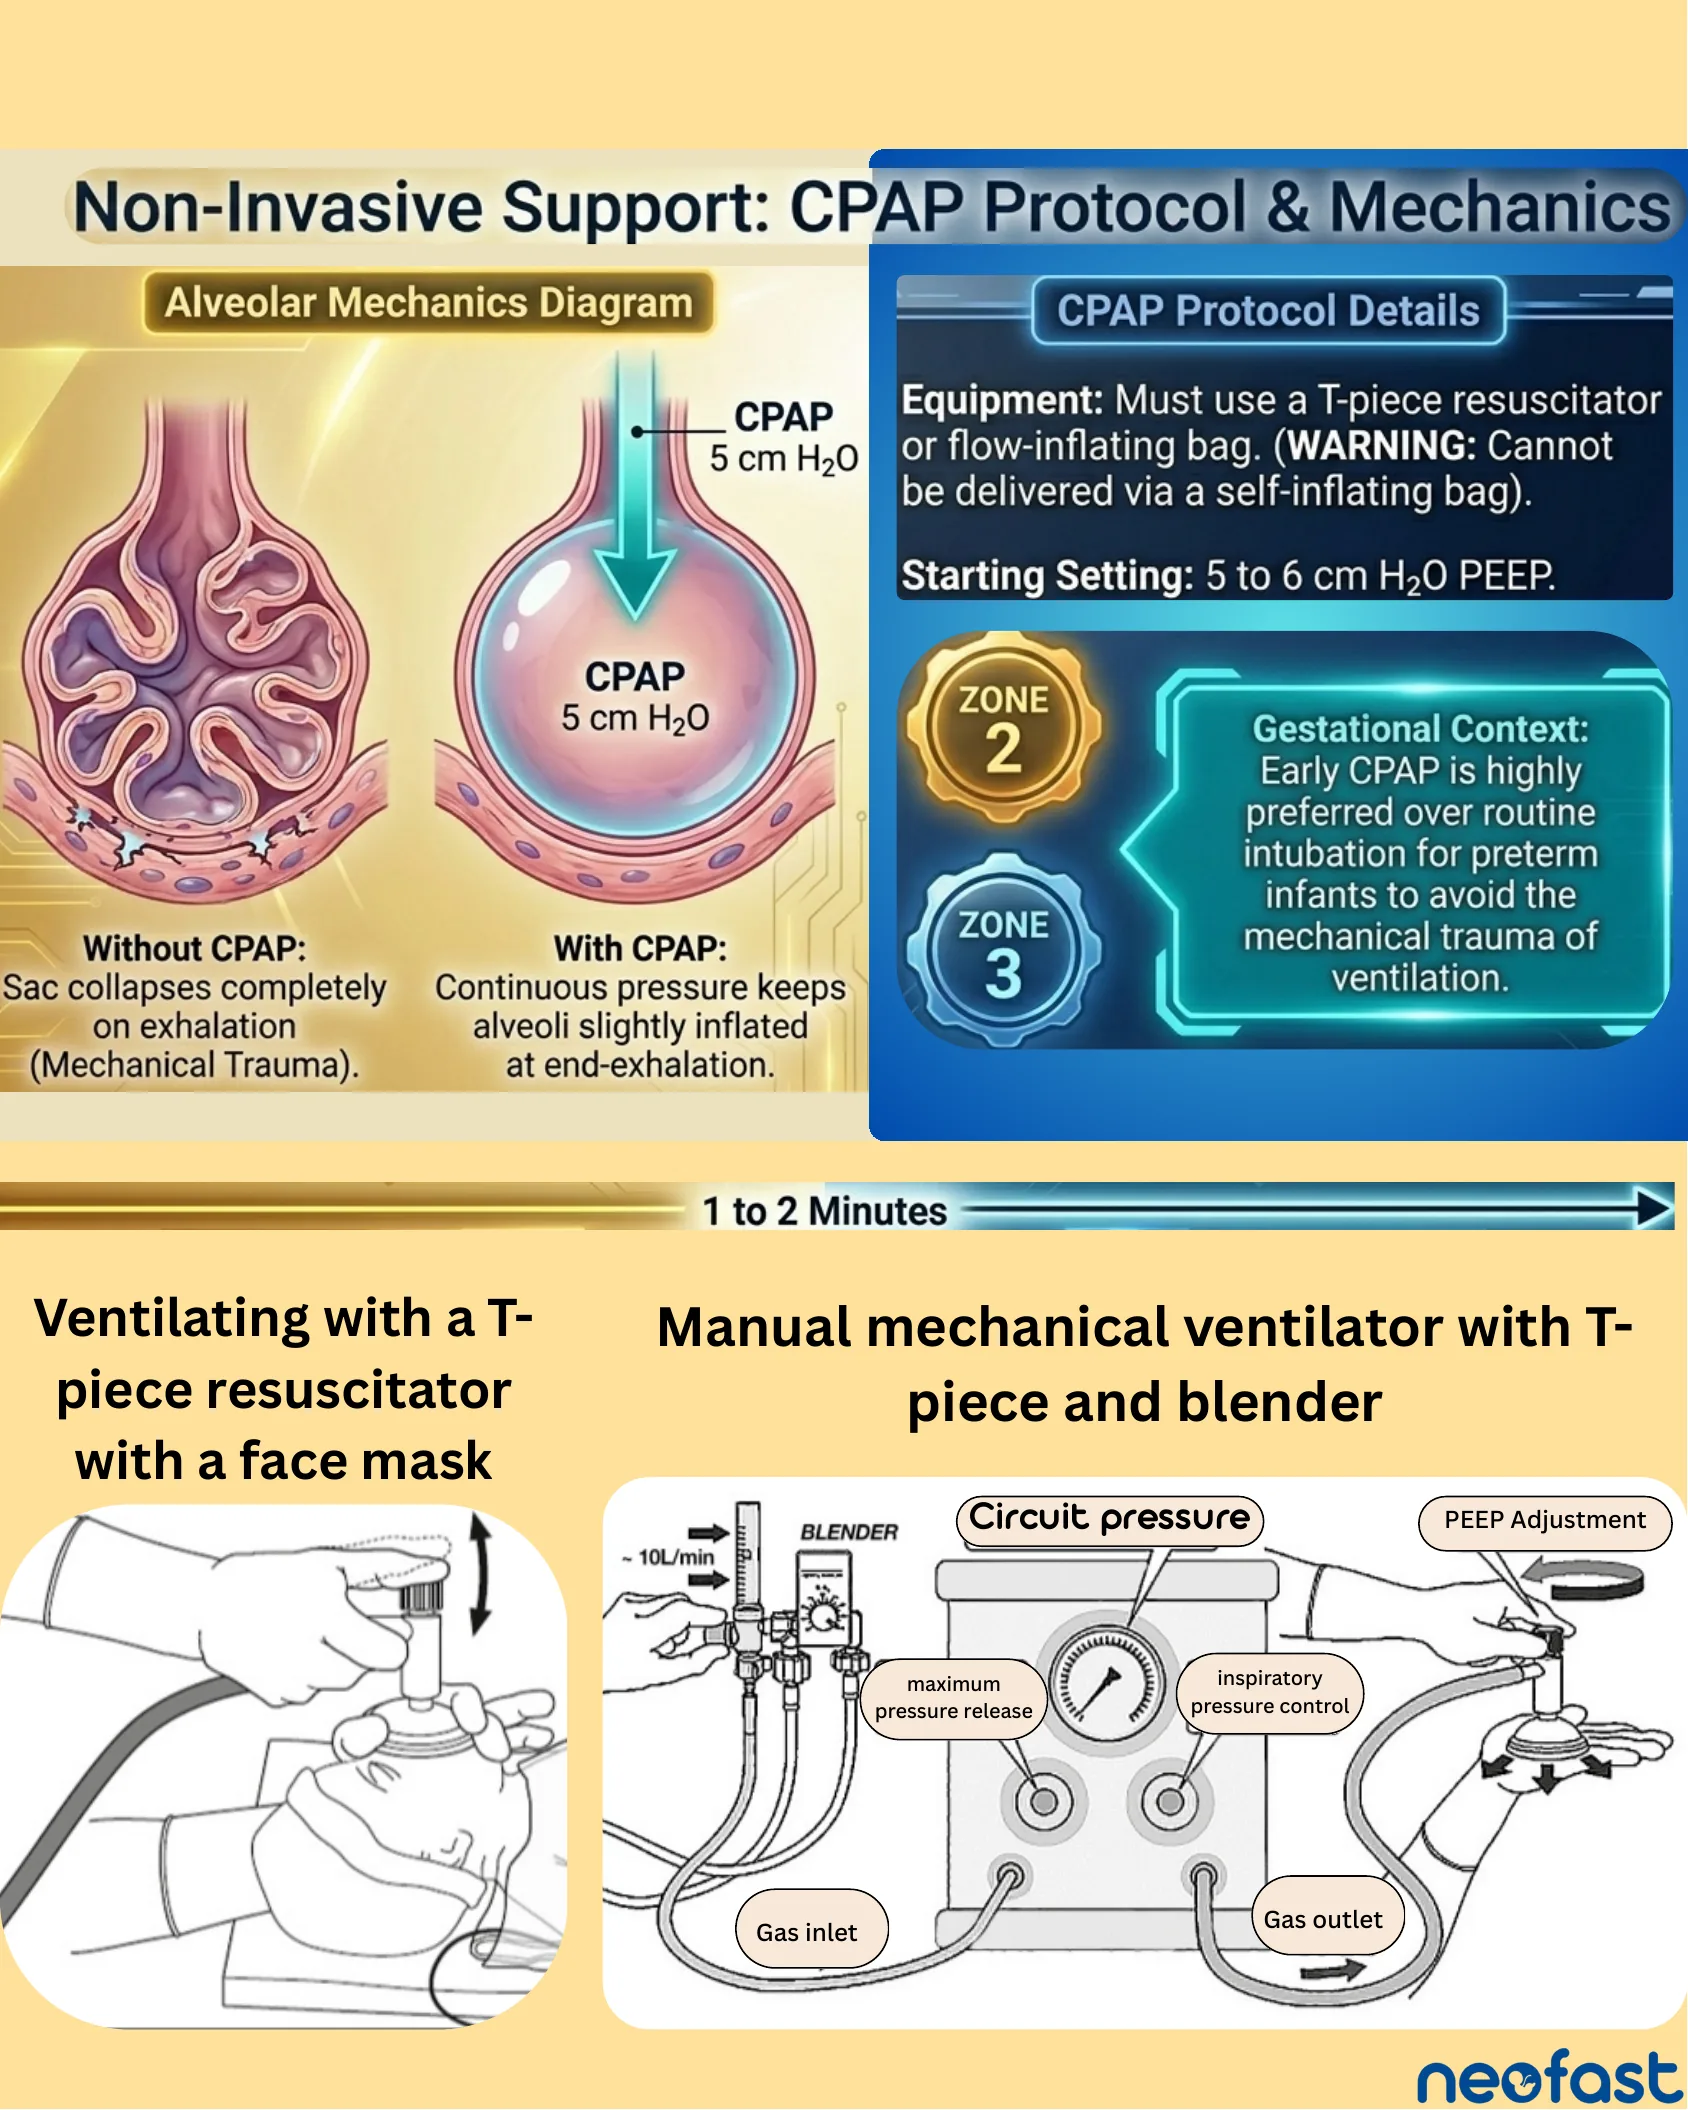
Non-Invasive Support: CPAP Protocol & Mechanics
Alveolar Mechanics Diagram
- Without CPAP: Sac collapses completely on exhalation (Mechanical Trauma).
- With CPAP (5 cm H2O): Continuous pressure keeps alveoli slightly inflated at end-exhalation.
CPAP Protocol Details
- Equipment: Must use a T-piece resuscitator or flow-inflating bag. (WARNING: Cannot be delivered via a self-inflating bag).
- Starting Setting: 5 to 6 cm H2O PEEP.
ZONE 2 / ZONE 3 Gestational Context: Early CPAP is highly preferred over routine intubation for preterm infants to avoid the mechanical trauma of ventilation.
Timeline: 1 to 2 Minutes
- Ventilating with a T-piece resuscitator with a face mask.
- Manual mechanical ventilator with T-piece and blender: Blender (~10L/min), Circuit pressure, maximum pressure release, inspiratory pressure control, PEEP Adjustment, Gas inlet, Gas outlet.
Positive Pressure Ventilation: Cadence & Parameters
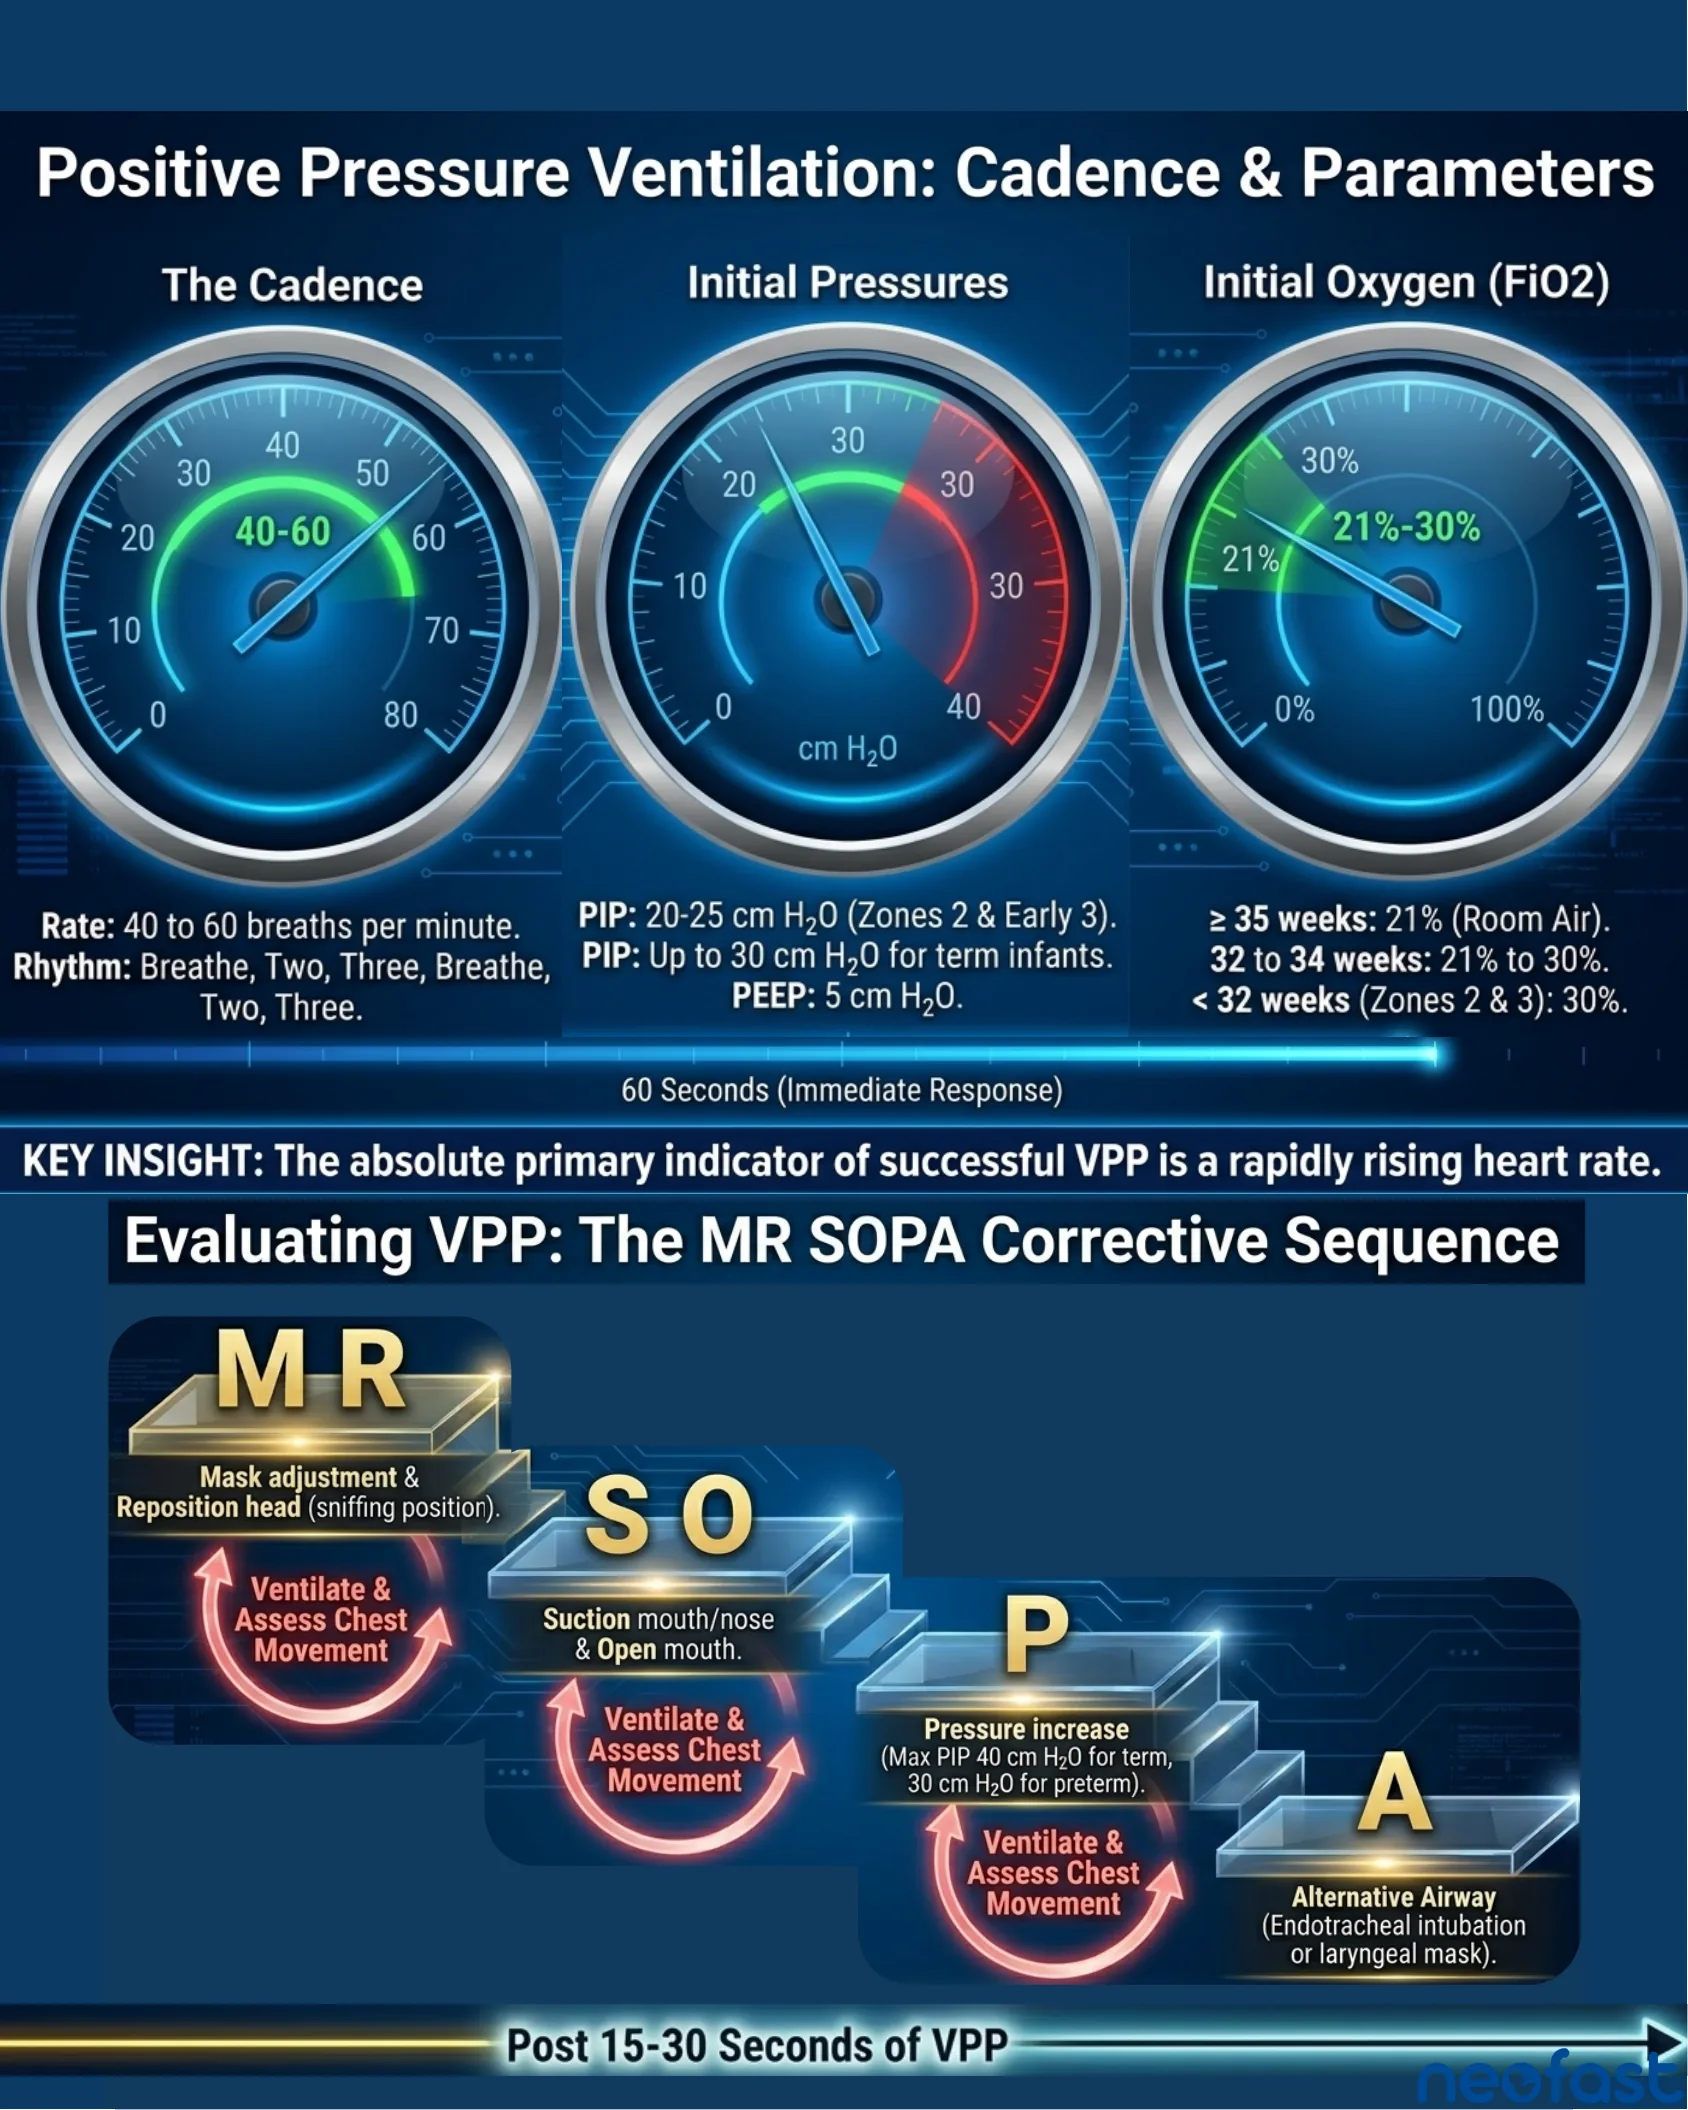
Positive Pressure Ventilation: Cadence & Parameters
The Cadence
- Rate: 40 to 60 breaths per minute.
- Rhythm: Breathe, Two, Three, Breathe, Two, Three.
Initial Pressures
- PIP: 20-25 cm H2O (Zones 2 & Early 3).
- PIP: Up to 30 cm H2O for term infants.
- PEEP: 5 cm H2O.
Initial Oxygen (FiO2)
- ≥ 35 weeks: 21% (Room Air).
- 32 to 34 weeks: 21% to 30%.
- < 32 weeks (Zones 2 & 3): 30%.
Timeline: 60 Seconds (Immediate Response)
KEY INSIGHT: The absolute primary indicator of successful VPP is a rapidly rising heart rate.
Evaluating VPP: The MR SOPA Corrective Sequence
- M – Mask adjustment & R – Reposition head (sniffing position). → Ventilate & Assess Chest Movement
- S – Suction mouth/nose & O – Open mouth. → Ventilate & Assess Chest Movement
- P – Pressure increase (Max PIP 40 cm H2O for term, 30 cm H2O for preterm). → Ventilate & Assess Chest Movement
- A – Alternative Airway (Endotracheal intubation or laryngeal mask).
Timeline: Post 15-30 Seconds of VPP
The 60-Second Assessment Gate
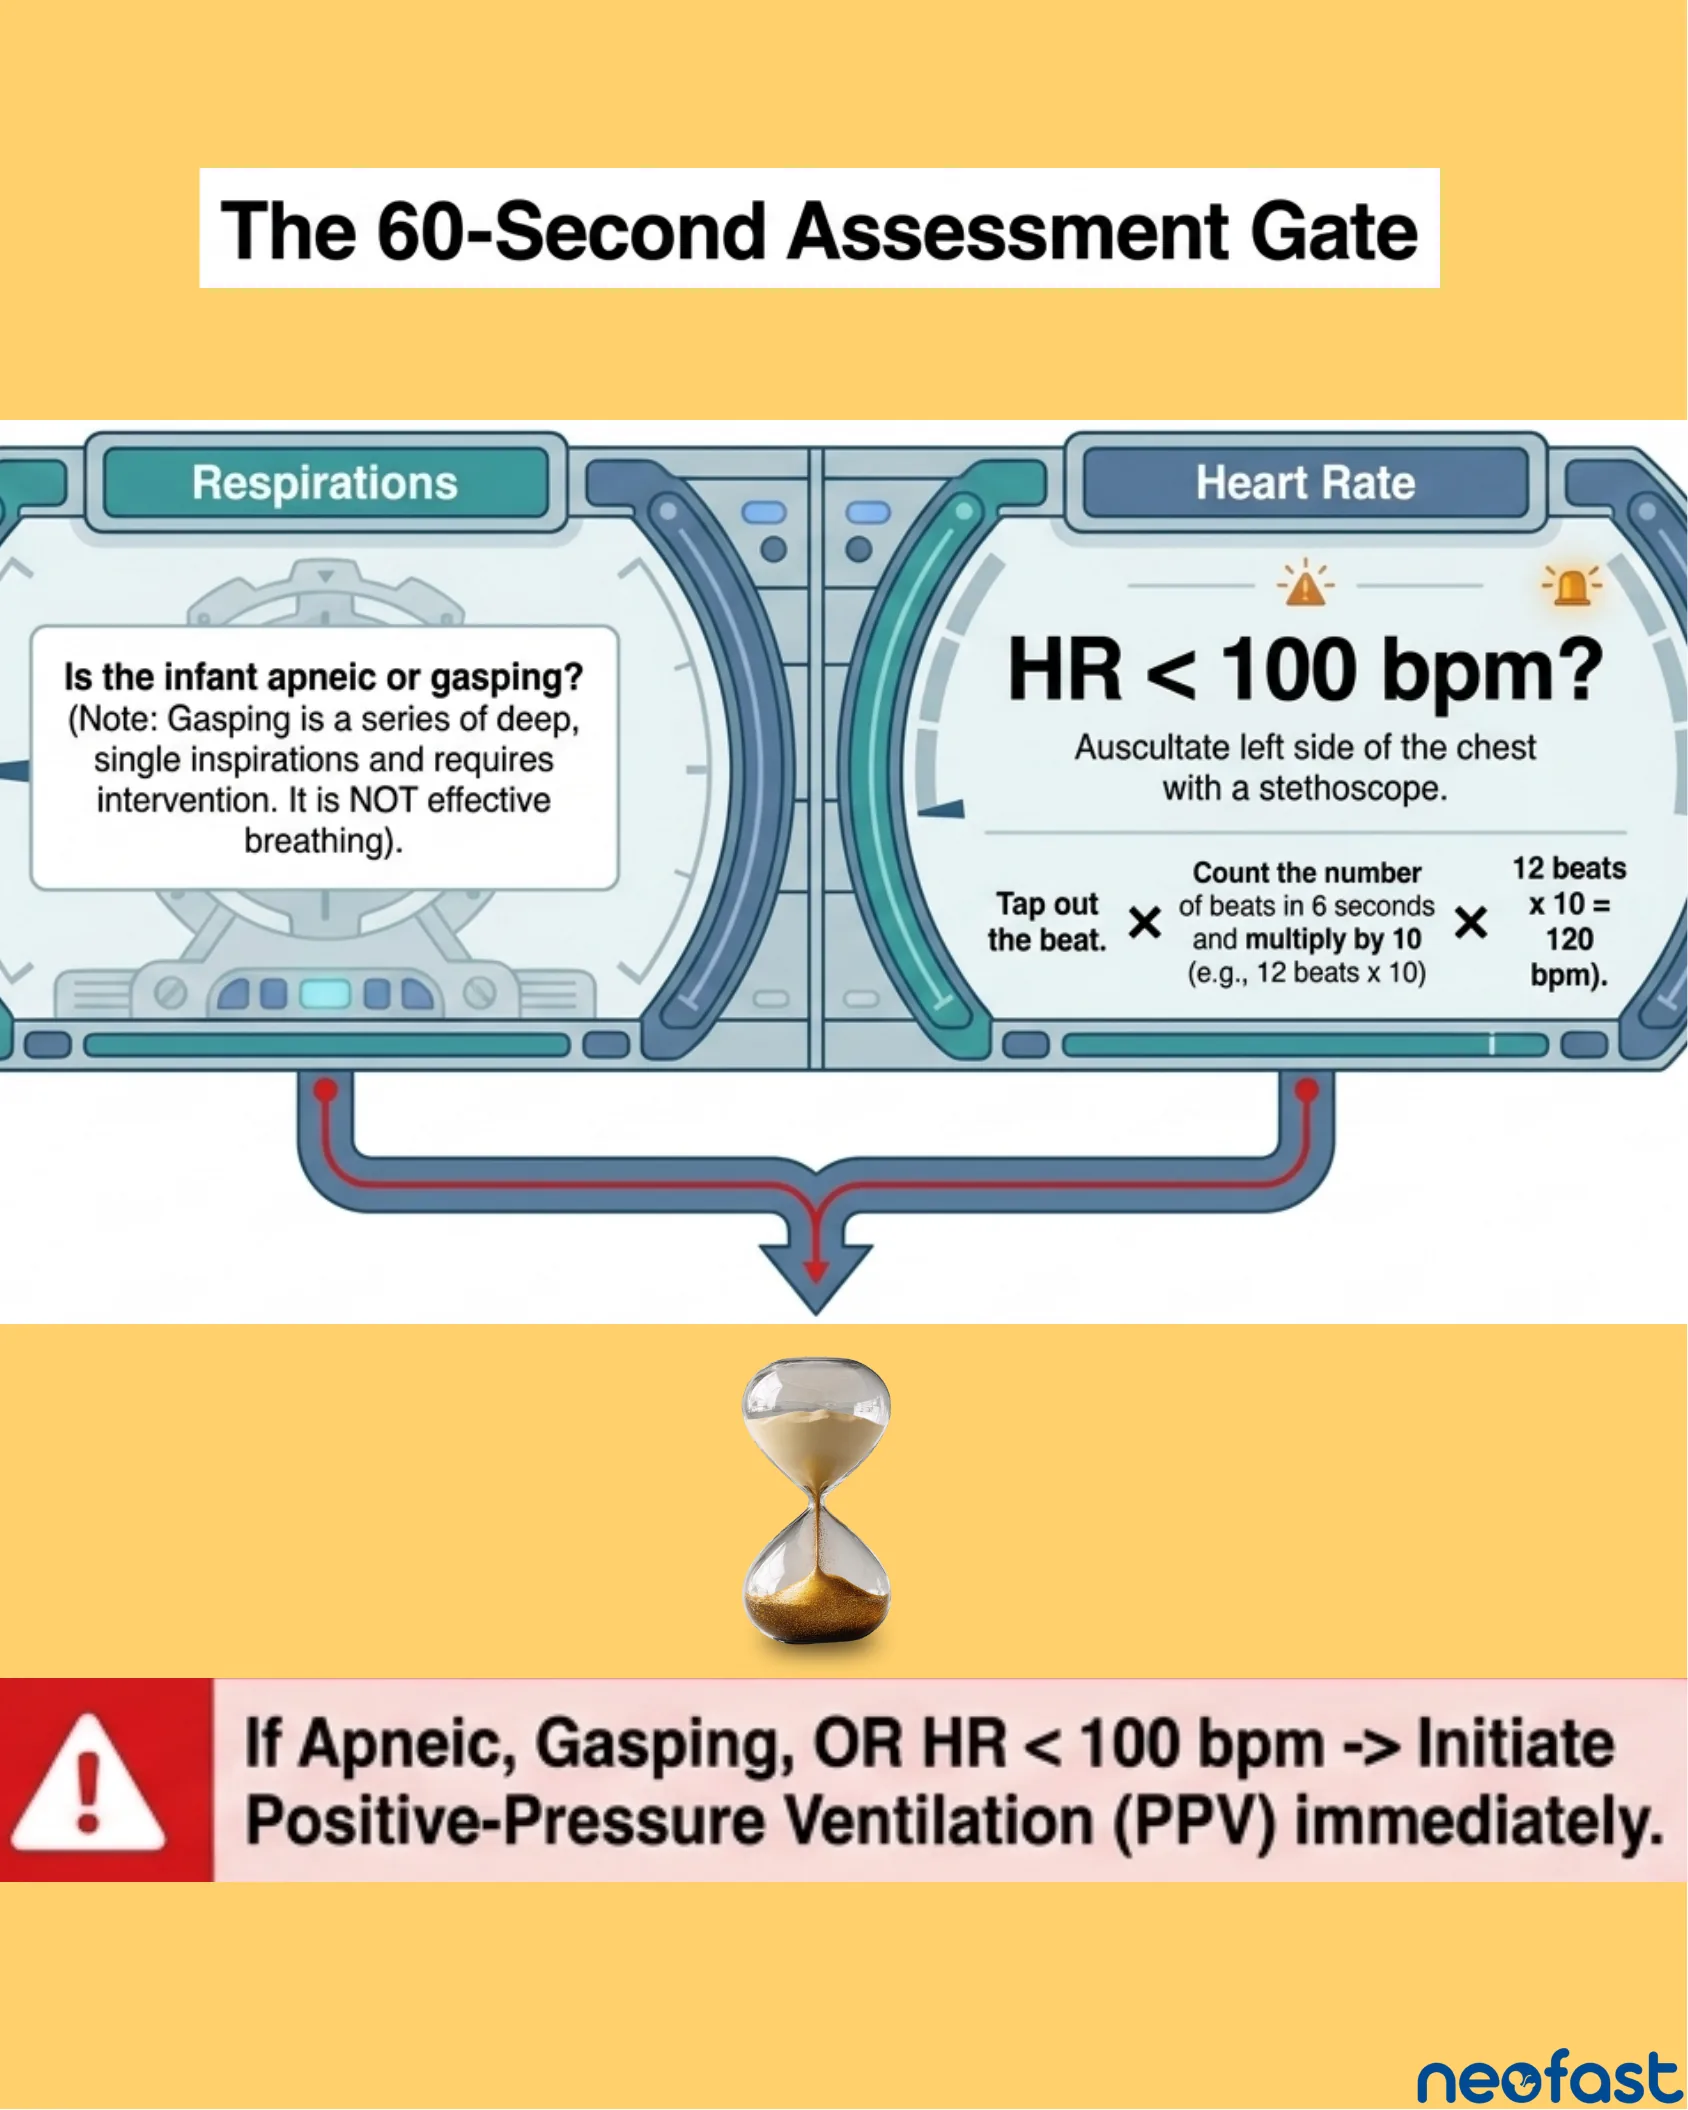
The 60-Second Assessment Gate
Respirations
Is the infant apneic or gasping? (Note: Gasping is a series of deep, single inspirations and requires intervention. It is NOT effective breathing).
Heart Rate
HR < 100 bpm? Auscultate left side of the chest with a stethoscope.
- Tap out the beat.
- Count the number of beats in 6 seconds and multiply by 10 (e.g., 12 beats x 10).
- 12 beats x 10 = 120 bpm.
If Apneic, Gasping, OR HR < 100 bpm → Initiate Positive-Pressure Ventilation (PPV) immediately.
Alternative Airway: Endotracheal Intubation
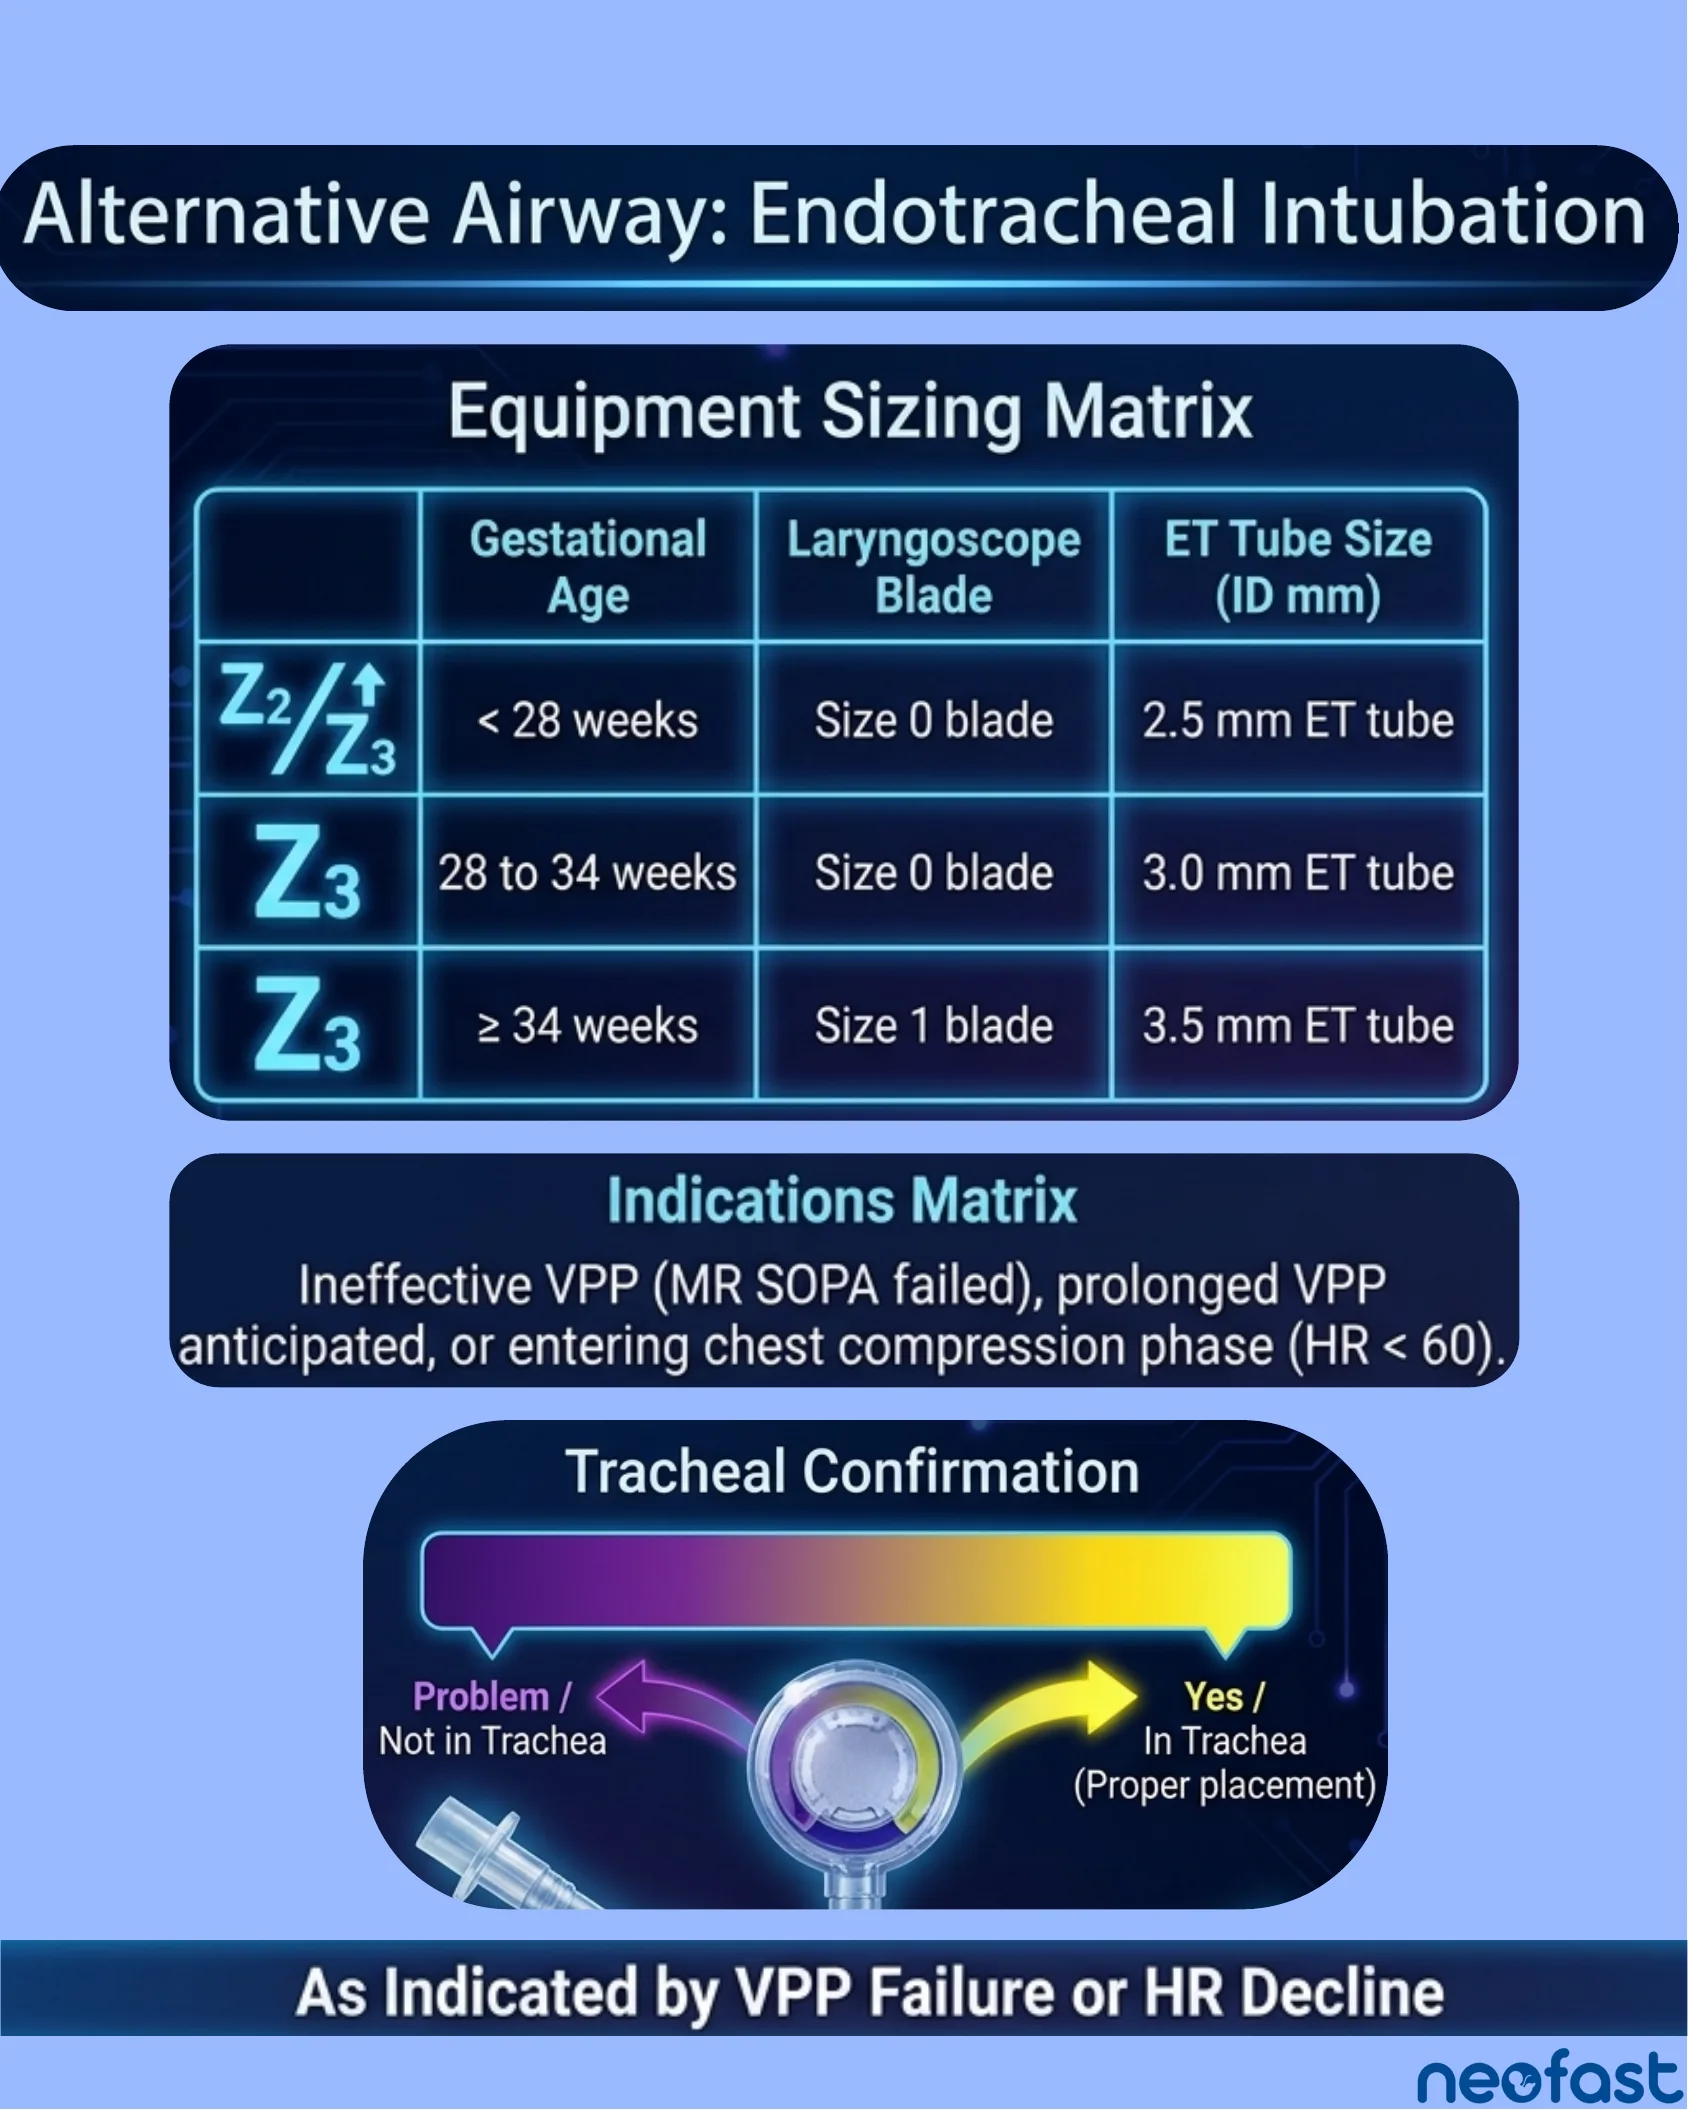
Equipment Sizing Matrix
| Gestational Age | Laryngoscope Blade | ET Tube Size (ID mm) | |
|---|---|---|---|
| Z2/Z3 | < 28 weeks | Size 0 blade | 2.5 mm ET tube |
| Z3 | 28 to 34 weeks | Size 0 blade | 3.0 mm ET tube |
| Z3 | ≥ 34 weeks | Size 1 blade | 3.5 mm ET tube |
Indications Matrix
Ineffective VPP (MR SOPA failed), prolonged VPP anticipated, or entering chest compression phase (HR < 60).
Tracheal Confirmation
- Problem / Not in Trachea (indicated by color change direction)
- Yes / In Trachea (Proper placement) (indicated by color change direction)
As Indicated by VPP Failure or HR Decline
Surfactant Therapy: Mechanics & Administration
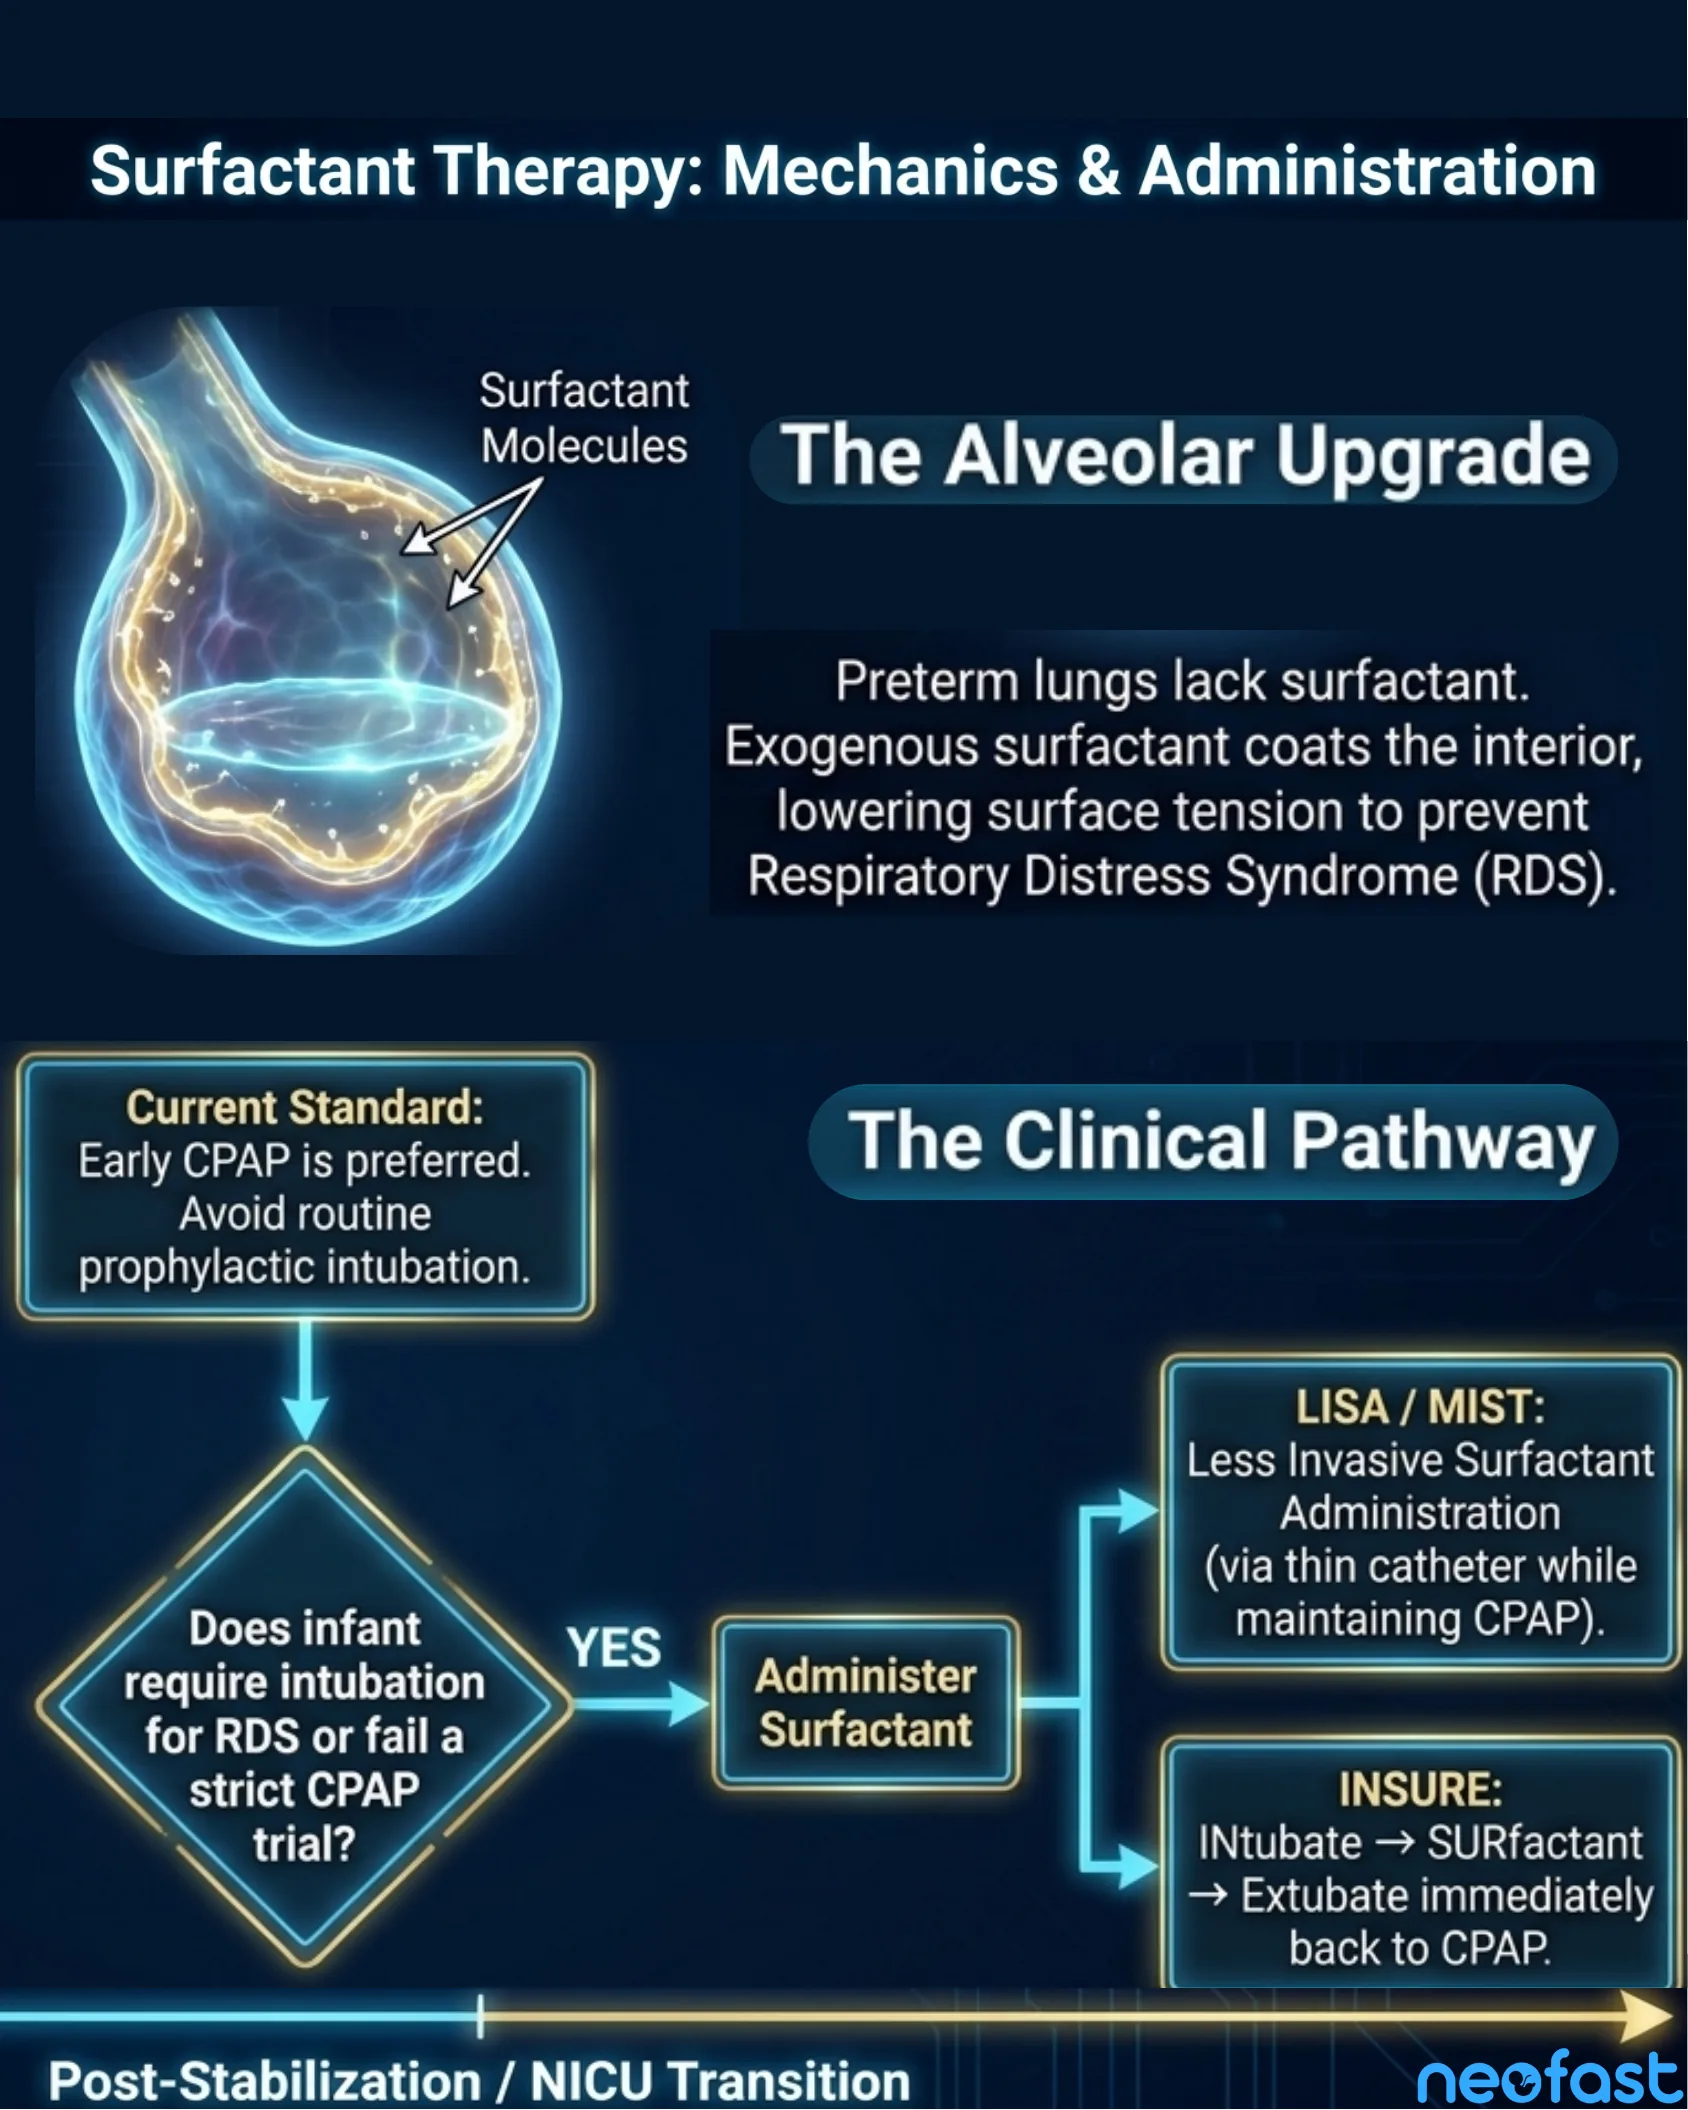
The Alveolar Upgrade
Preterm lungs lack surfactant. Exogenous surfactant coats the interior, lowering surface tension to prevent Respiratory Distress Syndrome (RDS).
The Clinical Pathway
Current Standard: Early CPAP is preferred. Avoid routine prophylactic intubation.
- Does infant require intubation for RDS or fail a strict CPAP trial?
- YES → Administer Surfactant
- LISA / MIST: Less Invasive Surfactant Administration (via thin catheter while maintaining CPAP).
- INSURE: INtubate → SURfactant → Extubate immediately back to CPAP.
- YES → Administer Surfactant
Post-Stabilization / NICU Transition
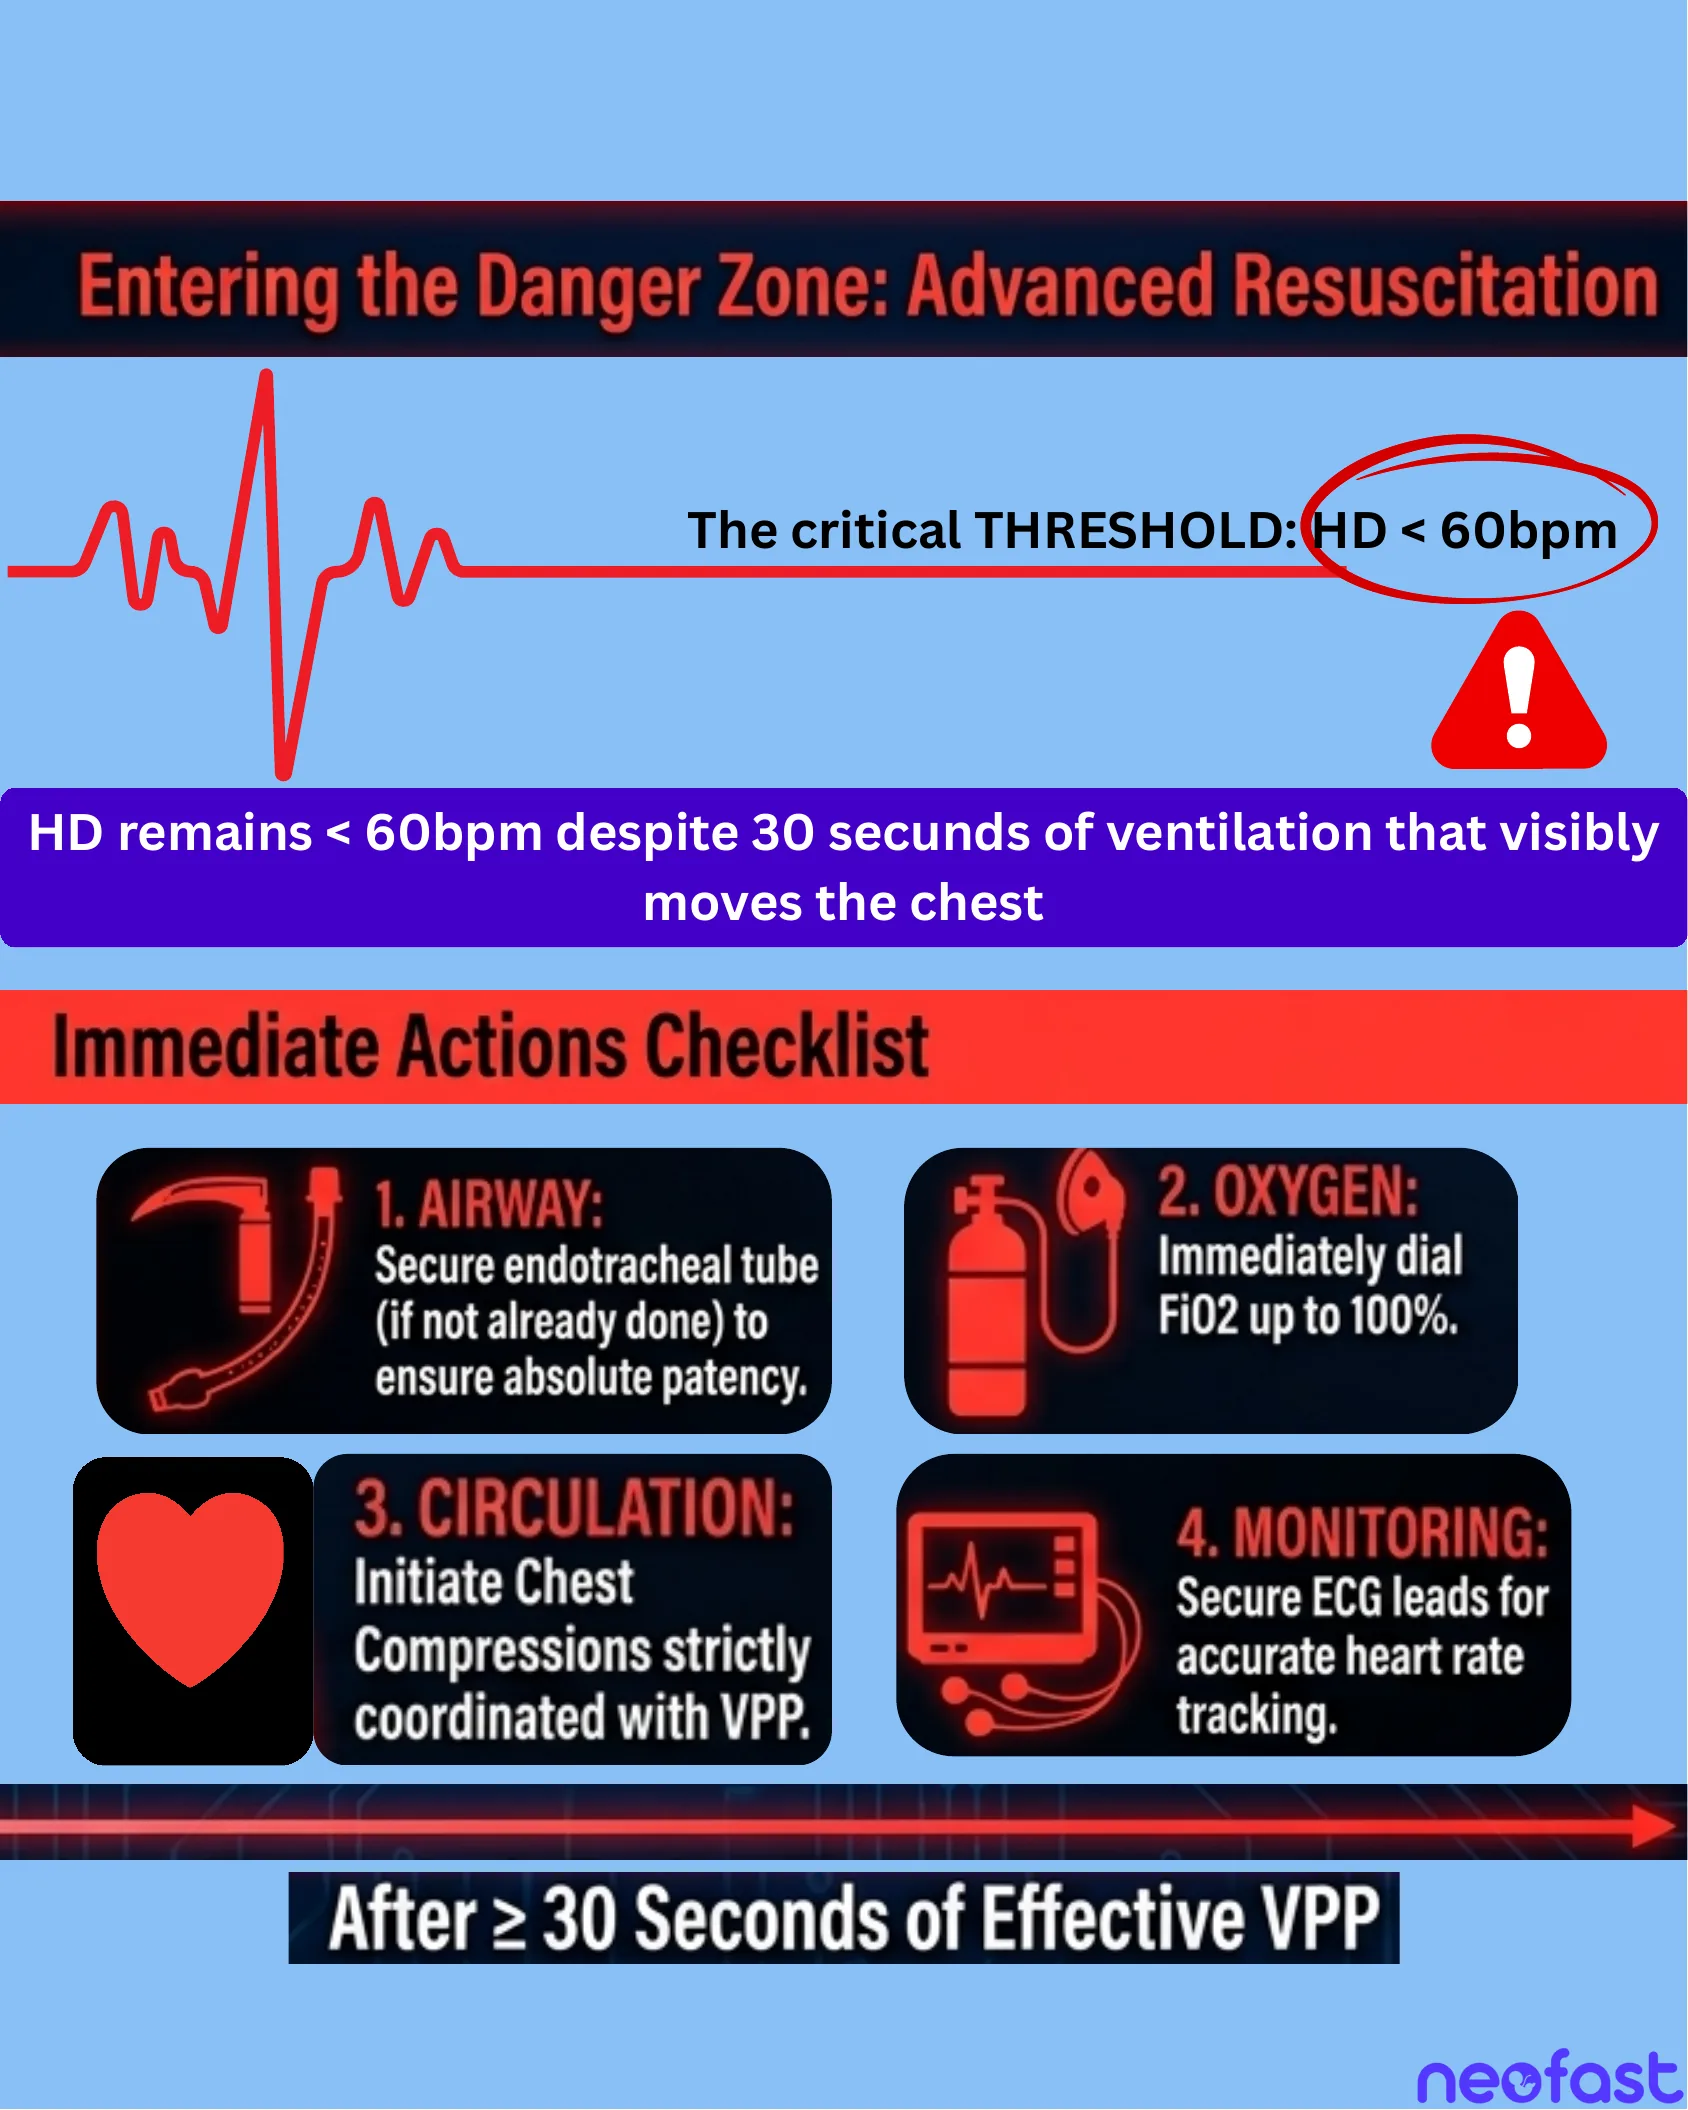
Entering the Danger Zone: Advanced Resuscitation
Entering the Danger Zone: Advanced Resuscitation
The critical THRESHOLD: HR < 60bpm
HR remains < 60bpm despite 30 seconds of ventilation that visibly moves the chest
Immediate Actions Checklist
- 1. AIRWAY: Secure endotracheal tube (if not already done) to ensure absolute patency.
- 2. OXYGEN: Immediately dial FiO2 up to 100%.
- 3. CIRCULATION: Initiate Chest Compressions strictly coordinated with VPP.
- 4. MONITORING: Secure ECG leads for accurate heart rate tracking.
After ≥ 30 Seconds of Effective VPP
Chest Compressions: The Two-Thumb Technique
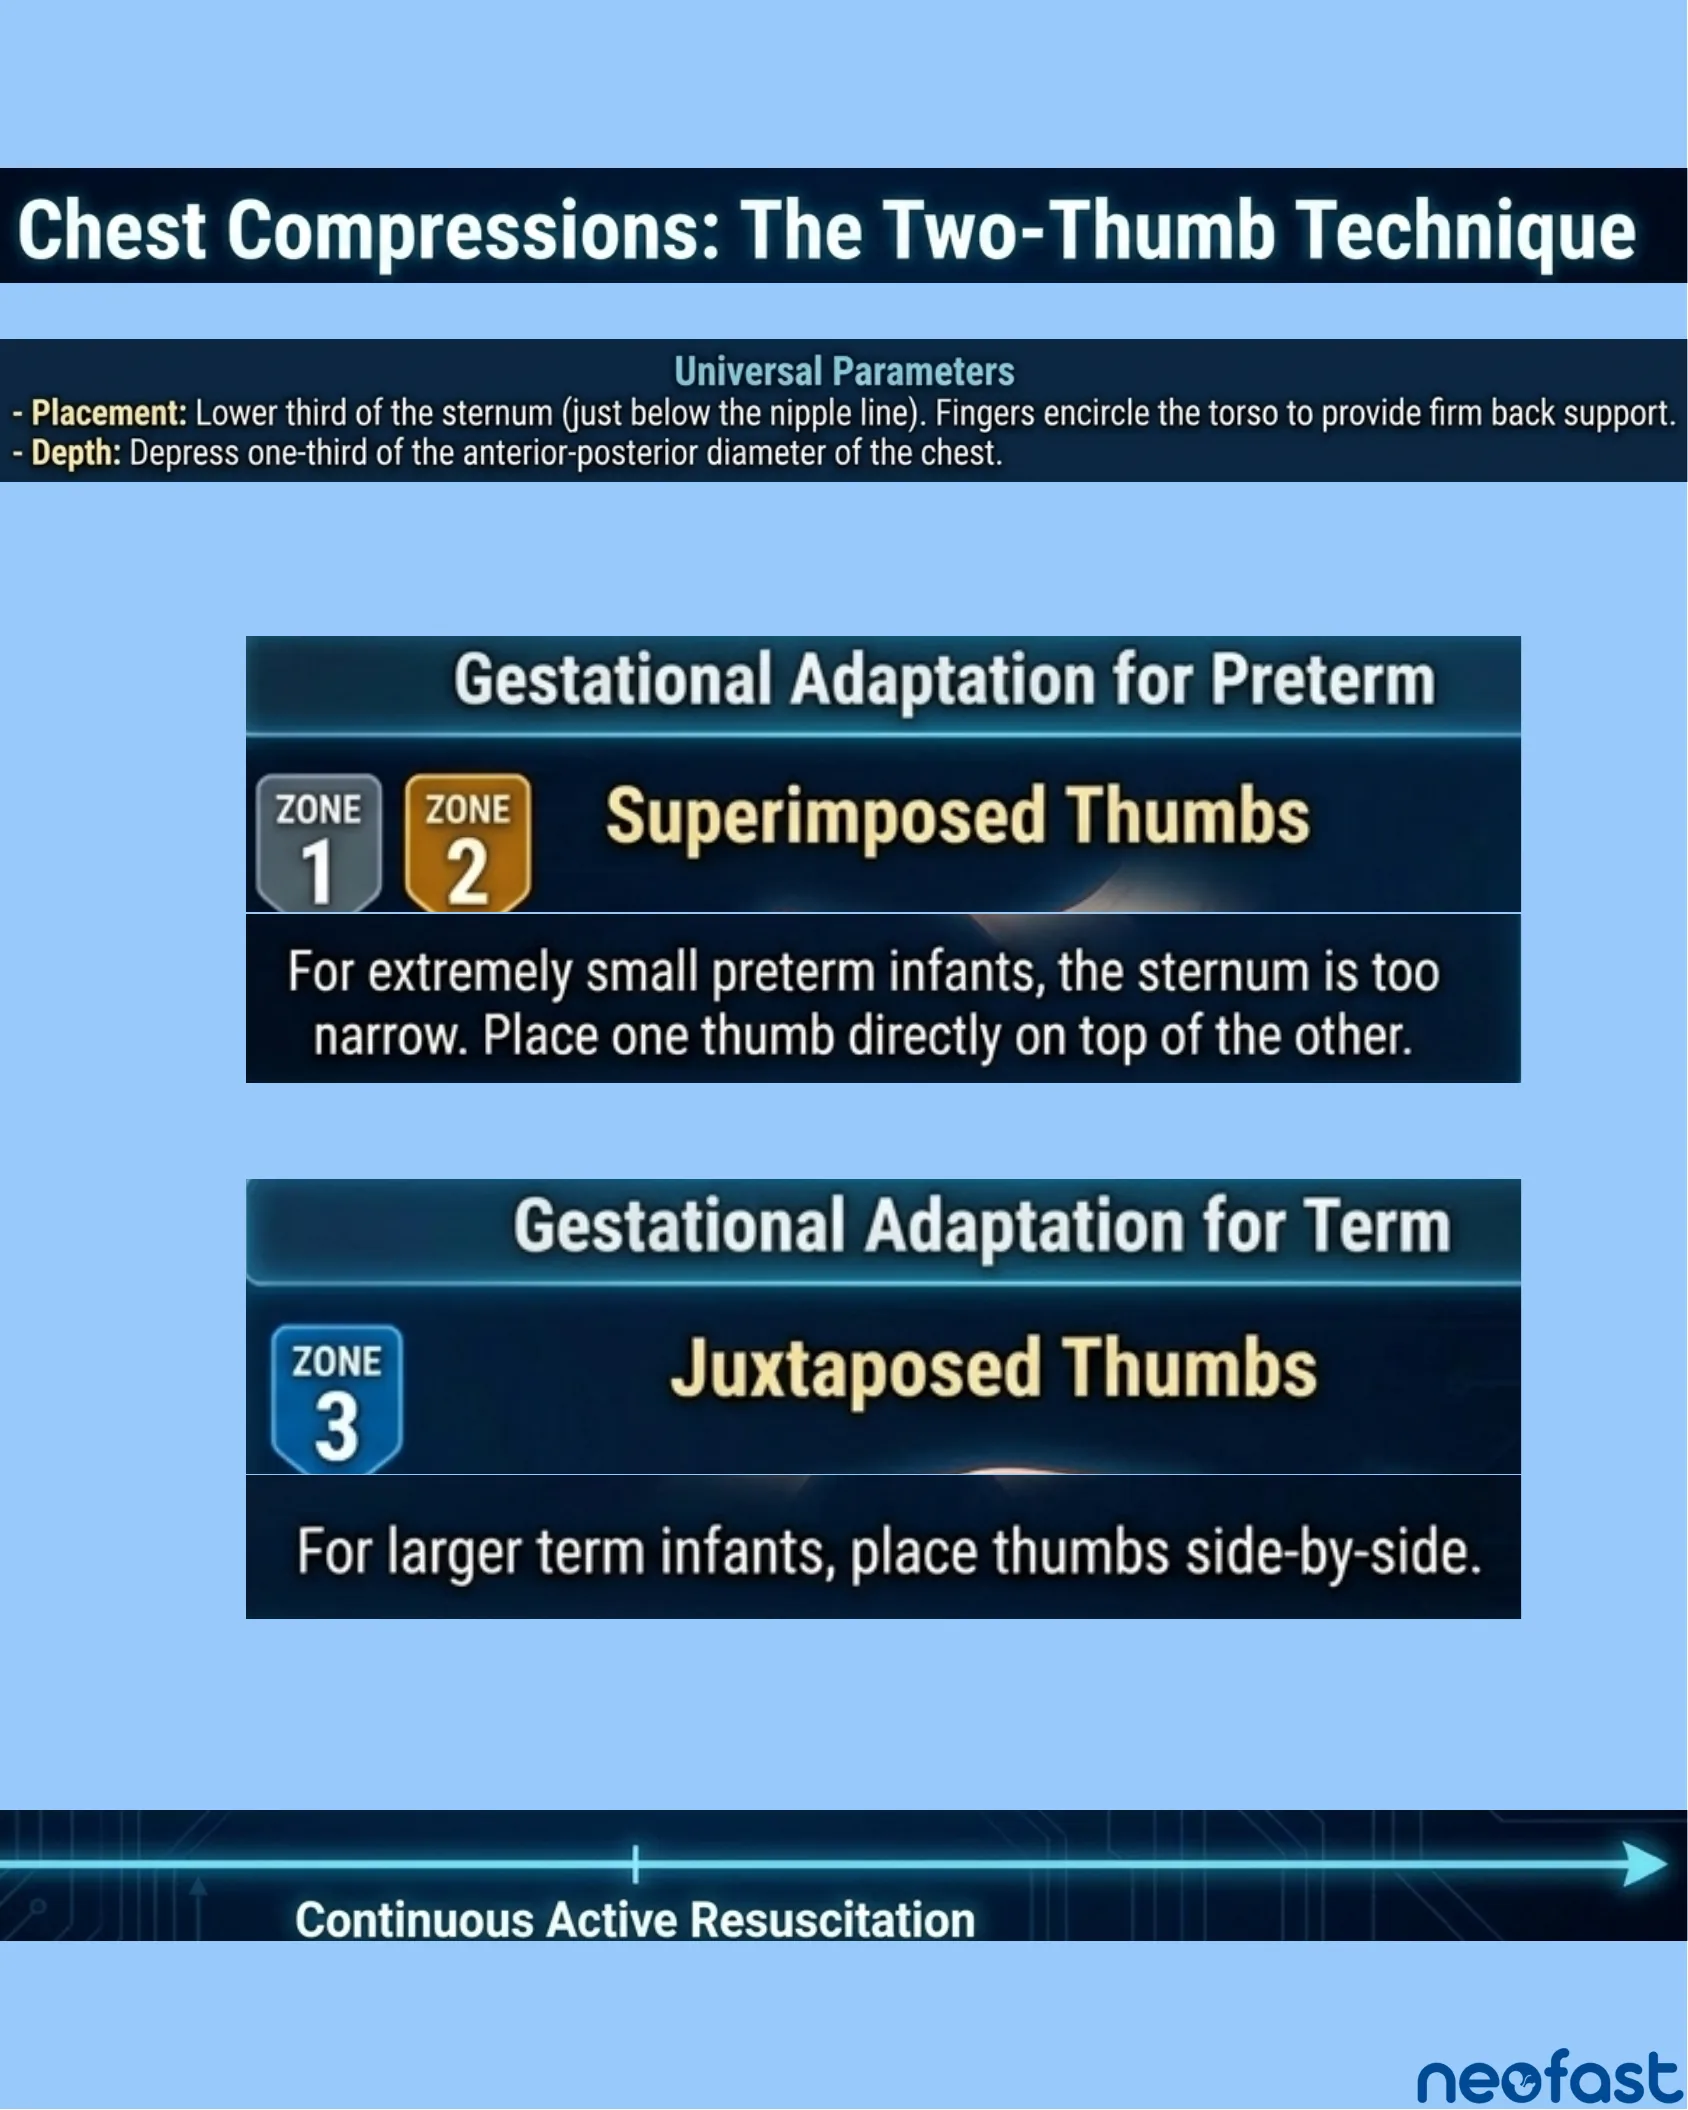
Universal Parameters
- Placement: Lower third of the sternum (just below the nipple line). Fingers encircle the torso to provide firm back support.
- Depth: Depress one-third of the anterior-posterior diameter of the chest.
Gestational Adaptation for Preterm
ZONE 1 / ZONE 2 — Superimposed Thumbs
For extremely small preterm infants, the sternum is too narrow. Place one thumb directly on top of the other.
Gestational Adaptation for Term
ZONE 3 — Juxtaposed Thumbs
For larger term infants, place thumbs side-by-side.
Continuous Active Resuscitation
Advanced Resuscitation: Rhythm & Cadence
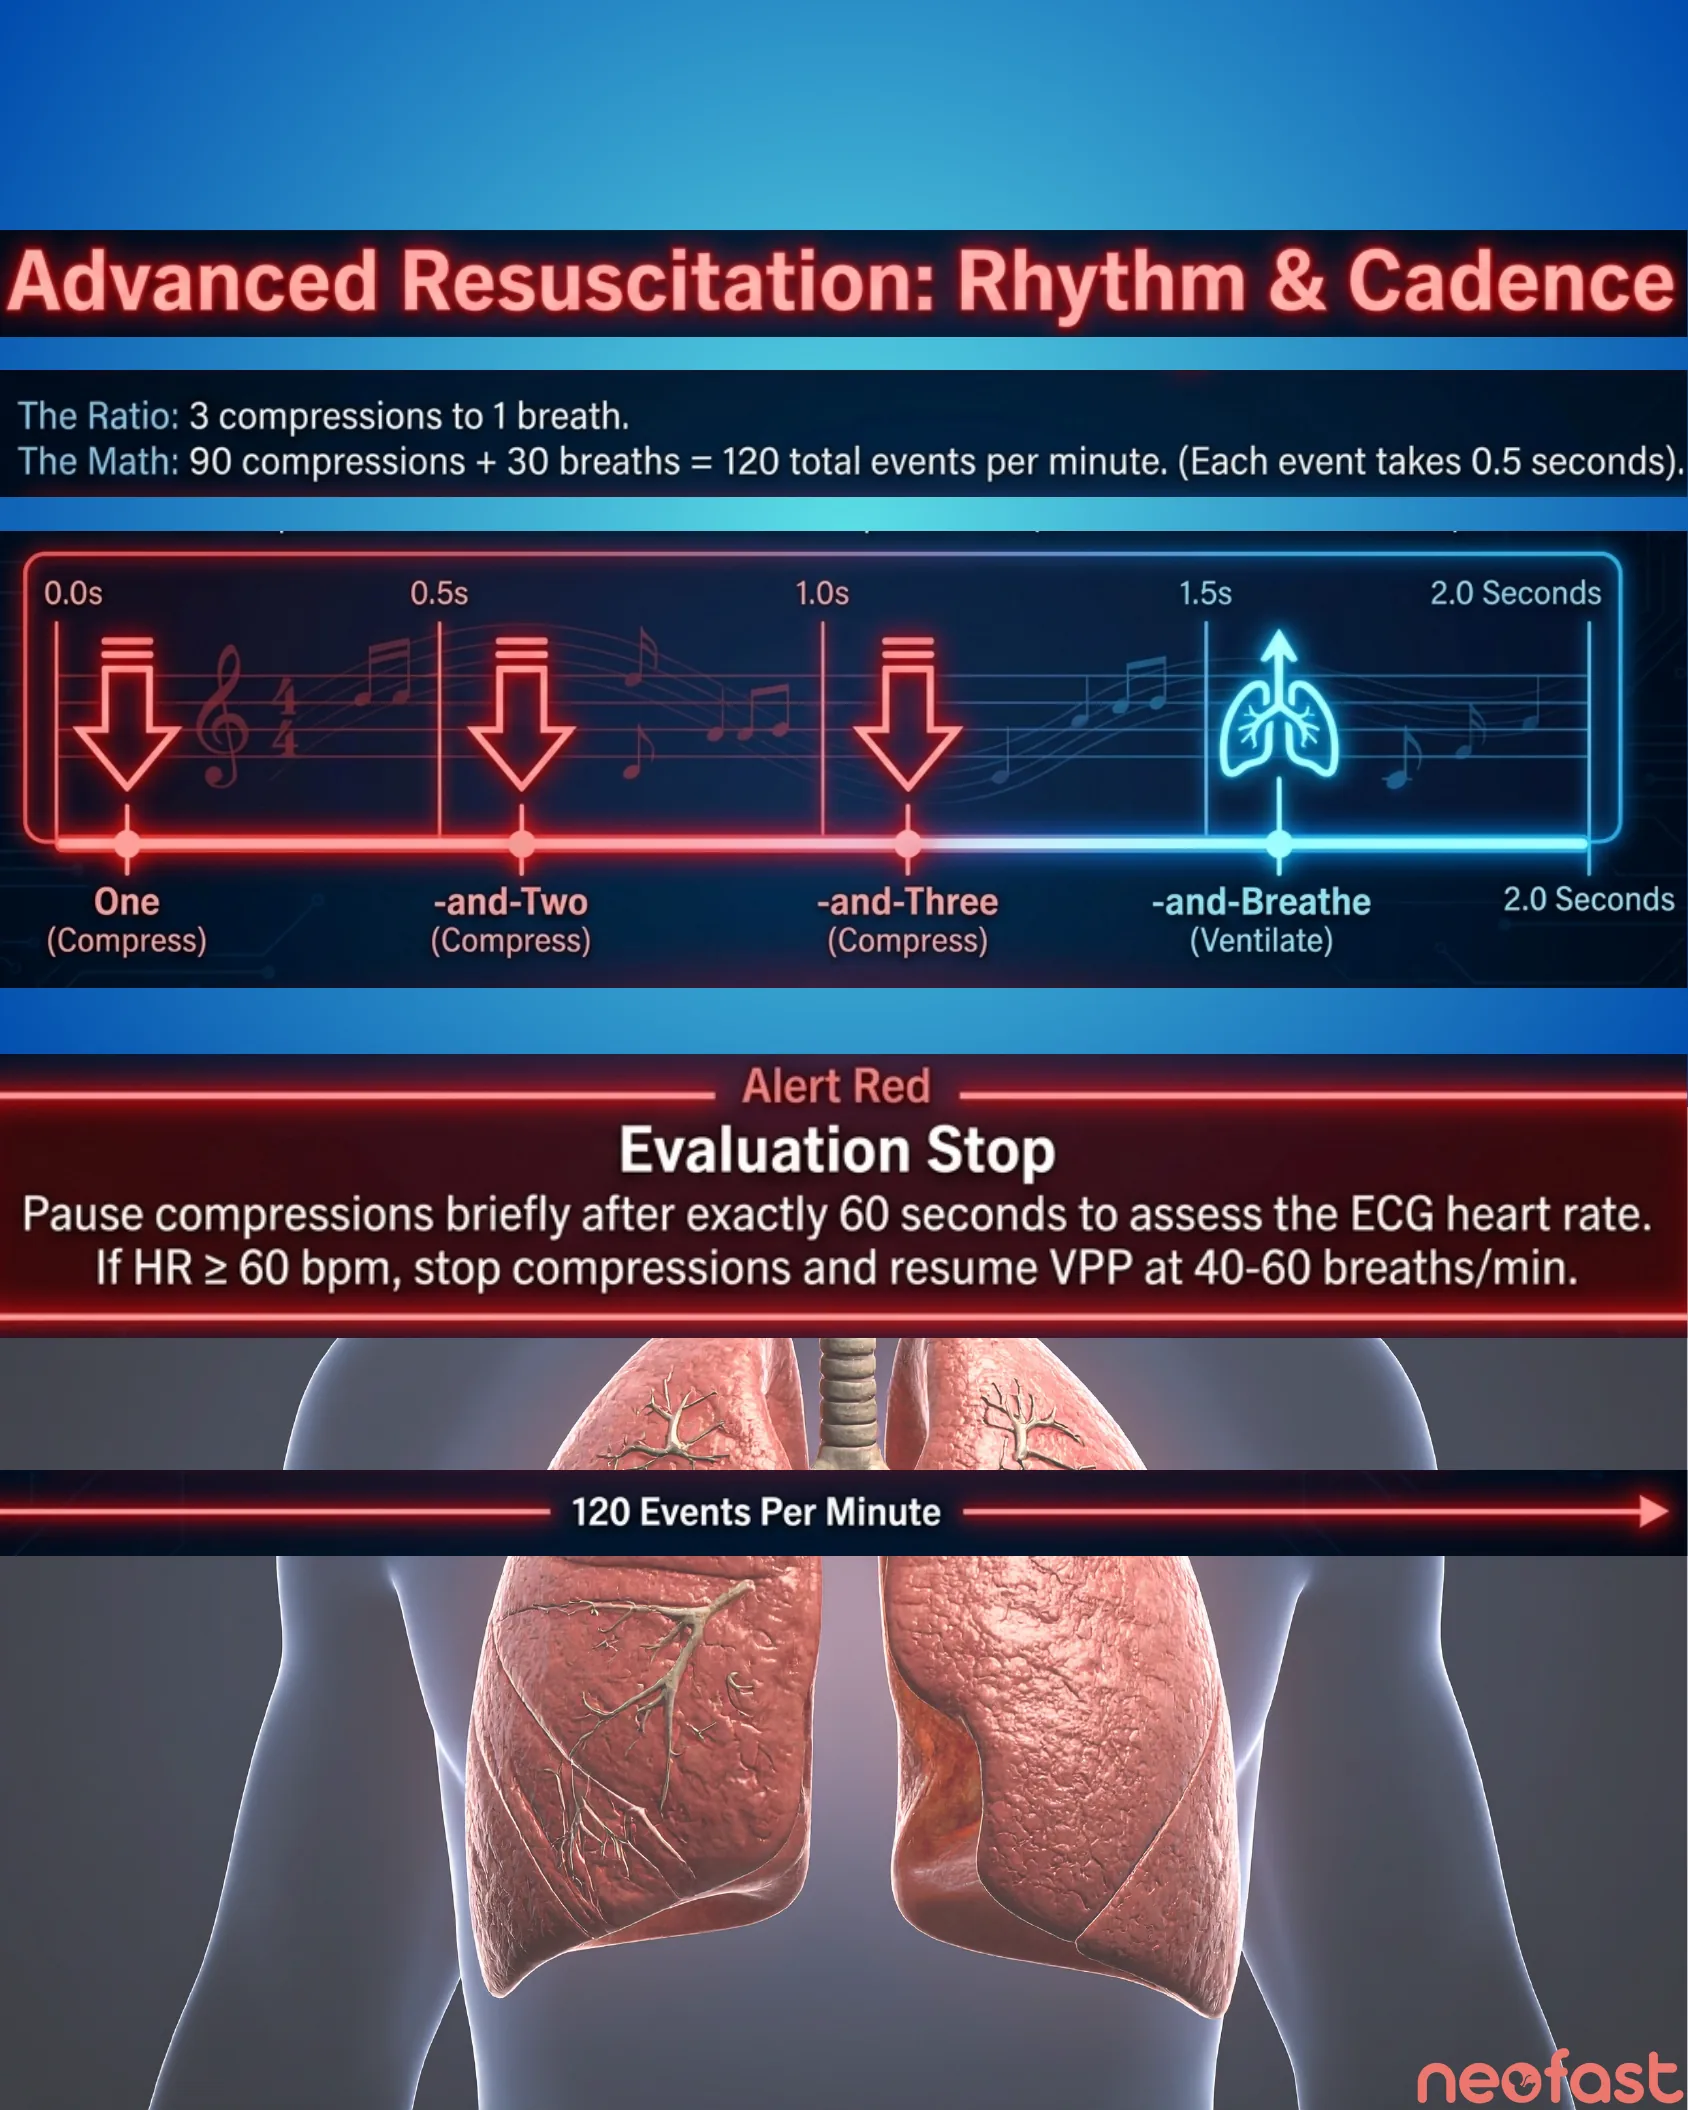
The Ratio: 3 compressions to 1 breath.
The Math: 90 compressions + 30 breaths = 120 total events per minute. (Each event takes 0.5 seconds).
Cadence Timeline
- 0.0s – One (Compress)
- 0.5s – -and-Two (Compress)
- 1.0s – -and-Three (Compress)
- 1.5s – -and-Breathe (Ventilate)
- 2.0 Seconds – cycle repeats
Alert Red: Evaluation Stop
Pause compressions briefly after exactly 60 seconds to assess the ECG heart rate. If HR ≥ 60 bpm, stop compressions and resume VPP at 40-60 breaths/min.
120 Events Per Minute
Post-Stabilization & Team Debriefing
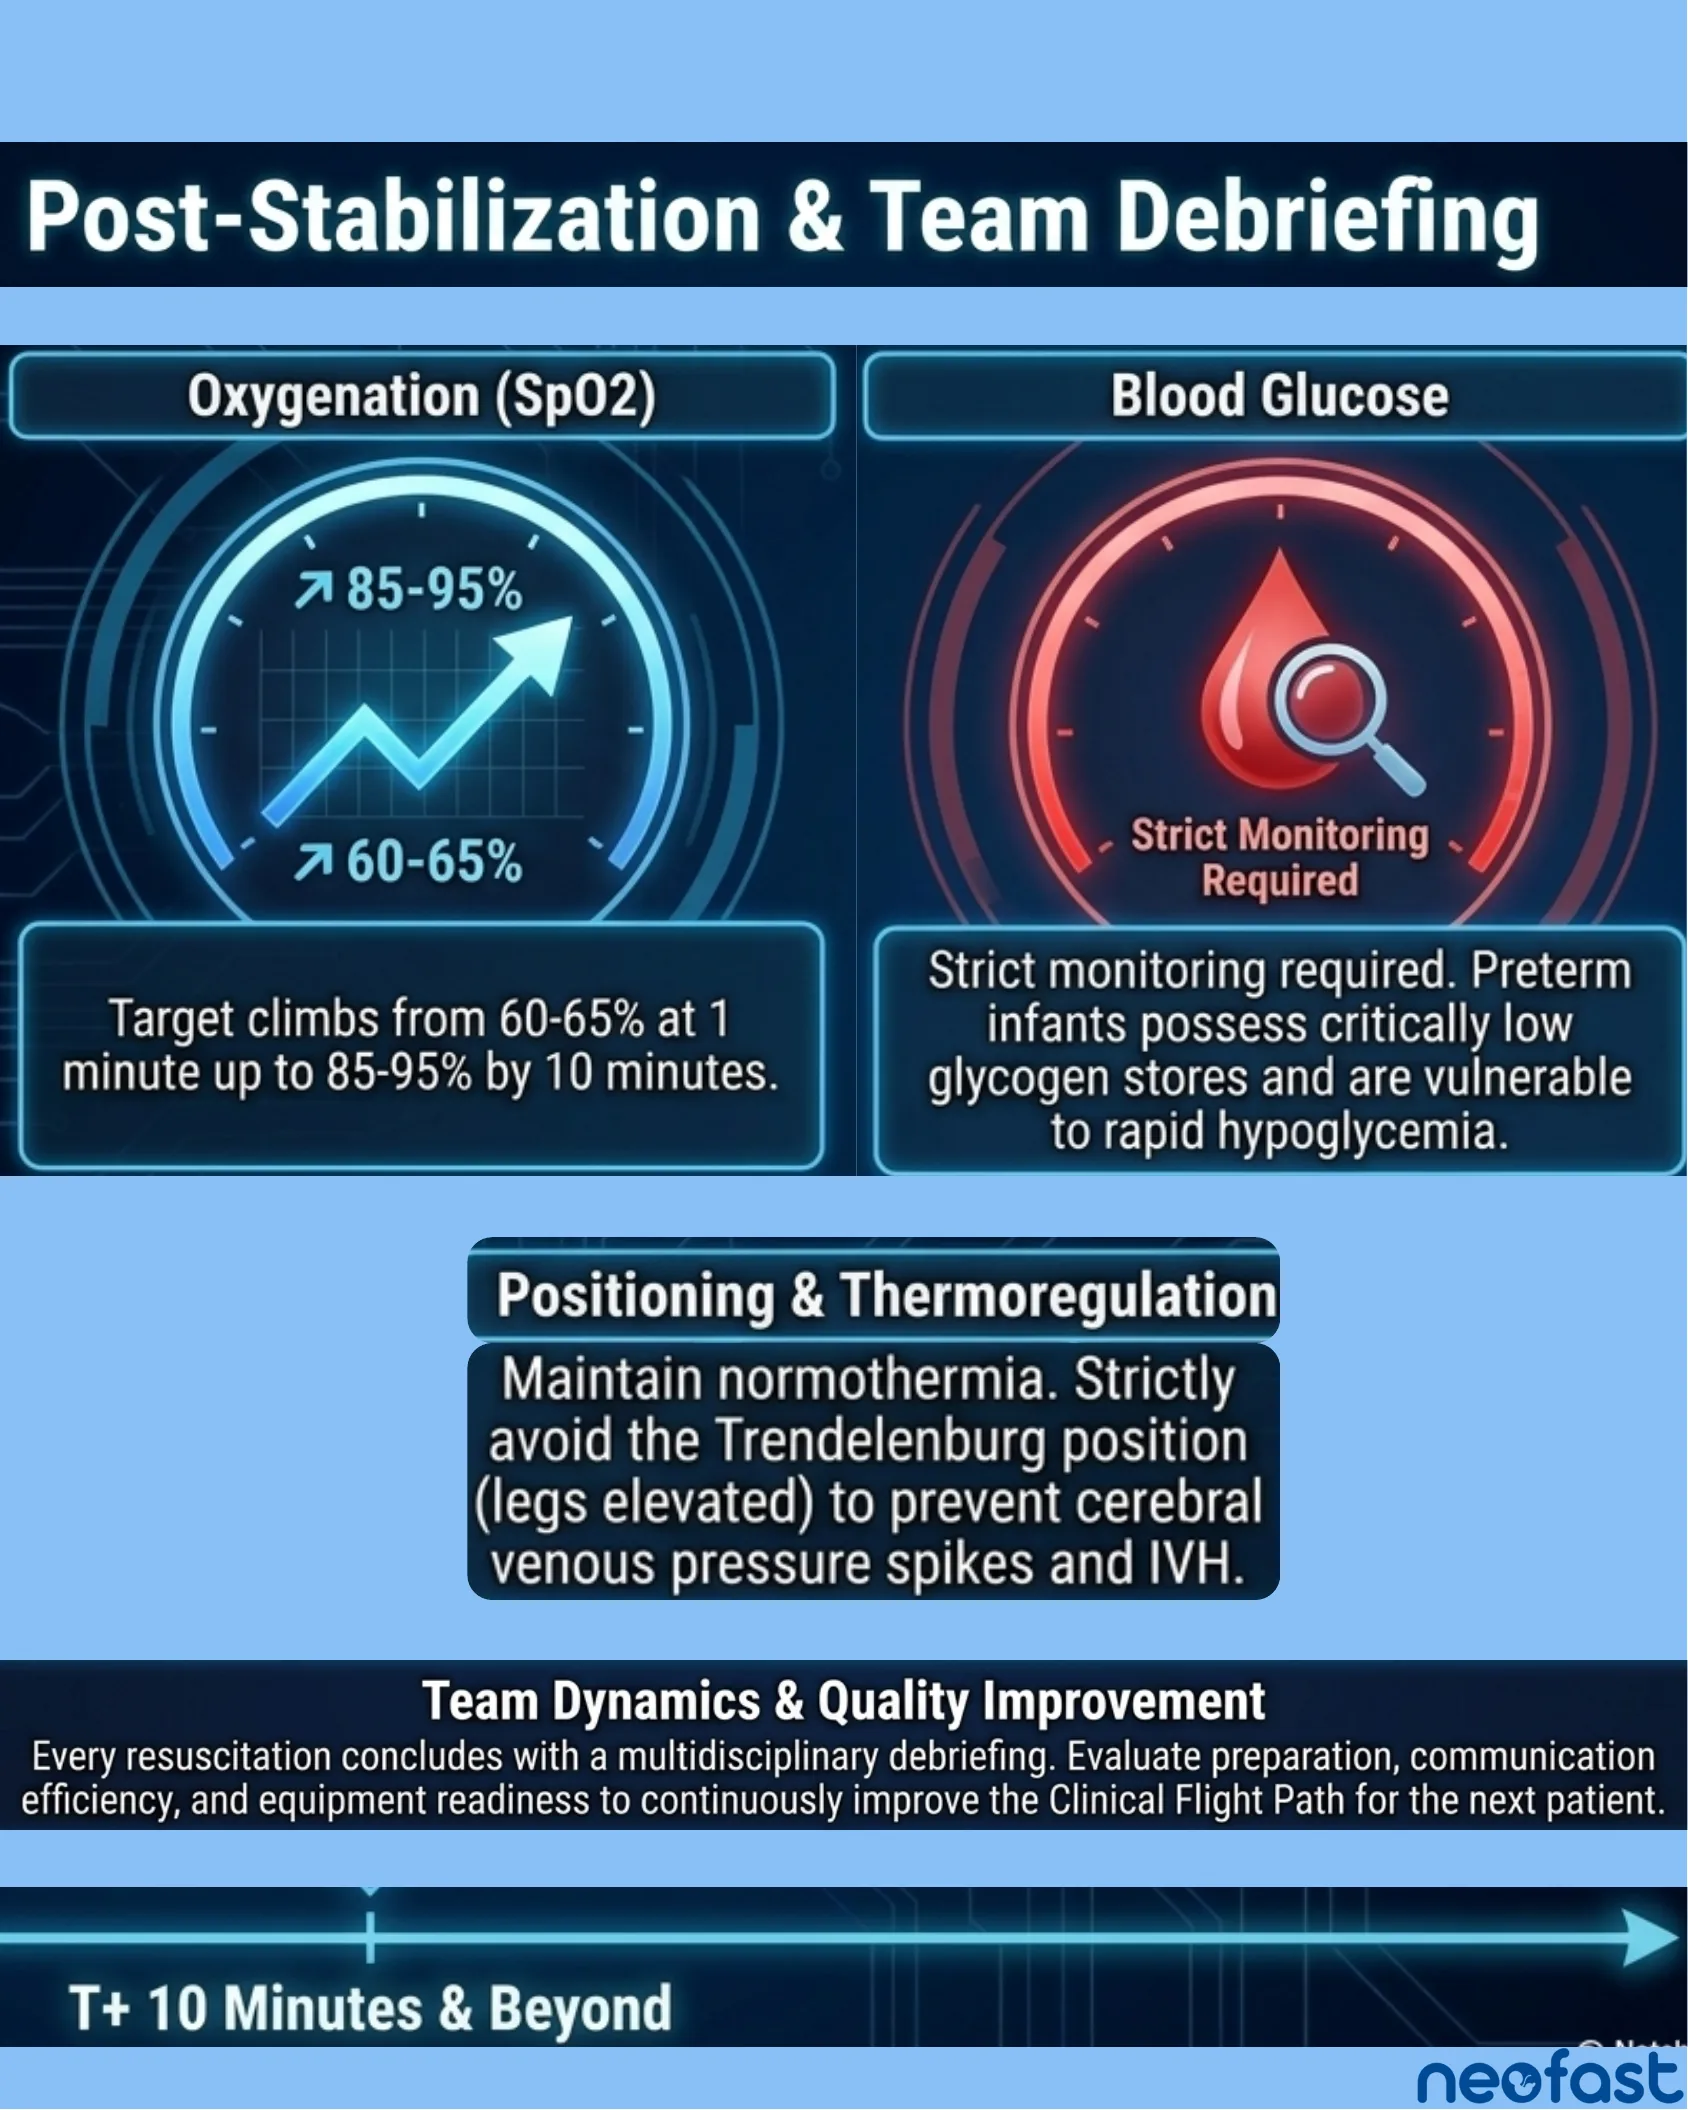
Oxygenation (SpO2)
Target climbs from 60-65% at 1 minute up to 85-95% by 10 minutes.
Blood Glucose
Strict monitoring required. Preterm infants possess critically low glycogen stores and are vulnerable to rapid hypoglycemia.
Positioning & Thermoregulation
Maintain normothermia. Strictly avoid the Trendelenburg position (legs elevated) to prevent cerebral venous pressure spikes and IVH.
Team Dynamics & Quality Improvement
Every resuscitation concludes with a multidisciplinary debriefing. Evaluate preparation, communication efficiency, and equipment readiness to continuously improve the Clinical Flight Path for the next patient.
T+ 10 Minutes & Beyond

neofast
Neonatal Prescription
Discover it and save time!
- Download on the App Store
- Get it on Google Play
Neonatal Resuscitation & Stabilization: The 9th Edition Protocol
Neonatal Resuscitation & Stabilization: The 9th Edition Protocol
Integrated Clinical Pathways, Gestational Age Considerations, and Advanced Resuscitation Techniques
T-Minus: Prenatal & Anticipation
Precision Resuscitation: Preterm Neonatal Protocol (NRP 9th Ed.)
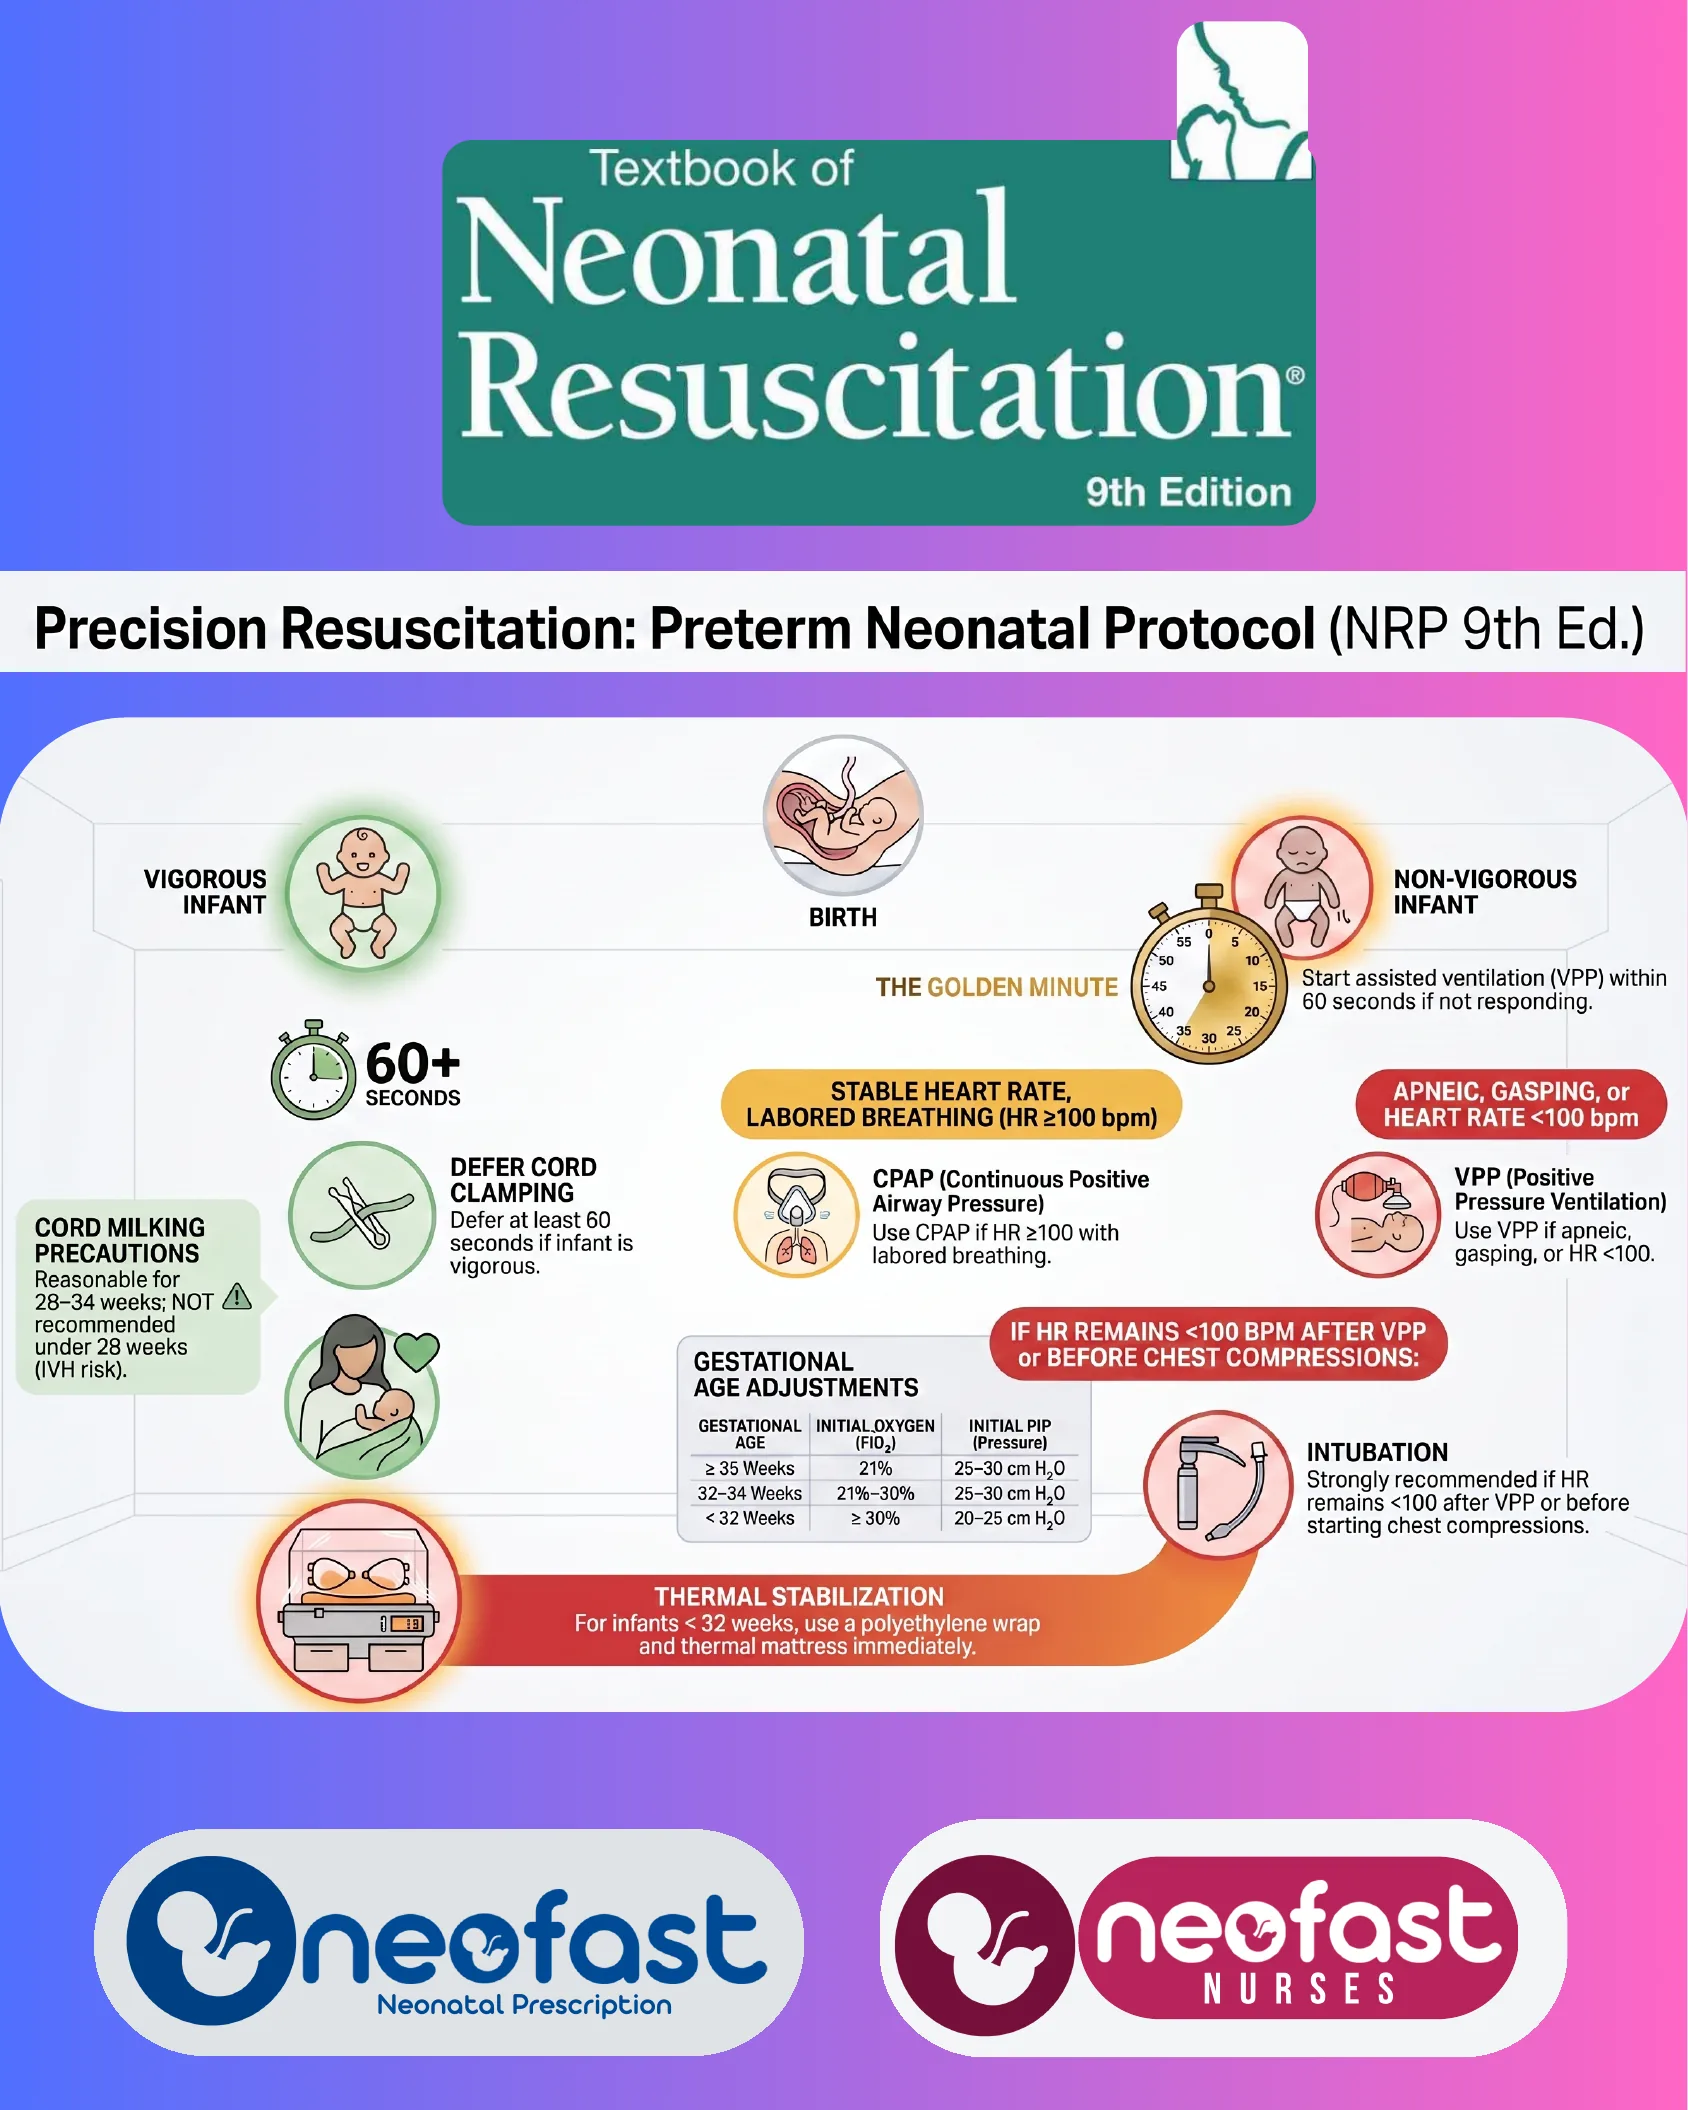
Textbook of Neonatal Resuscitation — 9th Edition
Precision Resuscitation: Preterm Neonatal Protocol (NRP 9th Ed.)
- Birth — infant is assessed as either Vigorous Infant or Non-Vigorous Infant.
The Golden Minute
- Non-Vigorous Infant: Start assisted ventilation (VPP) within 60 seconds if not responding.
Vigorous Infant Pathway
- 60+ Seconds — Defer Cord Clamping: Defer at least 60 seconds if infant is vigorous.
- Cord Milking Precautions: Reasonable for 28–34 weeks; NOT recommended under 28 weeks (IVH risk).
- Skin-to-skin/maternal contact depicted alongside deferred cord clamping.
- Thermal Stabilization: For infants < 32 weeks, use a polyethylene wrap and thermal mattress immediately.
Assessment After Initial Steps
- Stable Heart Rate, Labored Breathing (HR ≥100 bpm):
- CPAP (Continuous Positive Airway Pressure): Use CPAP if HR ≥100 with labored breathing.
- Apneic, Gasping, or Heart Rate <100 bpm:
- VPP (Positive Pressure Ventilation): Use VPP if apneic, gasping, or HR <100.
Gestational Age Adjustments
| Gestational Age | Initial Oxygen (FiO₂) | Initial PIP (Pressure) |
|---|---|---|
| ≥ 35 Weeks | 21% | 25–30 cm H₂O |
| 32–34 Weeks | 21%–30% | 25–30 cm H₂O |
| < 32 Weeks | ≥ 30% | 20–25 cm H₂O |
If HR Remains <100 bpm After VPP or Before Chest Compressions
- Intubation: Strongly recommended if HR remains <100 after VPP or before starting chest compressions.
Thermal Stabilization
- For infants < 32 weeks, use a polyethylene wrap and thermal mattress immediately.
Brands: Neofast — Neonatal Prescription; Neofast Nurses.